Here are the links to the parts of the blog series:
Part 1 - Drawing and painting Goldilocks
Part 2 - Drawing and painting Papa Bear
Part 3 - Drawing and painting Mama Bear
Part 4 - Drawing and painting Baby Bear
Part 5 - Adding educational items to Goldilocks and Papa Bear
Part 6 - Adding educational items to Mama Bear and Baby Bear
Part 7 - Sewing the actual book bags
With all the painting done it is time we now started on the sewing. But first we need to fix the color to the fabric. Two things will set color; heat and salt. I therefore set the the iron to hot and iron each of the designs. I iron on the back first and then on the front. I also keep a protective cloth over my ironing board just in case. I always recommend my clients add salt to the water the first time they wash hand painted fabric as well. It should wash normally, but why take an unnecessary risk?
I now cut a cotton vilene/stiffening for each of the four designs.
Whenever I iron stiffening on, I always use a protective cloth to keep the glue from sticking to my iron. I have posed this photo so you can see the layers.
I now want to add some things that will add interest to the book bags, but will also aid in the development of the children. Sewing some hair onto Goldilocks will give them a different texture to explore. It also helps to establish our modern Goldilocks as a bit of rebel and wild child. I therefore keep the hair very unruly.
I now cur a piece of fabric to measure 14 cm x 19 cm. I also cut stiffening to the same size.
Iron the stiffening onto the fabric.
Sew the sides, leaving only enough space to turn the fabric inside out.
Fold the open seam in and iron the fabric flat. Cut a length of ribbon slightly longer than the length of the fabric.
Get three different buttons of different colors and sizes. This way you can use this as an aid to teach color, size and shape. Measure where the buttons will go. You will make buttonholes on the fabric. It is important for a young child to use buttons and is brilliant for developing their fine motor skills.
Sew the buttonholes.
Open the buttonholes.
Sew the flap onto the fabric. I like the idea of the riboon because it makes it prettier. It also give me the excuse to give it a double seam, which will make it stronger when little hands pull on it.
Sew down one side of the ribbon and up the other, fixing the flap to the design.
This gives you and idea where I positioned the flap on the design.
Mark carefully where the buttons will go and sew them on.
The first panel is now ready to go onto the book bag.
Starting on the second panel with Papa Bear, I start by cutting two pieces of fabric to size.
Again I cut and iron stiffening onto the fabric.
Fold the fabric over on itself and sew closed leaving only enough space open to turn it inside out.
Cut away the excess fabric in the corners.
Fold the open seams in and iron flat. Cut a piece of Velcro to use as fastening. Velcro is yet another tool to develop fine motor skills. It also adds two new elements of texture to the baby's experiences.
Sew the Velcro onto the top flap of the pocket, as well as the pocket itself.
Pin the pocket in place.
Sew both the pocket and the flap onto the panel.
This is what the pocket should look like once finished. This also opens the possibility to teach opposites regarding spatial orientation, e.g. open/closed, inside/outside, hidden/exposed/found, etc.
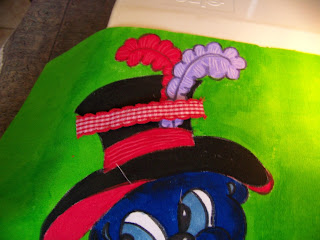
Now cut a length of ribbon to use as the hat band. Cut is slightly longer than the design so you can fold the ends in. Pin one side in place.
Slide a 'buckle' onto the ribbon. Sew the ends closed.
The buckle is loose and can be moved from LEFT to RIGHT. Again you have added a learning element and yet another texture.
We willput the finishing touches on the last two characters of the book bags in the next blog.
For more crafty ideas and great products, visit APrettyTalent.com.
Remember to keep nurturing your TALENT for making PRETTY things.
You can subscribe to this blog and receive regular updates by email by simply registering your email address at the top of the current blog.


No comments:
Post a Comment