This blog is about empowering everyone who has a talent for making pretty things, be it a latent or developed one. I bring you practical tips and tricks to make and do the things you've always wanted to.
For today's blog, I use a number of smaller die-cut elements to combine into a small card for a baby or small child. We are still embossing and die-cutting, but seeing if there is any use for the smaller dinky dies, if it is not used in conjunction with bigger elements. This is a very quick and easy project.
I use my Sizzix machine to cut a number of buttons with the X-Cut Mini Dies.
I fold a small sheet of blue cardboard in half to form card.
I then use stickers to add the word 'Cute' to the card.
I use a rub-on alpahbet to add the words 'as a' to the card.
I then cut a bright yellow frame from carboard.
I glue the frame to the card with Tombow glue.
I want some buttons to be raised, and others not. So I use a combination of 3D squares and glue to adhere them to the card, sticking them inside the frame.
The completed card. Sadly, the bad lighting makes the stickers disappear a little.
Marietjie Uys (Miekie) is a published author. You can buy my books here:
You can purchase Designs By Miekie 1 here.
Jy kan Kom Ons Teken en Verf Tuinstories hier koop.
Jy kan Kom Ons Kleur Tuinstories In hier koop.
Jy kan Tuinstories hier koop.
You can follow Miekie's daily Bible Study blog, Bybel Legkaart, here in English & Afrikaans.
You may prefer to follow the traveling blog, A Pretty Tourist.
For more crafty ideas and great product reviews, visit A Pretty Talent on Facebook.
If you are in a literary mood, follow Miekie's musings, stories and poetry on A Pretty Author - Miekie.
Remember to keep nurturing your TALENT for making life PRETTY.
You can subscribe to any of these blogs and receive regular updates by email. Simply register your email address at the top of the applicable blog.
I am still playing with my die cutting and embossing machines and today I return to one of my favourite themes, namely butterflies. I always seem to veer back to these marvelous creatures. I show you how to use two different butterflies to overlay each other. I also do quite a bit of inking again, before using the negatives from a previous project to incorporate in this one.
I make an embossed sheet from this garden design by Kaizer Crafts, running the embossing folder through my Go Cut & Emboss machine.
I then make a die cut butterfly with my Sizzix, using a die from X-Cut Dinky Dies. I also use the engative of three leaves, that I cut for a previous card.
I ink the embossed sheet with Rabger Archival Ink.
I make sure to ink the sides of the embossed sheet as well.
Then I ink the die-cut butterfly.
I cover the wet ink with embossing powder.
I shake the excess powder off and return it to the container. Then I melt the powder onto the butterfly with heat.
I fold a yellow sheet of A4 cardboard in half to form a card.
I then crop some red cardstock to fit under the negative leaves.
I glue around the leaves, as well as around the frame of the red cardstock with Tombow Glue.
This turns the piece of discardable negative into a lovely embellishment for my card.
I use double-sided tape to adhere the paper pieces to my card.
I play around with the layout before settling on this idea.
I bend the butterfly between my fingers to lift the wings.
I place a thin line of glue on the body of the smaller butterfly on the embossed paper.
I glue the die-cut butterfly to the embossed butterfly, even though they don't fit precisely. It is close enough to fool the eye into accepting it, especially as the top butterfly's wings are raised.
I then find these red sequins and glue them to the side of my card.
Marietjie Uys (Miekie) is a published author. You can buy my books here:
You can purchase Designs By Miekie 1 here.
Jy kan Kom Ons Teken en Verf Tuinstories hier koop.
Jy kan Kom Ons Kleur Tuinstories In hier koop.
Jy kan Tuinstories hier koop.
You can follow Miekie's daily Bible Study blog, Bybel Legkaart, here in English & Afrikaans.
You may prefer to follow the traveling blog, A Pretty Tourist.
For more crafty ideas and great product reviews, visit A Pretty Talent on Facebook.
If you are in a literary mood, follow Miekie's musings, stories and poetry on A Pretty Author - Miekie.
Remember to keep nurturing your TALENT for making life PRETTY.
You can subscribe to any of these blogs and receive regular updates by email. Simply register your email address at the top of the applicable blog.
I am still fooling around with my die cutting and embossing machines that need to be cranked by hand, and I am having a ball with them. In today's blog, I use autumn colours to create a card for someone special. Even though I start on a very intense blue, this colour disappears behind the overwhelming autumn colours late on in the process. I once again use some inking to enhance the elements. Let me show you how to do somehing similar yourself with this blog.
I use this leave design embossing folder by Kaizer Ctafts to emboss a piece of blue cardboard.
I crop the embossed sheet to size.
I use Ranger Archival Ink to ink the raised embossed images.
I fold a yellow A4 sheet of cardboard in half to form a card.
I use a darker yellow cardboard to cut a frame for my embossed sheet.
I ink the frame with Tim Holtz's Distress Ink.
I cut some embellishments with my Sizzix, using X-Cut Dinky Dies.
I cut more embellishments from the darker yellow cardboard as well.
I use a sponge dauber to ink the flowers with Archival Ink by Ranger.
I use a finer dauber to ink the stems and leaves.
I use the stamp pad itself to ink the larger leaves.
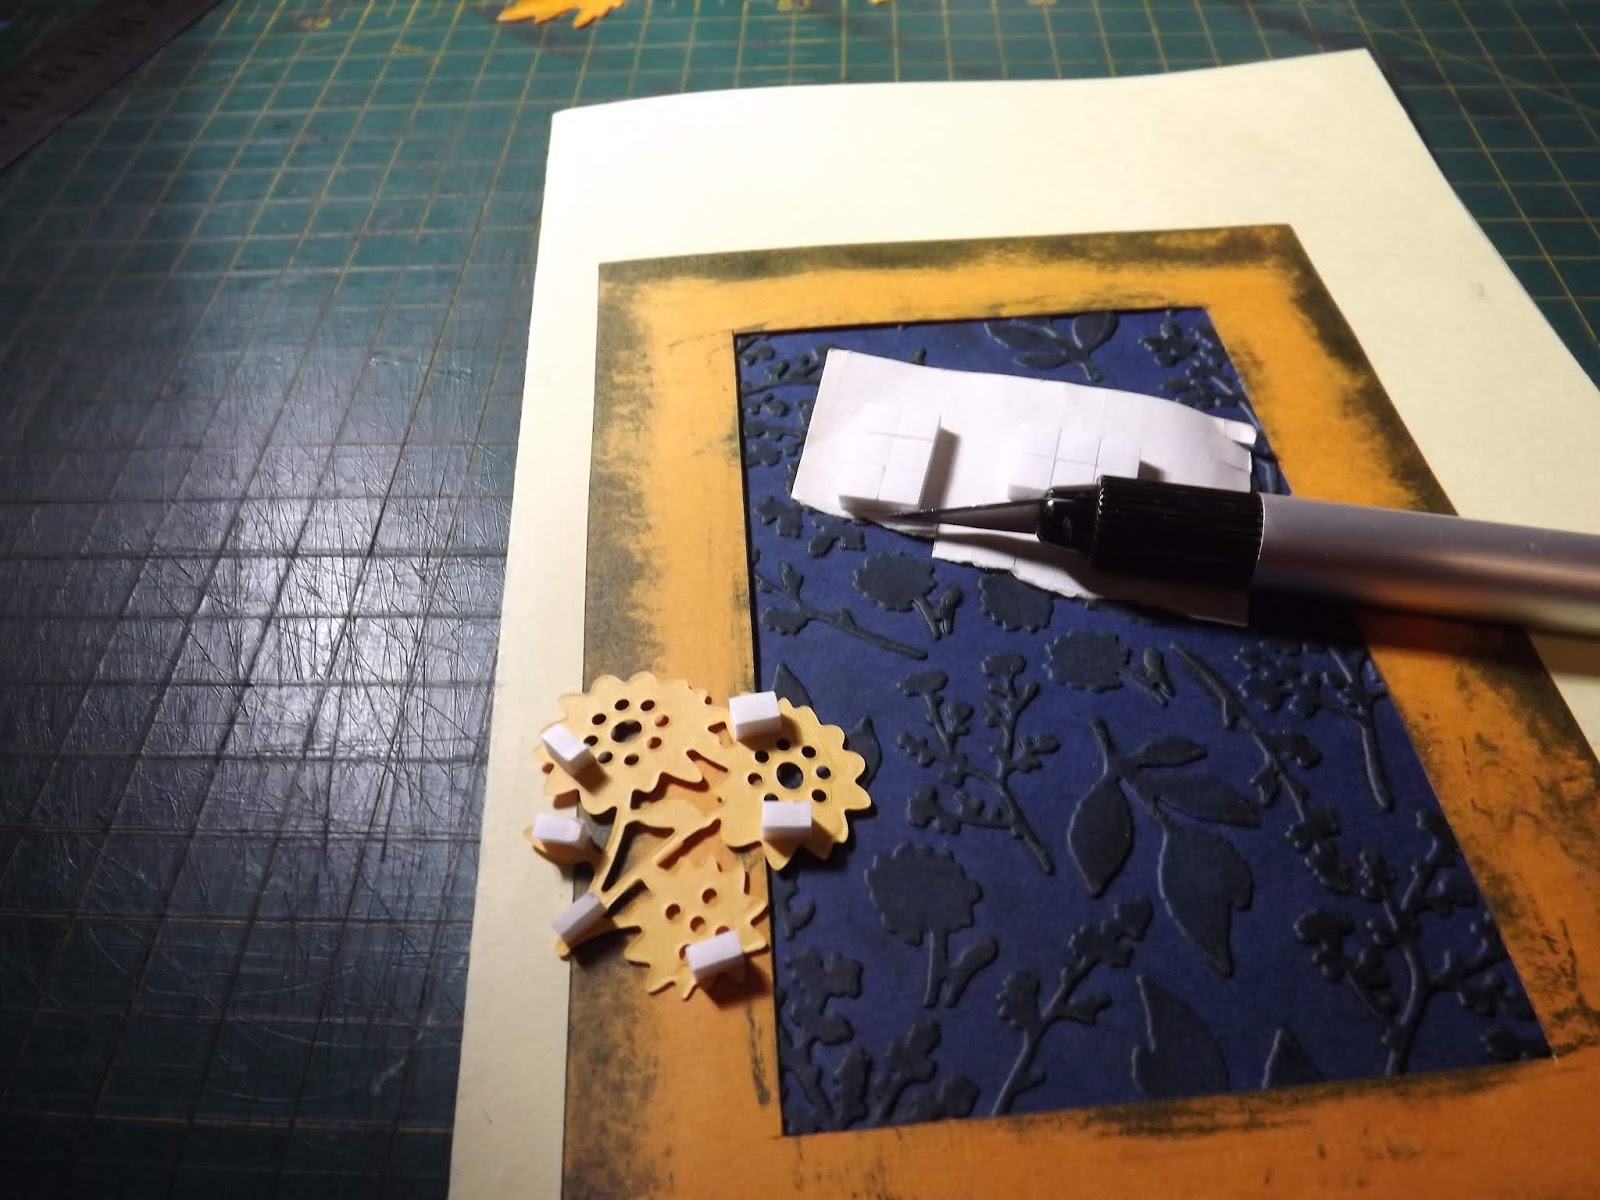
I then use double-sided tape to secure the pieces together and to the card.
I use 3D double-sided squares to secure the smaller embellishments to the card, so that they appear raised and dimensional.
My card now looks like this.
I use photo corner stickers on the corners of the frame.
I then use Tombow Glue to glue some wooden lady bugs to the side of the card.
I have some printed die cut sentiments to use on the card.
Marietjie Uys (Miekie) is a published author. You can buy my books here:
You can purchase Designs By Miekie 1 here.
Jy kan Kom Ons Teken en Verf Tuinstories hier koop.
Jy kan Kom Ons Kleur Tuinstories In hier koop.
Jy kan Tuinstories hier koop.
You can follow Miekie's daily Bible Study blog, Bybel Legkaart, here in English & Afrikaans.
You may prefer to follow the traveling blog, A Pretty Tourist.
For more crafty ideas and great product reviews, visit A Pretty Talent on Facebook.
If you are in a literary mood, follow Miekie's musings, stories and poetry on A Pretty Author - Miekie.
Remember to keep nurturing your TALENT for making life PRETTY.
You can subscribe to any of these blogs and receive regular updates by email. Simply register your email address at the top of the applicable blog.
In today's blog I use my hand cranked machine to die cut and emboss some elements which I turn into a special card for my dad. In the process I also use inking and stamping techniques to make the card a little more special. The card is a very simple one with clean lines. My colour scheme is blue and silver. I show you step by step how I went about it in this blog.
I emboss a sheet of blue paper with an embossing folder from Kaizer Crafts, featuring gears.
I crop the edges of the embossed sheet.
I then ink the raised embossed images with Distress Ink.
I fold a blue A4 sheet of cardboard in half to form a card.
I then use masking tape to tape a die cut of a label, by Sizzix to another sheet of blue cardboard. I also use a 'P' and an 'A' from X Cut Mini Dies to cut the word 'PA' into the label.
I put the sandwich through my Sizzix.
I then use the embossing floder that accompanied the die already used and sandwiched the die cut in the folder, before putting it through the machine once again.
Make sure to position the die cut properly in the emobossing folder.
My embellishment now looks like this.
I ink the embossed surface with Distress Ink.
I then use the stamps that accompanied the die and embossing folder to add a pointing finger to the label, drawing the attention to the word 'PA.'
Now the embellishment looks like this.
I find a sheet of shiny silver paper in my paper stash and cut matting for my embossed sheet.
I then cut a small piece of the same silver paper to fit under my label die.
I cut another label with my die cutter.
I then emboss this label as well.
I use double-sided tape to secure the embossed sheet to the matting.
The matting is similarly secured to the card. Notice how I work off-centre.
I use a hammer and eyelet setter to set an eyelet, securing the two labels together.
I then stick the two labels securely together when I put double-sided tape behind them.
The labals are fixed to the card. Note how the word 'PA' is now written in silver because of the backing label showing through the openings left by the die.
I use a glue pen to glue a heavy metal embellishment.
Marietjie Uys (Miekie) is a published author. You can buy my books here:
You can purchase Designs By Miekie 1 here.
Jy kan Kom Ons Teken en Verf Tuinstories hier koop.
Jy kan Kom Ons Kleur Tuinstories In hier koop.
Jy kan Tuinstories hier koop.
You can follow Miekie's daily Bible Study blog, Bybel Legkaart, here in English & Afrikaans.
You may prefer to follow the traveling blog, A Pretty Tourist.
For more crafty ideas and great product reviews, visit A Pretty Talent on Facebook.
If you are in a literary mood, follow Miekie's musings, stories and poetry on A Pretty Author - Miekie.
Remember to keep nurturing your TALENT for making life PRETTY.
You can subscribe to any of these blogs and receive regular updates by email. Simply register your email address at the top of the applicable blog.