Blogs 1-50
Blogs 51-100
Blogs 101-150
Blog 1 - How to put grommets in your curtains
"These days there are plenty of easy ways to hang curtains which makes hanging them a breeze. I especially love those metal/plastic holes where you simply slide the rod through them. Being a DIY girl, I always wondered how I could make those myself. I found this nifty tool, called the Dejuca Grommet Tool, in a hardware store and have not looked back since. These are available in various sizes."

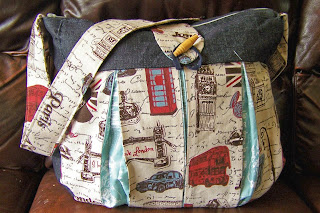
Blog 2 - Designing and making a Pleated Handbag (Part 1)
"I've had a bee in my bonnet lately, not finding a bag that could accommodate the technology I always carry with me, i.e. mobile phone and tablet PC. I also want a space for my glasses and somewhere to hook my pen onto, so I don't have to search for it, madly shoving all sorts of oddities aside. Easy access to my USB stick would be nice as well. Or I could use those same spaces for make-up. But who am I kidding?! Every woman has her own ideas and priorities when it comes to handbags. Long story short, not finding what I was looking for, I opted to design my own handbag. I did not obtain a diploma in Haute Couture for nothing! Where to start? With a picture, of course."

"I've had a bee in my bonnet lately, not finding a bag that could accommodate the technology I always carry with me, i.e. mobile phone and tablet PC. I also want a space for my glasses and somewhere to hook my pen onto, so I don't have to search for it, madly shoving all sorts of oddities aside. Easy access to my USB stick would be nice as well. Or I could use those same spaces for make-up. But who am I kidding?! Every woman has her own ideas and priorities when it comes to handbags. Long story short, not finding what I was looking for, I opted to design my own handbag. I did not obtain a diploma in Haute Couture for nothing! Where to start? With a picture, of course."

Blog 3 - How to fold a neat corner
"Have you ever covered books or gifts and gotten yourself into a jam with the excess paper on the corners? Or maybe you were sewing something that made a right angle somewhere, perhaps a table cloth or a curtain, and you had to struggle with a thick wad of fabric on the corner. Let me show you a quick and easy solution to folding neat corners."

"Have you ever covered books or gifts and gotten yourself into a jam with the excess paper on the corners? Or maybe you were sewing something that made a right angle somewhere, perhaps a table cloth or a curtain, and you had to struggle with a thick wad of fabric on the corner. Let me show you a quick and easy solution to folding neat corners."

Blog 4 - Designing and making a Pleated Handbag Part 2
"In Part 1 of this blog, I have shown you the development of the pattern of the handbag, which is downloadable in PDF format from the A Pretty Talent website, free of charge. When we reached the end of the article, our pattern pieces were already cut out in fabric and waiting to be made."

"In Part 1 of this blog, I have shown you the development of the pattern of the handbag, which is downloadable in PDF format from the A Pretty Talent website, free of charge. When we reached the end of the article, our pattern pieces were already cut out in fabric and waiting to be made."

Blog 29 - Designing and Making a Pleated Handbag Part 3
"This is Part 3 of an ongoing BLOG where we design and sew a handbag. The pattern can be downloaded free of charge from A Pretty Talent."

Blog 5 - Designing and Making a Pleated Handbag Part 4
"This is the 4th and final part of the series in which we design and make a pleated handbag. If you like what you see, you can always go back to the previous blogs and make your own. The pattern can be downloaded free of charge from A Pretty Talent."

Blog 6 - Designing and Making a French Beret with Cap Part 1
"A friend invited me to go along on a seaside holiday and after contemplating it for about half a second I agreed. At the time, I had just made myself a handbag and was still feeling very impressed with it. You can read all about that in earlier blogs. Naturally it started me thinking that I should take the bag to the beach with me, something I had contemplated happening when designing it already. Now I saw an opportunity to make myself a matching cap for my beach excursions. When studying fashion design, I had loved making hats more than anything else and I am still looking for excuses to do so."

"A friend invited me to go along on a seaside holiday and after contemplating it for about half a second I agreed. At the time, I had just made myself a handbag and was still feeling very impressed with it. You can read all about that in earlier blogs. Naturally it started me thinking that I should take the bag to the beach with me, something I had contemplated happening when designing it already. Now I saw an opportunity to make myself a matching cap for my beach excursions. When studying fashion design, I had loved making hats more than anything else and I am still looking for excuses to do so."
Blog 7 - Designing and Making a French Beret with Cap Part 2
"In the first part of this series we have conceptualized the design of the beret we wanted to make. It is time to start drawing up a pattern. I don't know how many of you are interested in the mechanics of drawing up a pattern, but I'll walk you through the process. Alternatively, you can buy the pattern online on APrettyTalent.com by following this link."

"In the first part of this series we have conceptualized the design of the beret we wanted to make. It is time to start drawing up a pattern. I don't know how many of you are interested in the mechanics of drawing up a pattern, but I'll walk you through the process. Alternatively, you can buy the pattern online on APrettyTalent.com by following this link."
Blog 8 - Designing and Making a French Beret with Cap Part 3
"We are finally at the point where we start to work with the fabric in making our beret. Let's recap quickly. In Part 1 of this series we conceptualized the idea. Then we designed the pattern in Part 2. This pattern can also be bought online here. Today we will cut out the fabric and start constructing the beret. My little niece insisted on modeling the beret, even though it is way too big for her. I love how adorable she looks in it. So did her mother and promptly asked me to make some hats for her kiddies. Show me an aunt who would turn down such a request! I have already started working on this and will write a blog about the process soon. So watch this space for some child-sized hats real soon."

"We are finally at the point where we start to work with the fabric in making our beret. Let's recap quickly. In Part 1 of this series we conceptualized the idea. Then we designed the pattern in Part 2. This pattern can also be bought online here. Today we will cut out the fabric and start constructing the beret. My little niece insisted on modeling the beret, even though it is way too big for her. I love how adorable she looks in it. So did her mother and promptly asked me to make some hats for her kiddies. Show me an aunt who would turn down such a request! I have already started working on this and will write a blog about the process soon. So watch this space for some child-sized hats real soon."
Blog 9 - Designing and Making a French Beret with Cap Part 4
"We have been designing and making a french style beret with a cap over a span of three blogs already and this is blog is the last in the series of four. In the first blog we conceptualized the idea. The second blog saw us designing the pattern. In the third blog we worked on the fabric layout and started construction on the cap. In today's blog, we take things quite a bit further by finishing the cap and attaching the head band. From there on out it is a few short steps to the finish line. Let's get started."

"We have been designing and making a french style beret with a cap over a span of three blogs already and this is blog is the last in the series of four. In the first blog we conceptualized the idea. The second blog saw us designing the pattern. In the third blog we worked on the fabric layout and started construction on the cap. In today's blog, we take things quite a bit further by finishing the cap and attaching the head band. From there on out it is a few short steps to the finish line. Let's get started."
Blog 10 - Designing and Making Children's Hats and Caps Part 1
"When my sister-in-law saw the beret I had made for myself, she asked if I would make hats for her kids as well. Of course I agreed to it. So she went off and bought a whole lot of fabric. Laying it before me she asked if I thought I could do something with it. She was thinking hats, handbags, trousers, waist coats and all sorts of cute things. Cute things? I am in! Show me a seamstress who would not like to be given free reign with a pile like this!"

Blog 11 - Designing and Making Children's Hats and Caps Part 2
"n this ongoing series of blogs we are looking at the design and making of hats for kids. In Part 1 we gave birth to a concept. In this second blog of the series, we will devote some time to developing the pattern of a Flat Top Cap as shown in the photo. The pattern can be downloaded from APrettyTalent.com."

Blog 12 - Designing and Making Children's Hats and Caps Part 3
"We are designing and making a selection of children's hats in this series of multiple blogs. In Part 1 we planned the concept. In part 2 we designed the pattern for the basic hat. Now, in Part 3, we will take the design of the basic hat one step further and develop it into variants. The first variant we will look at is a beret."

Blog 13 - Designing and Making Children's Hats and Caps Part 4
"We are already in the fourth part of the series and we are still designing patterns. That's the way it goes when you combine multiple pattern variations in one project. Let's finish up, though, so we can start sewing! But first a quick recap:
Part 1 - Conceptualization
Part 2 - Design the basic pattern
Part 3 - Variation: a round beret
Part 4 - Variation: a flower beret"

Blog 14 - Designing and Making Children's Hats and Caps Part 5
"In the first four parts of the series we were working on a concept and designing patterns to realize the ideas we had. We have finally reached the stage where we can bring out the fabric. But first a quick recap:

Blog 15 - Designing and Making Children's Hats and Caps Part 6
"Did you have as much fun as I did making the cap last time? When I gave the cap to my little nephew to fit, before it had the lid on, he announced that he wanted it that way. I told him I'd make the next one like that. After all, it was already an existing version on the pattern. The patterns can be downloaded from APrettyTalent.com here. Here is a summary of the blogs:

Blog 16 - Designing and Making Children's Hats and Caps Part 7
"In today's blog we will be making the round beret of the pattern we designed in the first few blogs. I will attach a cap to this beret, but it is also possible to make the beret without a cap, as I will show you in the next blog. The patterns can be downloaded from APrettyTalent.com here. Here is a summary of the blogs:

Blog 17 - Designing and Making Children's Hats and Caps Part 8
"Phew! This was an extensive series of blogs. I hope you enjoyed it as much as I did. I want to show you one last beret before we leave off. Once you understand what I did here, you will know that the world is your oyster when it comes to berets. You can literally do whatever you want with this fun and easy hat. Think of the next Halloween or dress-up party. Or what about that school play. You will be the talk of the town showing off your millinery skills! But I'm getting ahead of myself. A quick reminder of what we've covered and where to find the patterns. The patterns can be downloaded from APrettyTalent.com here. Here is a summary of the blogs:

"When my sister-in-law saw the beret I had made for myself, she asked if I would make hats for her kids as well. Of course I agreed to it. So she went off and bought a whole lot of fabric. Laying it before me she asked if I thought I could do something with it. She was thinking hats, handbags, trousers, waist coats and all sorts of cute things. Cute things? I am in! Show me a seamstress who would not like to be given free reign with a pile like this!"
Blog 11 - Designing and Making Children's Hats and Caps Part 2
"n this ongoing series of blogs we are looking at the design and making of hats for kids. In Part 1 we gave birth to a concept. In this second blog of the series, we will devote some time to developing the pattern of a Flat Top Cap as shown in the photo. The pattern can be downloaded from APrettyTalent.com."
Blog 12 - Designing and Making Children's Hats and Caps Part 3
"We are designing and making a selection of children's hats in this series of multiple blogs. In Part 1 we planned the concept. In part 2 we designed the pattern for the basic hat. Now, in Part 3, we will take the design of the basic hat one step further and develop it into variants. The first variant we will look at is a beret."
Blog 13 - Designing and Making Children's Hats and Caps Part 4
"We are already in the fourth part of the series and we are still designing patterns. That's the way it goes when you combine multiple pattern variations in one project. Let's finish up, though, so we can start sewing! But first a quick recap:
Part 1 - Conceptualization
Part 2 - Design the basic pattern
Part 3 - Variation: a round beret
Part 4 - Variation: a flower beret"
Blog 14 - Designing and Making Children's Hats and Caps Part 5
"In the first four parts of the series we were working on a concept and designing patterns to realize the ideas we had. We have finally reached the stage where we can bring out the fabric. But first a quick recap:
Part 1 - Conceptualization
Part 2 - Design the basic pattern
Part 3 - Variation: a round beret
Part 4 - Variation: a flower beret
Part 5 - Constructing the flat top cap"
Blog 15 - Designing and Making Children's Hats and Caps Part 6
"Did you have as much fun as I did making the cap last time? When I gave the cap to my little nephew to fit, before it had the lid on, he announced that he wanted it that way. I told him I'd make the next one like that. After all, it was already an existing version on the pattern. The patterns can be downloaded from APrettyTalent.com here. Here is a summary of the blogs:
Part 1 - Conceptualization
Part 2 - Design the basic pattern
Part 3 - Variation: design a round beret
Part 4 - Variation: design a flower beret
Part 5 - Constructing the flat top cap
Part 6 - Variation: sew an open cap
Part 7 - Variation: sew a round beret
Part 8 - Variation: sew a flower beret"
Blog 16 - Designing and Making Children's Hats and Caps Part 7
"In today's blog we will be making the round beret of the pattern we designed in the first few blogs. I will attach a cap to this beret, but it is also possible to make the beret without a cap, as I will show you in the next blog. The patterns can be downloaded from APrettyTalent.com here. Here is a summary of the blogs:
Part 1 - Conceptualization
Part 2 - Design the basic pattern
Part 3 - Variation: design a round beret
Part 4 - Variation: design a flower beret
Part 5 - Constructing the flat top cap
Part 6 - Variation: sew an open cap
Part 7 - Variation: sew a round beret
Part 8 - Variation: sew a flower beret"Blog 17 - Designing and Making Children's Hats and Caps Part 8
"Phew! This was an extensive series of blogs. I hope you enjoyed it as much as I did. I want to show you one last beret before we leave off. Once you understand what I did here, you will know that the world is your oyster when it comes to berets. You can literally do whatever you want with this fun and easy hat. Think of the next Halloween or dress-up party. Or what about that school play. You will be the talk of the town showing off your millinery skills! But I'm getting ahead of myself. A quick reminder of what we've covered and where to find the patterns. The patterns can be downloaded from APrettyTalent.com here. Here is a summary of the blogs:
Part 1 - Conceptualization
Part 2 - Design the basic pattern
Part 3 - Variation: design a round beret
Part 4 - Variation: design a flower beret
Part 5 - Constructing the flat top cap
Part 6 - Variation: sew an open cap
Part 7 - Variation: sew a round beret
Part 8 - Variation: sew a flower beret"
Blog 18 - Child's Waistcoat & Bell-bottoms Part 1
"After receiving a large pile of fabric from my sister-in-law, I still had lots of sewing to do after making hats for my nieces and nephew. I decided to start by making a matching waistcoat and trouser set for the three year old girl.
Part 1: Conceptualization, Pattern Design & Fabric Layout
Part 2: Constructing the Waistcoat
Part 3: Constructing the Bell-bottoms

Blog 19 - Child's Waistcoat & Bell-bottoms Part 2
"After receiving a large pile of fabric from my sister-in-law, I still had lots of sewing to do after making hats for my nieces and nephew. I decided to start by making a matching waistcoat and trouser set for the three year old girl.
Part 1: Conceptualization, Pattern Design & Fabric Layout
Part 2: Constructing the Waistcoat
Part 3: Constructing the Bell-bottoms

Blog 20 - Child's Waistcoat & Bell-bottoms Part 3
"In the previous blogs in this series I showed you how to design a pattern for a child’s outfit and we made a waistcoat. Today we are going to construct the bell-bottom pants to match the waistcoat.
Part 1: Conceptualization, Pattern Design & Fabric Layout
Part 2: Constructing the Waistcoat
Part 3: Constructing the Bell-bottoms

"After receiving a large pile of fabric from my sister-in-law, I still had lots of sewing to do after making hats for my nieces and nephew. I decided to start by making a matching waistcoat and trouser set for the three year old girl.
Part 1: Conceptualization, Pattern Design & Fabric Layout
Part 2: Constructing the Waistcoat
Part 3: Constructing the Bell-bottoms
The patterns can be downloaded from APrettyTalent.com. Click here for the pattern."
Blog 19 - Child's Waistcoat & Bell-bottoms Part 2
"After receiving a large pile of fabric from my sister-in-law, I still had lots of sewing to do after making hats for my nieces and nephew. I decided to start by making a matching waistcoat and trouser set for the three year old girl.
Part 1: Conceptualization, Pattern Design & Fabric Layout
Part 2: Constructing the Waistcoat
Part 3: Constructing the Bell-bottoms
The patterns can be downloaded from APrettyTalent.com. Click here for the pattern."
Blog 20 - Child's Waistcoat & Bell-bottoms Part 3
"In the previous blogs in this series I showed you how to design a pattern for a child’s outfit and we made a waistcoat. Today we are going to construct the bell-bottom pants to match the waistcoat.
Part 1: Conceptualization, Pattern Design & Fabric Layout
Part 2: Constructing the Waistcoat
Part 3: Constructing the Bell-bottoms
Blog 21 - Handbags and Wallets Part 1
"I was asked to design and make a few more handbags as well as a few wallets. What is a few? Difficult question. For this reason I have decided to do this process as a series of scattered blogs with others in between. In this first blog I will talk about the conceptualization process and then we'll look at the first pattern for one of the bags."

Blog 22 - Making a Scatter Cushion Cover
"Having tested the Acrilpens in the previous blog, I decided that I liked the test project so much that I wanted to keep it. I decided to put it on a scatter cushion."

Blog 23 - Handbags and Wallets Part 2
"We started with an ongoing series of blogs on designing and making handbags and wallets. In the first blog we developed some ideas and designs for a number of bags and wallets. If you don't want to design your own pattern you can buy and download the pattern here from APrettyTalent.com. We then focused on one specific bag and designed a pattern for it. We opted to call it a paneled bag, since the sides were divided into panels. In this blog we will start with the construction of the bag, which will stretch over three blogs."

Blog 24 - Handbags and Wallets Part 3
"We started with an ongoing series of blogs on designing and making handbags and wallets. In the first blog we developed some ideas and designs for a number of bags and wallets. If you don't want to design your own pattern you can buy and download the pattern here from APrettyTalent.com. We then focused on one specific bag and designed a pattern for it. We opted to call it a paneled bag, since the sides were divided into panels. In the second part of the series we started with the construction of the bag. In Part 3 we continue with the construction and we will be concentrating on the pockets and side panels."

Blog 25 - Handbags and Wallets Part 4
"We are busy with an ongoing series of blogs on designing and making handbags and wallets. In the first blog we developed some ideas and designs for a number of bags and wallets. If you don't want to design your own pattern you can buy and download the pattern here from APrettyTalent.com. We then focused on one specific bag and designed a pattern for it. We opted to call it a paneled bag, since the sides were divided into panels. In the second part of the series we started with the construction of the bag. In Part 3 we continued with the construction and we concentrated on the pockets and side panels. In this blog we will be putting the finishing touches on the paneled bag."

"I was asked to design and make a few more handbags as well as a few wallets. What is a few? Difficult question. For this reason I have decided to do this process as a series of scattered blogs with others in between. In this first blog I will talk about the conceptualization process and then we'll look at the first pattern for one of the bags."
Blog 22 - Making a Scatter Cushion Cover
"Having tested the Acrilpens in the previous blog, I decided that I liked the test project so much that I wanted to keep it. I decided to put it on a scatter cushion."
Blog 23 - Handbags and Wallets Part 2
"We started with an ongoing series of blogs on designing and making handbags and wallets. In the first blog we developed some ideas and designs for a number of bags and wallets. If you don't want to design your own pattern you can buy and download the pattern here from APrettyTalent.com. We then focused on one specific bag and designed a pattern for it. We opted to call it a paneled bag, since the sides were divided into panels. In this blog we will start with the construction of the bag, which will stretch over three blogs."
Blog 24 - Handbags and Wallets Part 3
"We started with an ongoing series of blogs on designing and making handbags and wallets. In the first blog we developed some ideas and designs for a number of bags and wallets. If you don't want to design your own pattern you can buy and download the pattern here from APrettyTalent.com. We then focused on one specific bag and designed a pattern for it. We opted to call it a paneled bag, since the sides were divided into panels. In the second part of the series we started with the construction of the bag. In Part 3 we continue with the construction and we will be concentrating on the pockets and side panels."
Blog 25 - Handbags and Wallets Part 4
"We are busy with an ongoing series of blogs on designing and making handbags and wallets. In the first blog we developed some ideas and designs for a number of bags and wallets. If you don't want to design your own pattern you can buy and download the pattern here from APrettyTalent.com. We then focused on one specific bag and designed a pattern for it. We opted to call it a paneled bag, since the sides were divided into panels. In the second part of the series we started with the construction of the bag. In Part 3 we continued with the construction and we concentrated on the pockets and side panels. In this blog we will be putting the finishing touches on the paneled bag."
Blog 26 - Handbags and Wallets Part 5
"I had a lot of fun conceptualizing different handbags and one of the designs We have already made the Paneled Bag in Parts 2-4 of the series, but I also came up with was for a round bag. I started playing around with a pattern to see where it would take me when it occurred to me that this would be a fabulous concept for a vanity bag. The pattern for this bag can be downloaded here from APrettyTalent.com."

Blog 27 - Handbags and Wallets Part 6
"I had a lot of fun conceptualizing different handbags and one of the designs we have already made is the Paneled Bag in Parts 2-4 of the series. I also came up with a design for a round vanity bag and we started construction of this bag in Part 5 of the series. The pattern for this bag can be downloaded here from APrettyTalent.com."

"I had a lot of fun conceptualizing different handbags and one of the designs We have already made the Paneled Bag in Parts 2-4 of the series, but I also came up with was for a round bag. I started playing around with a pattern to see where it would take me when it occurred to me that this would be a fabulous concept for a vanity bag. The pattern for this bag can be downloaded here from APrettyTalent.com."
Blog 27 - Handbags and Wallets Part 6
"I had a lot of fun conceptualizing different handbags and one of the designs we have already made is the Paneled Bag in Parts 2-4 of the series. I also came up with a design for a round vanity bag and we started construction of this bag in Part 5 of the series. The pattern for this bag can be downloaded here from APrettyTalent.com."
Blog 28 - Handbags and Wallets Part 7
"It is very rare that I will go back to a design once I have finished with it, but this time I liked the idea of the suggested changes and decided to apply them. Besides which, it came with an order! My mom saw the vanity bag I had made and fell in love with the idea. I had no idea she was in the market for a vanity bag and this one came at the right time. She only had one request; she wanted a pocket or two on the outside of the bag for the things she wants quick access to. Then my sister-in-law suggested a pocket in the lid to keep things like razors in, which posed potential harm if kept in among the rest of the contents of the bag. At first I did not like either of the suggestions, but the more I thought about it, the more it grew on me. Finally I succumbed. You can download the pattern for the bag here from APrettyTalent.com."

Blog 29 - Handbags and Wallets Part 8
"In yesterday's blog we started a variation on the round vanity bag we did before. We will continue on this bag today and finish it in the next blog. The pattern can be downloaded from APrettyTalent.com by clicking here."

Blog 30 - Handbags and Wallets Part 9
"For the past two blogs we have been constructing a variation on the round vanity bag we made earlier. Today we will be putting the final touches on the bag. You can buy and download the pattern from APrettyTalent.com by clicking here."

"It is very rare that I will go back to a design once I have finished with it, but this time I liked the idea of the suggested changes and decided to apply them. Besides which, it came with an order! My mom saw the vanity bag I had made and fell in love with the idea. I had no idea she was in the market for a vanity bag and this one came at the right time. She only had one request; she wanted a pocket or two on the outside of the bag for the things she wants quick access to. Then my sister-in-law suggested a pocket in the lid to keep things like razors in, which posed potential harm if kept in among the rest of the contents of the bag. At first I did not like either of the suggestions, but the more I thought about it, the more it grew on me. Finally I succumbed. You can download the pattern for the bag here from APrettyTalent.com."
Blog 29 - Handbags and Wallets Part 8
"In yesterday's blog we started a variation on the round vanity bag we did before. We will continue on this bag today and finish it in the next blog. The pattern can be downloaded from APrettyTalent.com by clicking here."
Blog 30 - Handbags and Wallets Part 9
"For the past two blogs we have been constructing a variation on the round vanity bag we made earlier. Today we will be putting the final touches on the bag. You can buy and download the pattern from APrettyTalent.com by clicking here."
Blog 31 - Handbags and Wallets Part 10
"I was asked to make a small wallet for a little boy to carry his money for baker’s day. This would have to be something simple, yet with enough space for a few keepsakes as well. I decided to make a wallet with a zipper as well as an open side pocket. I would also put a ring inside the wallet to which he could hook any hidden treasure. You can download the pattern here from APrettyTalent.com."

"I was asked to make a small wallet for a little boy to carry his money for baker’s day. This would have to be something simple, yet with enough space for a few keepsakes as well. I decided to make a wallet with a zipper as well as an open side pocket. I would also put a ring inside the wallet to which he could hook any hidden treasure. You can download the pattern here from APrettyTalent.com."
Blog 32 - Handbags and Wallets Part 11
"Ever since I saw these handles for the first time when the supplier advertised them, I have wanted to do a project with them. Therefore you can only imagine my excitement today as I finally get the opportunity to do exactly that. The handles are also available from APrettyTalent.com for your convenience, if you would like to purchase them for your own project.
Part 1 of this blog can be found here.
Part 1 of this blog can be found here."

Blog 33 - Handbags and Wallets Part 12
"In Part 11 of the series we started preparations for the Artbag with Handles. We conceptualized the design, drew up the pattern, cut out fabric and then started on the art. First, we painted the handles the way we wanted them to look and then devoted our attention to the two centre panels where we painted a picture on both panels using the Acrilpens. It is time we started the sewing. I want to remind you that you can download the pattern from APrettyTalent.com by clicking here. Set your margins to 0 and print the pattern on A4 paper. You can buy the handles here.
Part 1 of this blog can be found here.
Part 1 of this blog can be found here."

"Ever since I saw these handles for the first time when the supplier advertised them, I have wanted to do a project with them. Therefore you can only imagine my excitement today as I finally get the opportunity to do exactly that. The handles are also available from APrettyTalent.com for your convenience, if you would like to purchase them for your own project.
Part 1 of this blog can be found here.
Part 1 of this blog can be found here."
Blog 33 - Handbags and Wallets Part 12
"In Part 11 of the series we started preparations for the Artbag with Handles. We conceptualized the design, drew up the pattern, cut out fabric and then started on the art. First, we painted the handles the way we wanted them to look and then devoted our attention to the two centre panels where we painted a picture on both panels using the Acrilpens. It is time we started the sewing. I want to remind you that you can download the pattern from APrettyTalent.com by clicking here. Set your margins to 0 and print the pattern on A4 paper. You can buy the handles here.
Part 1 of this blog can be found here.
Part 1 of this blog can be found here."
Blog 34 - Handbags and Wallets Part 13 Upright Bag
"It is time for something a little different in handbags. I decided to design a bag with a little more structure and concentrated a lot on practical pockets. This is the result. You can download the pattern from APrettyTalent.com. In this first part of the making of the bag we work our way through from conceptualization to the construction of the pockets. In the next blog we shall bring the final pieces together and finish the bag."

Blog 35 - Handbags and Wallets Part 14 Upright Bag
"We started with the construction of this bag in the previous blog and got as far as the construction of the pockets. To day we will put the final touches on. The pattern can be downloaded from APrettyTalent.com."
"It is time for something a little different in handbags. I decided to design a bag with a little more structure and concentrated a lot on practical pockets. This is the result. You can download the pattern from APrettyTalent.com. In this first part of the making of the bag we work our way through from conceptualization to the construction of the pockets. In the next blog we shall bring the final pieces together and finish the bag."
Blog 35 - Handbags and Wallets Part 14 Upright Bag
"We started with the construction of this bag in the previous blog and got as far as the construction of the pockets. To day we will put the final touches on. The pattern can be downloaded from APrettyTalent.com."
Blog 36 - Handbags and Wallets Part 15 Upright Bag Republished
"I noticed that there were problems with the photos in the previously published blogs with the instructions to make this bag. I had to make another of these bags on order and decided to take another set of photographs. I hope these are clearer that the previous ones. You can download the pattern from APrettyTalent.com. In this first part of the making of the bag we start the construction up to and including the pockets. In the next blog we shall bring the final pieces together and finish the bag."

Blog 37 - Handbags and Wallets Part 16 Upright Bag Republished
"We started with the construction of this bag in the previous blog and got as far as the construction of the pockets. To day we will put the final touches on. The pattern can be downloaded from APrettyTalent.com."

"I noticed that there were problems with the photos in the previously published blogs with the instructions to make this bag. I had to make another of these bags on order and decided to take another set of photographs. I hope these are clearer that the previous ones. You can download the pattern from APrettyTalent.com. In this first part of the making of the bag we start the construction up to and including the pockets. In the next blog we shall bring the final pieces together and finish the bag."
Blog 37 - Handbags and Wallets Part 16 Upright Bag Republished
"We started with the construction of this bag in the previous blog and got as far as the construction of the pockets. To day we will put the final touches on. The pattern can be downloaded from APrettyTalent.com."
Blog 38 - Handbags and Wallets Part 17 Art Bag Republished
"I have published the instructions for making this bag in previous blogs. I wanted to show you a variation, though. This time I did not paint the fabric panel, but restricted the painting to the handles. Isn't it amazing how the results differ from one bag to the next? You can download the pattern for this bag here. The handles are available here. Or simply visit APrettyTalent.com."

Blog 39 - Handbags and Wallets Part 18 Art Bag Republished
"I have decided to republish the steps of this bag to show you a different take on the same pattern. In the previous blog, Part 17, we prepared the handles and we are now ready to start construction on the bag. You can download the pattern for this bag here. The handles are available here. Or simply visit APrettyTalent.com."

Blog 40 - Handbags and Wallets Part 19 Art Bag Republished
"We have been busy with this bag for the past two blogs already. In Part 17 we prepared the handles of the bag. In part 18 we attached the zippers and completed the pockets. We are now going to finish the bag. You can download the pattern for this bag here. The handles are available here. Or simply visit APrettyTalent.com. The actual bag made in this blog is available in APrettyTalent.com. Click here to buy the bag from Miekie Crafts."

"I have published the instructions for making this bag in previous blogs. I wanted to show you a variation, though. This time I did not paint the fabric panel, but restricted the painting to the handles. Isn't it amazing how the results differ from one bag to the next? You can download the pattern for this bag here. The handles are available here. Or simply visit APrettyTalent.com."
Blog 39 - Handbags and Wallets Part 18 Art Bag Republished
"I have decided to republish the steps of this bag to show you a different take on the same pattern. In the previous blog, Part 17, we prepared the handles and we are now ready to start construction on the bag. You can download the pattern for this bag here. The handles are available here. Or simply visit APrettyTalent.com."
Blog 40 - Handbags and Wallets Part 19 Art Bag Republished
"We have been busy with this bag for the past two blogs already. In Part 17 we prepared the handles of the bag. In part 18 we attached the zippers and completed the pockets. We are now going to finish the bag. You can download the pattern for this bag here. The handles are available here. Or simply visit APrettyTalent.com. The actual bag made in this blog is available in APrettyTalent.com. Click here to buy the bag from Miekie Crafts."
Blog 41 - Using Derwent Inktense on Fabric
"Derwent is renowned for great quality art products and their Inktense pencils and bars certainly rank among the best watersoluble products on the market today. I fell in love with Inktense on first use because if its intense vibarant colours. I had read that it could be used on fabric, but remained so fascinated by the beautiful results I got on paper, that I never bothered with using them on fabric. Then I started making hand-painted handbags and suddenly my interest was peeked by everything that promised to put colour on fabric. I dove into my art supplies and pulled out the Inktense sets."

"Derwent is renowned for great quality art products and their Inktense pencils and bars certainly rank among the best watersoluble products on the market today. I fell in love with Inktense on first use because if its intense vibarant colours. I had read that it could be used on fabric, but remained so fascinated by the beautiful results I got on paper, that I never bothered with using them on fabric. Then I started making hand-painted handbags and suddenly my interest was peeked by everything that promised to put colour on fabric. I dove into my art supplies and pulled out the Inktense sets."
Blog 42 - Using Inktense on Wood
"Today's blog is about using Derwent's Inktense on wood. I know you will think me silly for even attempting this, but I found myself in a tight spot recently. You see, I had decided to show you how great Inktense was when used on fabric. You can read all about this here. When I was done, I liked the project so much that I did not want to condemn it to an album, but decided that I could much more easily use it in a panel for one of my Art Bags. I naturally painted a second one and had all but made up my mind to paint the handles with acrylic paint when it dawned on me that I might very well be able to use the Inktense itself to paint the handles as well. This would have the advantage of colours and techniques matching automatically. I simply had to give it a try."

"Today's blog is about using Derwent's Inktense on wood. I know you will think me silly for even attempting this, but I found myself in a tight spot recently. You see, I had decided to show you how great Inktense was when used on fabric. You can read all about this here. When I was done, I liked the project so much that I did not want to condemn it to an album, but decided that I could much more easily use it in a panel for one of my Art Bags. I naturally painted a second one and had all but made up my mind to paint the handles with acrylic paint when it dawned on me that I might very well be able to use the Inktense itself to paint the handles as well. This would have the advantage of colours and techniques matching automatically. I simply had to give it a try."
Blog 43 - Covering buttons with fabric
"There was a time when everybody knew how to cover buttons with fabric. Then covered buttons became unfashionable, as did wearing home-sewn clothes. Lately this has changed, partly due to the poor quality of workmanship in factory made clothing and partly due to the fact that there is a new-found appreciation for craftsmanship of any kind, including sewing and tailoring. Buttons have also moved out of needlepoint and into a variety of other crafts, making it all the more popular to once again learn the neglected 'art' of covering buttons in fabric."

"There was a time when everybody knew how to cover buttons with fabric. Then covered buttons became unfashionable, as did wearing home-sewn clothes. Lately this has changed, partly due to the poor quality of workmanship in factory made clothing and partly due to the fact that there is a new-found appreciation for craftsmanship of any kind, including sewing and tailoring. Buttons have also moved out of needlepoint and into a variety of other crafts, making it all the more popular to once again learn the neglected 'art' of covering buttons in fabric."
Blog 44 - Artbag with Sling Part 1 of 3
"I know you've seen this bag before, but I have had requests about adding a sling. I decided that it would necessarily have to be an optional one. There are a few new tricks to learn in the process to make it worth your while. The pattern is available from APrettyTalent.com and can be downloaded in PDF format by clicking here. If you are interested in purchasing the bag made in this blog, you can purchase it form Miekie Crafts by clicking here. In this blog we concentrate on the zippers and pockets. In the next blog we'll construct the different elements and in the last we'll pull it all together."

Blog 45 - Artbag with Sling Part 2 of 3
"We have once again started construction on one of these versatile Artbags. This time we added the twist of a sling with a few new techniques. In the first blog we constructed the zippers and pockets and that is where we pick up in this blog. We will be constructing the remaining pattern pieces today and in the next blog we will pull it all together."

Blog 46 - Artbag with Sling Part 3 of 3
"We have been working on the construction of the artbag with the sling for the past two blogs and have prepared all of the pieces. All that remains for us to do is to bring these separate pieces together today."

"I know you've seen this bag before, but I have had requests about adding a sling. I decided that it would necessarily have to be an optional one. There are a few new tricks to learn in the process to make it worth your while. The pattern is available from APrettyTalent.com and can be downloaded in PDF format by clicking here. If you are interested in purchasing the bag made in this blog, you can purchase it form Miekie Crafts by clicking here. In this blog we concentrate on the zippers and pockets. In the next blog we'll construct the different elements and in the last we'll pull it all together."
Blog 45 - Artbag with Sling Part 2 of 3
"We have once again started construction on one of these versatile Artbags. This time we added the twist of a sling with a few new techniques. In the first blog we constructed the zippers and pockets and that is where we pick up in this blog. We will be constructing the remaining pattern pieces today and in the next blog we will pull it all together."
Blog 46 - Artbag with Sling Part 3 of 3
"We have been working on the construction of the artbag with the sling for the past two blogs and have prepared all of the pieces. All that remains for us to do is to bring these separate pieces together today."
Blog 47 - Learn to Sew 1: Making a Pocket with a Flap
"Want to make your own clothes, but don't know where to start? I have had numerous requests from people asking for sewing lessons. This blog is the first in an open-ended series of blogs in which I will try to teach you the basics of sewing. I am going to start you off with a very easy pattern for a pair of trousers with an elastic in the waist. To sew along, you can find any pattern for pants with this description. There is no waistband, the fabric simply folds over into a tube and a length of elastic is run through it. Ask your friendly fabric shop assistant to help you find the right pattern if you are in doubt. In the first blog I will concentrate on the pockets and in the second we'll make the actual pants."

Blog 48 - Learn to Sew 2: Making a Pair of Trousers with an Elastic Waist
"The first piece of clothing I will teach you to sew is a very easy pair of trousers. There is nothing complicated about this pattern since it has no waistband, zipper or buttons. You simply fold the top over and put an elastic through. We did make a slightly complicated pair of pockets to attach to the pants in the previous blog and we shall add those today to make our pants a little more edgy."

Blog 49 - Learn to Sew 3: Waistcoat with pockets
"We have made a cozy pair of trousers in the previous lesson and it seem right that we should be making something to match that. With this in mind, I have decided that another easy pattern for newbies to sewing is a waistcoat. I am going to add some pockets, which are optional, but very easy to make. Any waistcoat pattern is good to use. Some patterns do not get lined and will have facings. Others only get lining in the front and a facing in the back. I am going to show you how to make a fully lined waistcoat. If your pattern is not the same, here is how to adapt it. Do not cut any facings. Cut 2 front panel out of fabric and 2 out of lining. Cut 1 back panel on the fold out of fabric and another out of lining."

Blog 50 - Making a French Beret with a Cap Republished Part 1 of 2
"I have published the instructions for making a French beret with a cap before, but I have discovered a couple of shortcuts that might simplify the process without adversely affecting the outcome. The pattern is available from APrettyTalent.com and can be downloaded here.
The previous blog series can be viewed by simply clicking on the part you want to view:
Part 1
Part 2
Part 3
Part 4

For more crafty ideas and great products, visit APrettyTalent.com.
Remember to keep nurturing your TALENT for making PRETTY things.
You can subscribe to this blog and receive regular updates by email by simply registering your email address at the top of the current blog.
"Want to make your own clothes, but don't know where to start? I have had numerous requests from people asking for sewing lessons. This blog is the first in an open-ended series of blogs in which I will try to teach you the basics of sewing. I am going to start you off with a very easy pattern for a pair of trousers with an elastic in the waist. To sew along, you can find any pattern for pants with this description. There is no waistband, the fabric simply folds over into a tube and a length of elastic is run through it. Ask your friendly fabric shop assistant to help you find the right pattern if you are in doubt. In the first blog I will concentrate on the pockets and in the second we'll make the actual pants."
Blog 48 - Learn to Sew 2: Making a Pair of Trousers with an Elastic Waist
"The first piece of clothing I will teach you to sew is a very easy pair of trousers. There is nothing complicated about this pattern since it has no waistband, zipper or buttons. You simply fold the top over and put an elastic through. We did make a slightly complicated pair of pockets to attach to the pants in the previous blog and we shall add those today to make our pants a little more edgy."
Blog 49 - Learn to Sew 3: Waistcoat with pockets
"We have made a cozy pair of trousers in the previous lesson and it seem right that we should be making something to match that. With this in mind, I have decided that another easy pattern for newbies to sewing is a waistcoat. I am going to add some pockets, which are optional, but very easy to make. Any waistcoat pattern is good to use. Some patterns do not get lined and will have facings. Others only get lining in the front and a facing in the back. I am going to show you how to make a fully lined waistcoat. If your pattern is not the same, here is how to adapt it. Do not cut any facings. Cut 2 front panel out of fabric and 2 out of lining. Cut 1 back panel on the fold out of fabric and another out of lining."
Blog 50 - Making a French Beret with a Cap Republished Part 1 of 2
"I have published the instructions for making a French beret with a cap before, but I have discovered a couple of shortcuts that might simplify the process without adversely affecting the outcome. The pattern is available from APrettyTalent.com and can be downloaded here.
The previous blog series can be viewed by simply clicking on the part you want to view:
Part 1
Part 2
Part 3
Part 4
For more crafty ideas and great products, visit APrettyTalent.com.
Remember to keep nurturing your TALENT for making PRETTY things.
You can subscribe to this blog and receive regular updates by email by simply registering your email address at the top of the current blog.
No comments:
Post a Comment