
Perspective 1
When striving to get perspective right in a drawing or painting, there is one thing that is essential to grasp. You HAVE to determine the horizon. The reason that this is so important is because the horizon is at the viewer's eye level. You can set it as high or as low as you like, but that simply means that the viewer has changed positions. This point will become clearer as we progress through the blog.

I am going to start by drawing a line of posts that vanish over the horizon. The posts are taller than the viewer. At the same time, the viewer is standing up (in contrast to lying on the ground). That is why the bottoms of the posts will be below the horizon, while the tops will be above it. I draw these limits, allowing them to meet where the posts disappear over the horizon. That point where the lines converge on the horizon, is called the vanishing point.

I now draw my posts between the limiting lines. All the posts are of equal length for the purpose of this explanation.

There are a number of things to pay attention to in this drawing. Note how the posts get shorter as they recede into the distance. The spaces between the posts also become smaller. The posts themselves become narrower. This is because things appear to be smaller in the distance. This principle must always be adhered to in art if you want to get perspective right.

When studying the drawing, the eye will believe what you want it to. It will believe that the posts are taller than they are, they will believe that they stretch deep into the distance, and they will believe that they are standing up, rather than lying on the ground. You have just forced your viewers to see things from your perspective, even though they are really looking at a flat sheet of paper with a couple of pencil lines on it. That is art. It is the illusion of making someone else believe what you see.

Let's try the same thing again, but this time we draw some telephone poles. Do you still remember those? The drawing is pretty much the same as before, but this time I want you to take note of the tops of the poles. Can you see how the horizontal lines on the poles also get shorter as they recede into the background?

Determine how long you want the shadows to be that are cast on the ground. Draw a line that will meet the others at the vanishing point. You will now be able to draw shadows of equal length that they eye will believe. The shadows will get smaller as they recede, same as the poles do.

I can draw as many pathways or embankments and sidewalks as I like next to this line of poles. The principle remain the same. All the lines will meet at the vanishing point.

Perspective 2
We start once again by drawing the horizon which will once again be at eye level.

This time I am going to draw a cube, that will become a house in a developed drawing. I decide to make eye level right in the middle of the height of the wall. This means your viewer is probably sitting down and looking at the house. This time, however, my viewer will be facing one of the corners of the house, seeing two of the walls of the house.

Connect the top and bottom ends of the corner to meet at the horizon. You will note that you will have two vanishing points in this drawing, but that both will still be on the horizon. Determine the length of the walls of the house and draw the lines to limit the house to this decision of yours.

If the walls were made of glass, you would be able to see the rest of the cube through the walls.

What if it is not a house towering over us? What if it is a present/box that we are looking into, or perhaps we are in a plane, looking down on our house? In that case we still start by drawing the horizon at our eye level. Draw the whole cube under the horizon, as you are now towering over it. The lines of the cube still meet at the vanishing points.

To draw the back panels of the cube, you connect the tops of the corners to the vanishing points.

Where these last two lines intersect, is where the back corner of the cube will be.

Keep connecting the corners to the vanishing points to get the length of the furthest corner, in case your cube is transparent and that corner is actually visible. Do the same thing in the opposite direction to draw tall buildings from the point of view of someone who is tunneling their way through the city. You get my point.
Perspective 3
In real life, a line of posts, as we drew in the beginning, will seldom stretch across a flat earth, as we presumed in the first drawings. A lot of times the earth has valleys and hills. In a case such as this, we will draw the fence line to mimic the contours of the land it is planted on.

When we draw the posts, we still follow the same principle of making spaces and lines smaller as they recede.

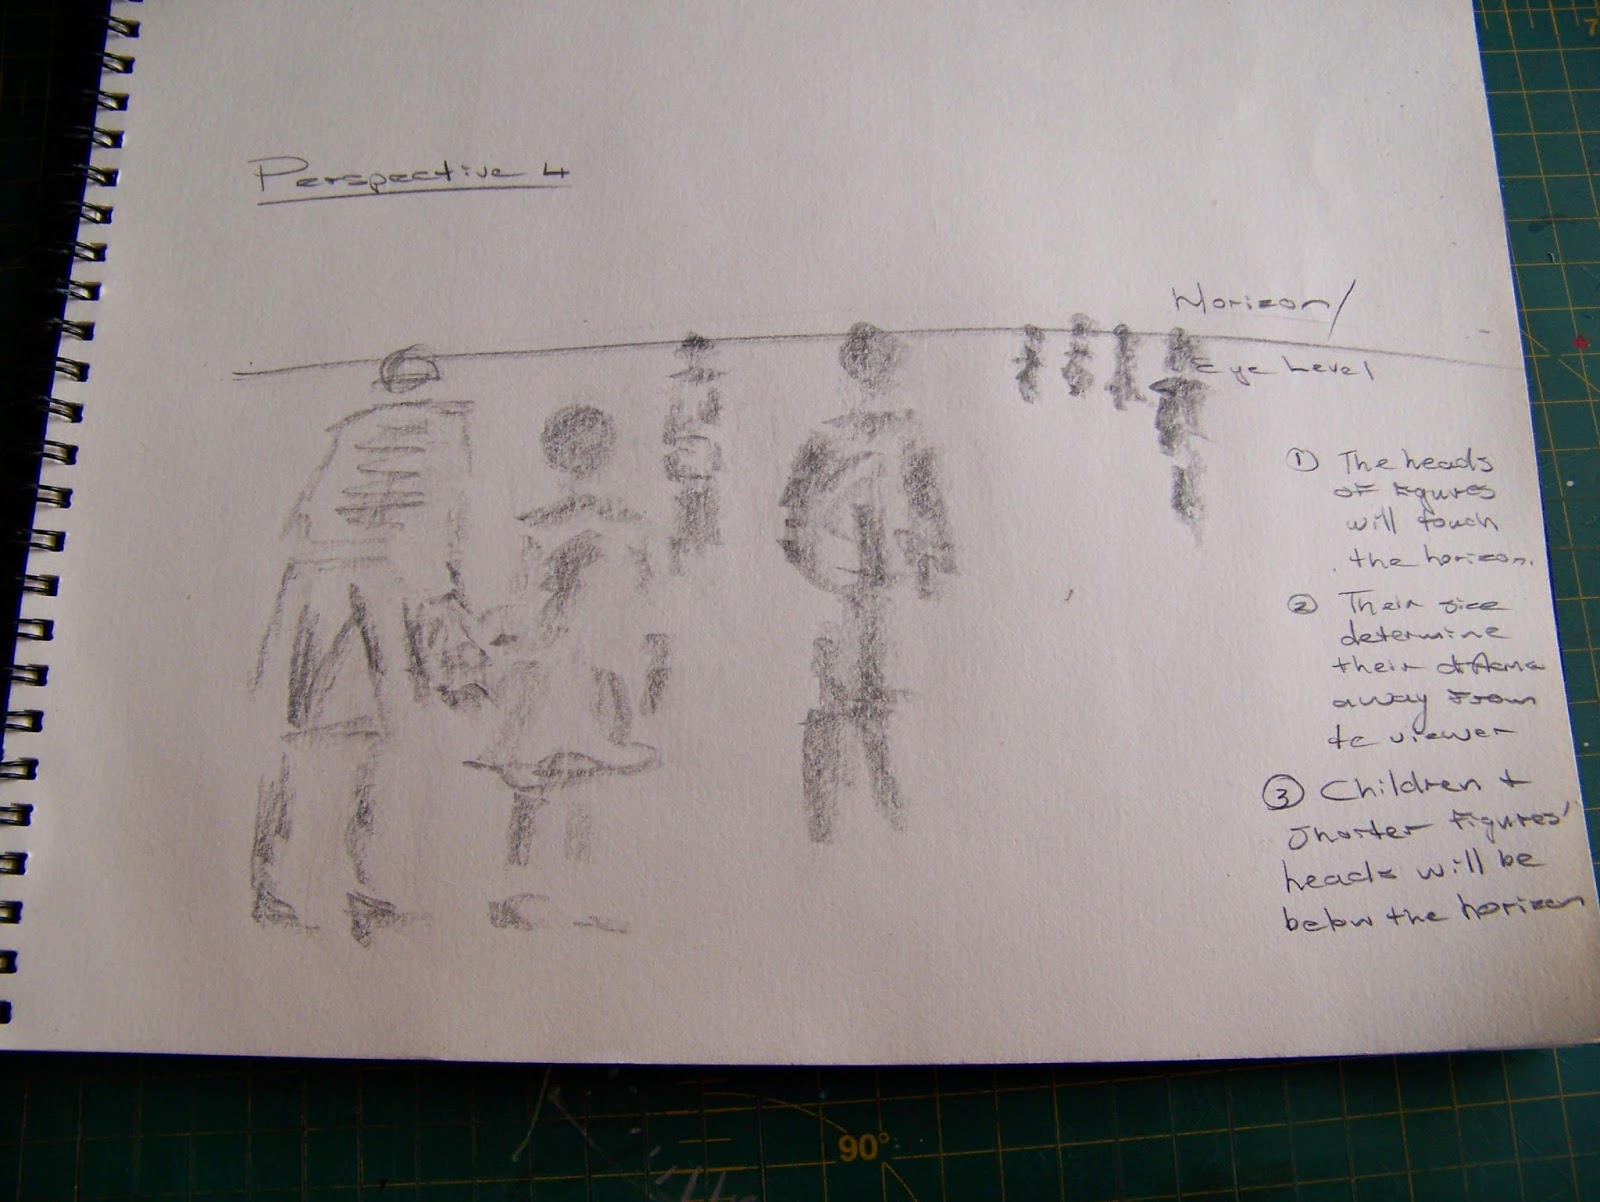
Perspective 4
That is all fair and well as long as we are drawing landscapes. But what if I want to put people in a picture? Let's assume that you are an average sized adult and that other adults will be at your eye level. Start by once again drawing the horizon at your eye level.

When you draw figures their heads will be touching the horizon. Some may be slightly taller than you, resulting in them protruding slightly past the horizon. The size at which the people are drawn, will determine how far away from you they are. All of the people in this drawing are adults and all of them are walking away from you.

Now we will draw a figure to be well under the horizon. Our eyes immediately believe that we are either dealing with a kid, or a person of small stature. Draw a figure whose head stretches well above the horizon, and you have the beginning of a fairy tale involving a giant.
Perspective 5
Tonal value will also help us to create the illusion of distance in a drawing. This is called atmospheric perspective. There is a whole lot more to say about atmospheric perspective, but a basic introduction to it holds that the further away an object is, the lighter it appears to the eye. The closer it is, the darker it appears to be. I drew 5 blocks of equal size with a ruler. This is important as I want you to understand that line work plays no role in creating distance here.

Using an 8B pencil at the bottom and working with ever harder pencils cores, I end with a 2H pencil in the top block. Can you see how the bottom block appears closer than the top one?

I repeated a similar exercise with dots. Can you see that the the 2H dots appear to be further away than the B dots? However the dark 8B dots appear to be closest to us.

Do the same exercise with some crude trees. Once again the 2H trees form the background, the 2B trees the middle-ground, and the 7B trees make up the foreground.

Here is a nice summarizing shot of the above explanations.

Perspective 6
Let's combine everything we've learned in one landscape drawing. Draw a couple of horizontal lines to represent hills and valleys. Plant a couple of rows of produce by drawing vertical lines. Make sure the horizontal lines are more closely spaces as they recede. Make sure the vertical lines are wider to the bottom as the advance.

Now do some tonal shading and watch how the depth of your drawing increases by increments.

For more crafty ideas and great products, visit APrettyTalent.com.
Remember to keep nurturing your TALENT for making PRETTY things.
You can subscribe to this blog and receive regular updates by email by simply registering your email address at the top of the current blog.
No comments:
Post a Comment