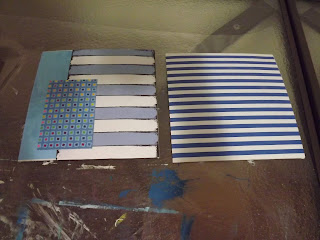
A friend dropped by the other day with the most wonderful idea of compiling an album with parental advice for a first-time parent and colleague at work. She had no idea how to go about it and had never done something like this before. I jumped at the opportunity to be a part of the fun that this promised to be and over the span of two afternoons and nights, we had the album ready. She then went off in search of advice from those who knew the father-to-be, and pretty soon the album was done. I show you how we made this album in today's blog.
We used two 8" x 8" canvas boards as cover pages for the album. We then decoupaged some designer papers to the canvas boards, using Dala Acrylic Gel Medium. The rectangle on the front cover, is meant to get a photograph of the little baby boy that is expected.
We then cut a sheet of black cardboard into 8 squares, each measuring 8" x 8". Afterwards, we painted the back of the cardboard, which was an ugly grayish cardboard colour, blue, with white streaks, using Dala Craft paint. These would serve as alphabet dividers.
We then used the off-cuts from the cardboard, combined with some more paper off-cuts, to decoupage the insides of the album covers. We also used a punch and hammer to punch holes into the cover pages.
We found alphabet stickers and marked the dividers accordingly. We also punched holes in the dividers.
We also cut the sides of the dividers out in steps to make it easy to find the right advice at the tip of your fingers.
We then used a hot glue gun to decorate the album cover some more.
Then we used a range of stickers to decorate the inside covers and the dividers.
More stickers.
Yet more stickers.
Still more stickers.
The camping stickers made a little story, starting with a road trip on the one side of the divider, and ending at the camp site on the flip side of the divider.
More stickers.
A combination of stickers, metal embellishments and 3D pictures were used on the inside of the back cover. The metal embellishments were attached with the hot glue gun.
We then used the leftover stickers on the reverse sides of the dividers, aside from two more sticker sheets, which was specially selected for this purpose.
More stickers.
Leftover stickers.
Leftover stickers.
My friend then went in search of an A5 lined paper pad with pretty colours. People would be requested to write their advice on these sheets. The pad turned out to be slightly too big for the album and we quickly trimmed it using a guillotine.
All that was left to do, was to punch holes in the papers and to gather the advice from knowledgeable and experienced parents.
Sadly, I never got to see the final product before it was given to the new parents. The advice was collected and alphabetically arranged into the album. The the album was 'bound' with plastic curtain rings, not unlike the ones you use on shower curtains.
Marietjie Uys (Miekie) is a published author. You can buy my books here:
You can purchase Designs By Miekie 1 here.
Jy kan Kom Ons Teken en Verf Tuinstories hier koop.
Jy kan Kom Ons Kleur Tuinstories In hier koop.
Jy kan Tuinstories hier koop.
You can follow Miekie's daily Bible Study blog, Bybel Legkaart, here in English & Afrikaans.
You may prefer to follow the traveling blog, A Pretty Tourist.
For more crafty ideas and great product reviews, visit A Pretty Talent on Facebook.
If you are in a literary mood, follow Miekie's musings, stories and poetry on A Pretty Author - Miekie.
Remember to keep nurturing your TALENT for making life PRETTY.
You can subscribe to any of these blogs and receive regular updates by email. Simply register your email address at the top of the applicable blog.


No comments:
Post a Comment