Being at a bit of a loss as to where to start, I decide upon a colour scheme that appeals to me today. I long for the warmth of red, but I want to tone it down with a cool colour. I also know that I want to make use of textures. With this in mind I start compiling some papers and other odds and ends that might make its way into the project.
Since I am not sure where the process will take me, I decide to give my base paper a proper coat of gesso. This will strengthen the paper so that I will be able to paint on it - even with oils. This was discussed in a previous blog as well. Click here to learn more about it.
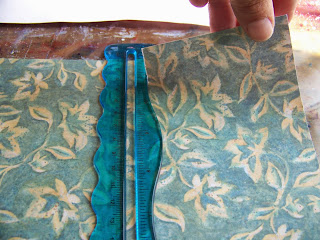
Using my Pentel Aquash Brush and a tearing ruler, I paint a thin line of water on the tear line. This will soften the paper ever so slightly and ensure a much neater tear.
Press the ruler down with one hand and with the other carefully tear the paper along the curves of the ruler.
I fit the different elements that I want to use to frame my message with on the paper, rearranging them until I am satisfied with the layout.
I am now going to use Acrylic Gel Medium and a flat brush to decoupage the elements onto the page.
The most important aspect to keep in mind here is to work from the bottom up. The pieces that goes at the bottom must be pasted down first. Paint the area for the first pieces with acrylic Gel Medium and then lay the piece in place. Rub out any trapped air bubbles and creases (although I wanted to deliberately include some creases in this particular project). Paint over the patterned paper with acrylic gel medium again to seal it.
I then added the elements I cut out from an A5 patterned paper I bought on a trip to the Netherlands. Again I paint the Acrylic Gel Medium at the bottom, lay down the elements and paint the Gel Medium over the elements again.
I now lay a piece of fabric netting over my elements at the bottom. I found that this required a huge amount of Acrylic Gel Medium to stay in place. Don't be afraid to keep adding medium. Fortunately my base paper could handle the amount of medium I added because of the Gesso treatment it had received.
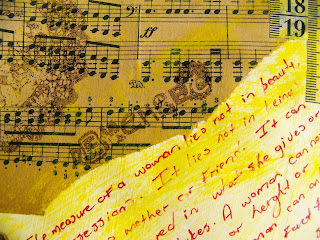
I was careful to decoupage the very brittle yellowed music score in place. The postcards are once again cut out from the A5 paper I referred to earlier.
I then decided to add the paper doily to the mix. I had been thinking that I would only use it as a stencil and remove it, but decided instead to decoupage it onto my collage.
I stood back and decided that the frame still lacked an essential element if I wanted to pull the idea of the measurement of a woman through. I added different lengths of measuring tape printed washi tape to the page.
Until this point all the elements are still lacking in cohesiveness. I decide to use a Pretty Color inked sponge to pull the elements together.
I use both ends of the sponge to dab colour all over my page randomly. The white paper doily receives special attention, since it is still sticking out like a sore thumb.
While my ink is still wet, I use the Acrylic Gel Medium to spread the ink thinly over the page and across the elements. Where I find the ink is spread too thinly, I simply dab on some more and spread it from there. I want to achieve a very uneven spread with darker and lighter patches.
I have now achieved success in introducing a common element that pulled the elements together cohesively. It is time to lay the project aside to dry properly before I add the journaling. Don't stress about the corners curling up. They will straighten out when we are done. If it bothers you too much, you can always stick your page down to a board with masking tape before you begin.
I will be using some of my all-time favourite pens to do the journaling with, the Faber-Castell Pitt Artist's Pens. I choose to use a Fine point pen for this project.
These are the words added to the page:
The measure of a woman lies not in beauty or possessions. It lies not in being a spouse, a mother or friend. It can not be discovered in what she gives or even what she takes. A woman can not be measured by depth or height or breadth. A true woman can only be measured by the fact that she exists and does so fully to the height and width and depth of all she is. Miekie.
I decide to add some subtle stamping to the project. I will be using Tim Holtz's Distress Ink in Walnut for this part of the project.
When I am done, you can see that the corners have already started to flatten out again, but I will put the page under a heavy book to make sure it flattens completely before I slide it into my album.
And there you have the finished project. I hope you enjoyed this as much as I did.
For more crafty ideas and great products, visit APrettyTalent.com.
Remember to keep nurturing your TALENT for making PRETTY things.
You can subscribe to this blog and receive regular updates by email by simply registering your email address at the top of the current blog.


No comments:
Post a Comment