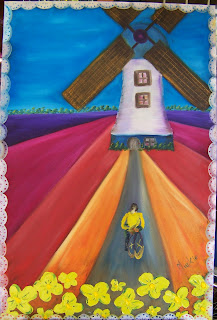
This is what our painting looked like when we left off yesterday. Now let's finish it.
I am going to start on the flowers at the bottom of the picture. I turn my canvas upside down to make it easier to reach them. This is not always possible in a painting, but this time it will not make any difference to the outcome.
I prefer to turn the Yellow Green that I'm using even more yellow and add Cadmium Yellow Deep to achieve the desired colour. I find the colour is too vibrant and tone it down by adding Titanium White. The best way to mix colours is to use a palette knife.
I use two palette knives in my painting. The bigger one is used on the bigger flowers and the smaller is used to lather the paint onto the smaller flowers.
When I am done, I squeeze pure Cadmium Yellow Deep onto my palette and dab this onto the centres of my flowers with the tips of the palette knives.
I now turn my palette the right way up again. I am now going to work on the lace border.
The lace will be painted with Titanium White. There are actually very few pure white occasions in art since white reflects the colours in its vicinity. To help me achieve this I am relying very heavily upon the fact that the oil colours next to the lace is still wet. I am purposefully going to sweep this into the edges of my lace. I am also going to use my soiled oil to make sure that my white is not too clean and stark. I dip a Filbert brush into the oil and then into my white. A Filbert brush is flat with rounded ends.
I paint the semi-circles of the lace in one clean sweep each.
Can you see how I take care to pull the adjoining paint into the lace?
The edges on the laces are all different colours reflecting the adjoining colours. Even though our painting is not intended to be realistic, it still needs to be believable. This helps to achieve that result.
Never underestimate the value of green in a painting. This one is sorely lacking in green and we will now add that. I use a small filbert brush and Terre Verte green to paint a line of trees and shrubbery on the horizon as well as at the foot of the windmill.
Simply dab the paint on in very quick movements. Make sure to leave gaps and to create random heights. Small twists of the wrist will help you achieve this. Don't overload the brush. This is dry brush painting. I did not use oil for painting the shrubbery.
This is looking nice, but we need highlights in this dark green. I go back to the Yellow Green from before and add highlights to the left tops of the protruding tips. I do this with the same rapid movements from before.
I am going to return to the lace now. I want to create the impression that you can see through the lace onto the background behind it. That is why I keep changing colours while painting the detail of the lace to match the colours of the surroundings. I start at the top with the Ceruleum Blue.
The lace seems more intricate that it really is. I use a very small flat brush with short hard bristles. I dab 5 equally spaced dots at the rounded edge of each semi-circle, using the broad side of the brush. I then make three short swipes of the brush, using the thin side of the brush, to create the inner detail on the straight edge.
Note how I have changed colours to paint the detail on the lace.
It is time to add the cyclist I took out yesterday. I randomly select colours already on my palette to paint the impression of a cyclist rather than to paint a detailed cyclist. This suits the style of the painting much better. I start by simply dabbing colours onto the canvas to establish the most important shapes of the figure.
When I am satisfied with the dimensions and sizes, I add more paint, being careful not to overwork the figure.
It is time to step back and evaluate the picture. I decide that the flowers in the foreground needs an impression of depth. I use a small flat brush to very lightly dab Terre Verte green onto the flowers taking care not to disturb the impasto lines.
At this stage I am satisfied with the painting and decide to add my signature. I use a Rigger brush to do this. A rigger brush has very thin long bristles and was developed to paint the rigging on ships. It is brilliant for signing your name with. I dip into the greens and add my signature.
The opinions of others are not always valid, but when the first two people to see the finished painting commented that they missed spokes in the wheels, I paid attention and quickly added the idea of spokes. I dipped the sharp edge of a palette knife into the greens and very lightly touched it to the inside of the wheels. You can only see all the spokes on a stationary bike. I therefore paint only a few that the light seem to reflect off.
This time I was really done.
You are free to use your own colours, but here are the products I used grouped together.
For more crafty ideas and great products, visit APrettyTalent.com.
Remember to keep nurturing your TALENT for making PRETTY things.
You can subscribe to this blog and receive regular updates by email by simply registering your email address at the top of the current blog.


No comments:
Post a Comment