Attaching the pockets to the side panels
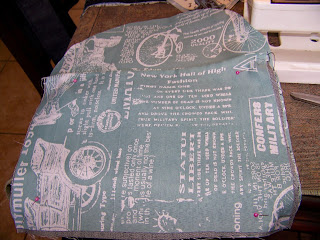
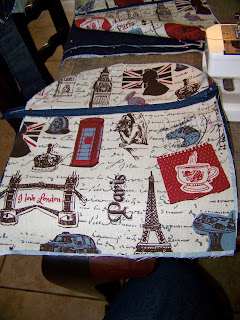
It is time to attach the pockets to the side panels. Lay the inside zipper pocket on the side panel cut from lining. Line the two pieces up at the top and pin them together.
Turn the pieces over. The zipper pocket will be slightly longer than the panel due to the extra length added by inserting the zipper. Trim it back so the they are the same length.
Starting at the zipper, sew all around the top, ending at the other end of the zipper. Seam allowance should be more or less the width of the foot on the sewing machine. This stitch is simply intended to keep the pieces together. You will find this invaluable when you do the last sewing by hand.
Lay the inside open pocket on top of the lining's side panel and pin it in place. There is no sewing yet for this step.
When it comes to the outside zipper pocket, we follow much the same rule. Line the pocket and the panel up at the top and pin in place. Turn it over and trim the excess length on the pocket back. There is no need to do the stitch at the top as you did for the lining, since this will not be sewn be hand and all the layers will be caught in the seam when we attach the zipper. The outside open pocket was already attached when we divided the pocket in two by sewing down the centre.
Attaching the zipper to the side panels
We are now going to attach the zipper to the side panels. Find the centre of the zipper by folding it in half. Mark centre on both sides of the zipper with a pin.
Find the centre of the side panels by folding them in half in the length and mark the centres with a pin. Mark both the top and the bottom, since you will need to use the centre at the bottom when we attach the base of the bag.
Line the centre of zipper up with the centre of one of the side panels and pin together. Make sure to fold the lining of the zipper back so it does not get caught in the pinning and sewing.
Pin the zipper to the side panel. Use enough pins to maintain a proper curve.
When you reach the pockets, do not pin any further. We will use this seam allowance to attach the base to the zipper.
Sew all along the top, starting at the pocket and ending on the other end of the pocket. The seam allowance is 1,5 cm.
Line the leftover side panel up with the zipper at the centre. Pin all the way around from pocket to pocket, just as for the other side.
Remember to leave the seam allowance at the pocket ends unpinned.
Sew from pocket to pocket. The seam allowance is 1,5 cm.
When you are done, this is what it should look like. I have folded the lining back so you could see the seams on both sides of the zipper. At the top is the inside view and at the bottom is the outside view of the bag.
Since the zipper is on a curve, we need to create space for the seam allowance when we turn it over. Cut spaces into the seam allowance taking care not to cut into the sewing. Do this on both sides of the zipper.
In order to attach the base to the bag, we need to once again find the centres. Mark the centre of the base on both sides with a pin.
Line the centre of the base up with the centre of the pocket and side panels. Pin in place.
Pin all the way around. When you reach the corners, you can simply fold the corner in as shown and continue pinning all the way to the top of the pocket. Leave the seam allowance unpinned at the top. This is where we attach the base to the zipper.
This is what the base should look like when it is pinned in place. Allowing 1,5 cm for the seam, sew from pocket to pocket all around the bottom of the bag.
Repeat the same steps for the other side panel and attach it to the base.
We will eventually need to turn the bag the right side out. When we do, we will find that we have excess fabric in the corners which will make it impossible to get a neat corner. Cut this excess fabric away.
Attaching the base to the lining
Find the centre of the base for the lining and mark both sides with a pin.
Find the centres of the side panels and mark with a pin.
Attach the base for the lining exactly the same as for the bag.
Sew, allowing 1,5 cm for the seam.
Repeat the same steps for the other side of the lining.
The lining does not get turned over and therefore you do not need to cut away excess fabric in the corners.
Attaching the sling
Slide the sling into the bag at the openings on the side where the base and zipper will soon be attached.
Line the zipper up with the seams from the zipper and the base, taking care to position it right across the centre of the zipper.
Pin the sling securely. Pin the rest of the seam as well.
Starting at the centre, right next to the zipper, sew to the side. Turn the bag around and sew from the zipper out again.
Repeat for the other side of the bag.
Finishing by hand
Turn the bag right side out and put the lining inside, fitting it in properly.
Now turn the bag inside out again, taking care that the lining remains in place.
Pin the lining of the side panel to the lining of the zipper. This is where you will find that it helped to have that little stay stitch at the top of the side panel with the inside zipper pocket. Pin all the way around, including the sides where the base and the zipper are attached.
Neatly close the bag by sewing the lining by hand.
This is what the inside of the bag looks like when you are done.
This is the outside of the bag, showing the side with the open pockets.
This is the outside of the bag showing the side with the zipper pocket.
For more crafty ideas and great products, visit APrettyTalent.com.
Remember to keep nurturing your TALENT for making PRETTY things.
You can subscribe to this blog and receive regular updates by email by simply registering your email address at the top of the current blog.


No comments:
Post a Comment