One of the groups I am part of on Facebook came up with the idea to make a Creative Roll and then the members share it among each other. Or perhaps they borrowed it from somewhere? Anyway, I loved the idea and jumped at the chance to be a part of this. The idea is to cut a length of fabric to which you attach all sorts of nick knacks which can be put to creative use. I expand a bit on this idea in today's blog. All of the products listed in this discussion are available in APrettyTalent.com. Simply click on the highlighted word for easy navigation to the listed products.
The first thing I did when I received the name of the person who was to be the recipient of my gift, was to befriend them on Facebook. I then went through their profile to find out what kinds of crafts they were into. It seemed rather general, which opened a range of possibilities to me. I would also keep it general then. I started by cutting a strip of fabric approximately 25 cm 'long', the full width of the fabric, i.e. 150 cm. I folded this in four to make it easier to maintain a straight line when cutting.
Stickers can be used in a variety of crafts and I noticed a photo of Madagascar, the movie, among her albums. I therefore opted for this sheet of stickers which reminded somewhat of the characters.
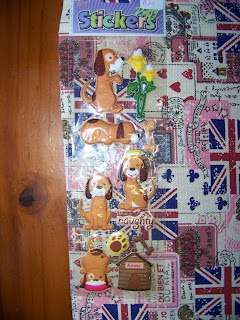
I added a second sticker sheet because it seemed she was a dog lover.
I then added a packet of die-cut tags since this is another product that can easily be used in many crafts, or simply attached to a gift.
I then added a couple of die-cut snowflakes and teddy bears to decorate the tags with.
I then added a couple of bags with ceramic creatures. These are great for mosaic projects, but work just as well in other crafts.
I then decided to shift my focus to art and included a small A5 paper pad for oil painting.
It seemed natural to then add a collection of 12 oil pastels as well, making sure that they are brilliant quality, as Faber-Castell always is.
A palette knife is so exceptionally useful for so many things that I simply had to include one of these.
What art supplies without a paintbrush. I added a popular no. 6 Round.
I realized that it would make perfect sense to add some good quality drawing pencils and included Cretacolor HB and 7H to the roll.
After this I really splashed out a bit by including four Derwent Pastel pencils. This is a brilliant product to which I really should devote a blog one of these days. These pencils can be bought in sets or individually.
It seemed logical to include a good quality eraser and a rare sharpener as well.
I added a little bag of sequins to fill the void.
I then added a small bag of colored ice cream sticks, another very versatile product.
Two bags with metal embellishments could be used in paper crafts, jewelry making, mosaics, fabric craft and so much more.
It was time to move solidly into fabric crafts and I added a bag of fabric embellishments.
I then added a few strips of pre-cut ribbon lengths.
Lastly, I cut approximately 1 m lengths of a variety of ribbons to fill the remaining space on the fabric.
The suggestion was that we should attach the elements with a glue gun since it would be easy to remove again. I realized that it should be possible to use pins to attach them to the fabric. These, when collected would make a substantial contribution to the gift. Bonus! The ribbons were simply speared with the pins.
The bags were pinned through the holes on which they hung.
A few items were not packaged in bags and I quickly 'bagged' them.
This then is what the roll looked like when I was done.
Since I had a number of bigger obrjects in the roll, I could not roll it tightly, but opted to rather fold it over again and again.
The whole roll was then stuffed into a padded envelope.
All that was needed was a pretty card to complete the gift. I decided to use a card I had made in a previous blog on using Posca Markers to draw a butterfly.
I wrote the message in the card in a coordinating red using a Pentel Marker.
All that was left was to add the card to the envelope and to seal it. A Pretty Talent works very closely with trusty couriers who would make sure to have the parcel at its destination in no time and without incurring any damage.
For more crafty ideas and great products, visit APrettyTalent.com.
Remember to keep nurturing your TALENT for making PRETTY things.
You can subscribe to this blog and receive regular updates by email by simply registering your email address at the top of the current blog.


No comments:
Post a Comment