Start by preparing a large oven dish with non-stick spray. Put it aside.
You will need to add 4 cups (4 x 250 ml) cake flour and 1 teaspoon (5 ml) salt to a large mixing bowl.
You will also need 200 g butter/margarine and ice cold water.
Dip your butter in the flour in your mixing bowl and grate it into the flour. Dip it every so often as you continue to grate. This will prevent the butter from sticking to the grater and to itself. Rub the butter into the flour until it resembles something like breadcrumbs.
Add just enough ice cold water to bring the dough together into a hard dough ball. You will need 50-100 ml water, but I suggest you add the first 50 ml and then add the water a tablespoonful at a time. It is very easy to get the dough too wet.
Form your dough into two balls and put in the freezer.
Now I am going to prepare the Pinda Satè. All you need is milk, peanut butter, salt and some flour.
Measure 350 ml milk in a jug.
Add 100 ml peanut butter.
Empty into a saucepan and bring to the boil while stirring/whisking. The peanut butter will eventually melt.
Add a little salt to taste. I find the peanut butter is a little too sweet and adding about a teaspoon (5 ml) salt, brings it back to a more savoury flavour. Mix a tiny bit of flour (25-50 ml) with water to create a flour paste with which to thicken the sauce.
Thicken the sauce and remove from the heat. You may want to leave adding the salt up to this stage. It will make no difference to the results.
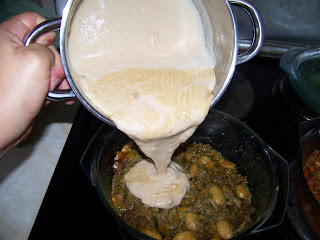
You now need to add the sauce to the meat you wish to bake in a pie. I added it to two dishes I had recently shared with you in the blogs, namely Chili Con Carne and Kapucijners. We still had leftovers and wanted to do something new with it. The Pinda Satè works well with both these dishes. I absolutely prefer it with hot meat dishes, but that is a personal preference of mine.
Heat up the leftover meat dish(es) and stir the Pinda Satè into it. Put it aside.
Take your dough out of the freezer. Place one of the balls on a lightly floured surface and put the other one in the fridge (not freezer) to remain cold. Roll the dough out to fit your dish.
Cover the dish bottom and sides with the dough. Prick the bottom to allow air to escape. Trapped air will make the dough bubble up (with trapped air bubbles).
Put your meat in the pie dish. If you are using two meat dishes in one pie, you need to determine if they should be added now, or later when the division has been inserted. It all depends on how runny your mixture is.
Pinch a tiny bit of dough off your second dough ball. Flatten it into a long strip with the rolling pin.
Use this dough strip as a division between you dishes. Spread the filling evenly once the division is in place.
Roll out the second dough ball to fit on top of the pie dish.
I neglected to show you this earlier, but the easiest way to transfer dough is to roll it up on the rolling pin ...
... and to unroll it over the dish.
Pinch the sides and the dough lid together. You can do all sorts of things to make this look good, but I did not bother as I had a house full of under-aged visitors again who were complaining that they were hungry.
Prick the dough lid to allow steam to escape. Trapped steam can cause your lid to 'explode' as it searches for a place to 'get out'.
Brush some egg white or egg yolk on top of the dough to give a pretty golden sheen once baked.
Bake the pie for roughly 30 minutes at 200 °C, or until the crust is golden brown and crispy.
As I had two different pies in one dish, I had to serve from both sides.
The pie was served with the leftover Pinda Satè. Did my audience love this? Yes, absolutely! But I only told them about the peanut butter once they had declared their appreciation. No need to wake sleeping dogs ahead of time! Did you catch me winking at you?
Marietjie Uys (Miekie) is a published author. You can buy the books here:
You can purchase Designs By Miekie 1 here.
Jy kan Kom Ons Teken en Verf Tuinstories hier koop.You can purchase Designs By Miekie 1 here.
Jy kan Kom Ons Kleur Tuinstories In hier koop.
Jy kan Tuinstories hier koop.
For more crafty ideas and great products, visit A Pretty Talent on Facebook.
Remember to keep nurturing your TALENT for making PRETTY things.
You can subscribe to this blog and receive regular updates by email by simply registering your email address at the top of the current blog.


No comments:
Post a Comment