I walked into a fabric store and bought this fabulous collection of fabric.
I did not have a pattern, but I had a fairly good idea of what I wanted to do. This pattern can not be cut on the fold, but has to be cut single. This is what gave me the idea of making a skirt for my mom as well. It seemed a silly waste of fabric to cut two of these awkward shaped from piece of fabric, when four would fit so nicely across the width of the fabric.
These are two shapes I would use as patterns for the rest of the cutting.
A second fabric.
A third fabric.
A fourth fabric.
A fifth fabric.
Finally, a sixth fabric to cut the panels from.
I then cut a semicircle from paper, 29,5 cm in radius.
I cut 12 pieces of these from red netting.
These 12 pieces were then cut into quarter circles, with 12 quarters for each skirt.
All that was left to cut, was the waistbands for the skirts.
I started by folding the waistband in half and sewing one end closed.
The other end of the waistband was sewn like this.
Overlock/zigzag all of the panels.
Pin the panels up to only to 31 cm from the hem of the skirt.
Sew two panels together up to the 31 cm mark.
Iron the panels open. Find a 20/25 cm zipper.
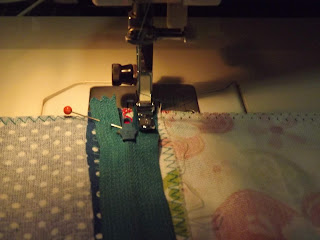
Pin the zipper to the seam.
Sew the zipper into the skirt.
Open the seam over the zipper.
Pin the netting to the opening at the bottom of the seam.
Sew one side of the netting to the seam.
Sew the other end of the netting to the seam.
Once all of the panels are sewn together, sew the waistband onto the skirt.
Set your machine to do top stitching.
Fold the other end of the waistband in and sew with a neat top stitch.
Sew a buttonhole.
Sew a button onto the waistband.
Add loops to the waistband to hang the skirt on a hanger.
Fold rolled hems at the bottom of the skirt.
Hem the skirts.
You can also watch a compilation video of the steps on YouTube:
https://youtu.be/iVcCAZK0VN8
Marietjie Uys (Miekie) is a published author. You can buy my books here:
You can purchase Designs By Miekie 1 here.
Jy kan Kom Ons Teken en Verf Tuinstories hier koop.
Jy kan Kom Ons Kleur Tuinstories In hier koop.
Jy kan Tuinstories hier koop.
You can follow Miekie's daily Bible Study blog, Bybel Legkaart, here in English & Afrikaans.
You may prefer to follow the traveling blog, A Pretty Tourist.
For more crafty ideas and great product reviews, visit A Pretty Talent on Facebook.
If you are in a literary mood, follow Miekie's musings, stories and poetry on A Pretty Author - Miekie.
Remember to keep nurturing your TALENT for making life PRETTY.
You can subscribe to any of these blogs and receive regular updates by email. Simply register your email address at the top of the applicable blog.


No comments:
Post a Comment