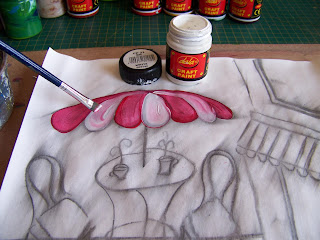
I decide to do the cafe scene on 12" x 12" 80 gsm white paper, just like the scene for the Art Therapy blog. Once again, I need to strengthen the paper to take the heavy paint. I do this by giving it a coat of Dala Gesso.
Once the gesso is touch dry, I begin a charcoal sketch. Using charcoal will leave my paint slightly muddy, which is a finish I like for this project. If you want to retain 'clean' colours, I suggest you rather use a hard pencil that will leave very feint marks. By the way, once the gesso is completely dry, those bubbles and warps on the paper will flatten out again. Don't get stressed over them at this stage.
With the upstairs apartment drawn in the first step, I now start drawing the canopy.
Continuing the drawing of the canopy.
Adding the fringe to the canopy.
Draw in the store front with its window.
Draw the upstairs window.
Draw the horizon where earth and sky meet.
Draw the table top and its support. Note that as this painting is in a whimsical style, I do not get hung up on proportions, or even perspective.
Add the table legs.
Add an umbrella for the table.
Draw the detail in the umbrella.
Add seats for the chairs.
Draw legs for the seats.
Add chair backs.
Now add two steaming mugs of coffee.
With the drawing complete, I contemplate which paints to use. I love the vibrant colours of Dala Craft Paints, that I used in the Art Therapy blog. It is an easy decision to continue working with these paints. You may note that I have been mixing my own colours from these paints as well.
Not wanting the charcoal to muddy my painting too much, I brush the excess charcoal away with a clean dry brush.
I paint every alternate section of the umbrella Red using a flat brush.
The open sections are painted white, while the red is still wet. That way I pick up some of the red in the process, dragging it into the white. This is good, as you seldom get true white in real life. White tends to reflect the colours in its vicinity.
The canopy is also painted Red, in the same way as the umbrella was.
The alternate sections are again painted white.
The trimmings on the building is painted Turquoise.
The building itself is painted a subtle Duck Egg.
The ground is painted in a colour that I mixed myself.
The sky is painted a too brilliant blue that I have mixed. The sky gets to be too brilliant when we have coffee with friends!
The table top and chair seats are painted a vibrant Lime.
Windows also reflect the colours in their vicinity. I start with the Lime that is already on my brush and make loose colour strokes in the windows.
I do the same thing with all of the other colours I used in my painting to create the impression of reflecting windows.
I then switch brushes for the first time in the painting to a round brush. I paint the cups Custard Yellow.
The umbrella's pole, the table legs and the chair legs are all painted Burnt Orange.
The coffee in the cups and the steam is painted the same mix as the ground.
I wait for the paint to dry and then find Dala Acrylic Drawing Ink in Black and a Dip Pen.
I find it easier to gauge how deep I dip the pen when I pour some ink into the lid. Do not overload your pen or it will leave blotches.
I outline the whole drawing with the acrylic ink.
Isn't this a fun painting to hang in your house?
Marietjie Uys (Miekie) is a published author. You can buy the books here:
You can purchase Designs By Miekie 1 here.
Jy kan Kom Ons Teken en Verf Tuinstories hier koop.You can purchase Designs By Miekie 1 here.
Jy kan Kom Ons Kleur Tuinstories In hier koop.
Jy kan Tuinstories hier koop.
For more crafty ideas and great products, visit A Pretty Talent on Facebook.
Remember to keep nurturing your TALENT for making PRETTY things.
You can subscribe to this blog and receive regular updates by email by simply registering your email address at the top of the current blog.


No comments:
Post a Comment