
This is the tatty old jeans from the front.

This is the back.

What makes jeans special, are the top-stitching on its features. The waistband with its basque, the pockets, the zipper, and all of the studs, are all things which ought to be retrieved before turning the rest into rags. You may also find interesting fasteners, loops, bands, cuffs, and other such things, depending on the design of your jeans. Mine had been too big for me, and I had caught it in the center back to make smaller. I took this seam out to reveal the original top-stitching. The colour diffrence was marked, but this would add interest to the finished product and I decided to make this a feature.

The next step was to lay the pieces out on the boards. These had already been prepared with universal undercoat, as well as being edged at the suppliers.

I realized I would have to cut some of the pieces smaller and did so, making sure to keep any feature pieces.

Successful ironing is key to the success of this project. Iron all of the pieces flat and fold the edges in. Iron these folded edges flat.

This is what the zipper and button looked like after I had ironed it flat, folding the edges in. This is a much tidier item to work with, which will speed things up later on, as well as guaranteeing a successful outcome.

I cut the insides of the pockets away as I would be creating a backing for the pockets against the board.

I did not want to loose the belt straps in the fold and unpicked them to use elsewhere.

The edges were then folded in and the pocket ironed flat.

As this storage was intended for a teenage boy's room, I decided to keep the bottom edge of the basque at the back frayed, giving it a much more informal, and dare I say sexy, appearance.

The back pockets often have interesting shapes. Make sure to retain these shapes when ironing the edges of these pockets.

The back pocket with its edges ironed flat.

The layouts of the boards are now starting to look much better after all the pieces had been ironed. Note, that I even iron the belt straps!

I want to decoupage matching fabric onto the boards, rather than painting the background, as I did for the previous project. I found this gingham pattern to use.

I measure the boards and then cut the fabric to fit perfectly on the boards.

These fabric pieces are then also ironed flat, making it easier to work with and resulting in a neat finish.

I paint Dala Acrylic Gel Medium on the universal undercoat. If you paint the Acrylic Gel Medium directly onto the board, the board will absorb too much of the medium, making it much more expensive, as well as compromising the success of the outcome. Paint a thick layer of the medium and do not waste any time to get the fabric on, or the medium will start to dry.

Carefully lay the fabric on the wet Acrylic Gel Medium, making sure to work any creases and bubbles out to the sides.

Paint yet another thick layer of Dala Acrylic Gel Medium on top of the fabric to seal it and to secure it to the board. Do this with both boards. Leave to dry.

Once the decoupaged fabric is dry, you can decide on the final layout of your pieces. I found some embroidered embellishments to use with the jeans.

You will now need some upholstering tacks, small nails and eye hooks.

Secure all the pieces to the boards by nailing upholstery tacks into the corners.

The top board with all the corners secured. Note how I had used different heights in my arrangement of the pieces, as well as allowing some elements to lie diagonally on the surface.

The corners on the bottom board were also secured with upholstery tacks. Once again I turned some pieces diagonally, while leaving others straight on the horizontal and/or vertical lines.

I then hammered the small nails into the open spaces between the upholstery tacks, securing the pieces to the boards, as well as creating the pockets that will serve as storage space. Both the tacks as well as the nails serve a decorative as well as a functional purpose. Select these carefully.

The top board once completed.

I now measure 10 cm in from the edges of the boards and mark these spots.

I align the hooks on these spots and lightly tap with a hammer to penetrate the sharp points into the wood.
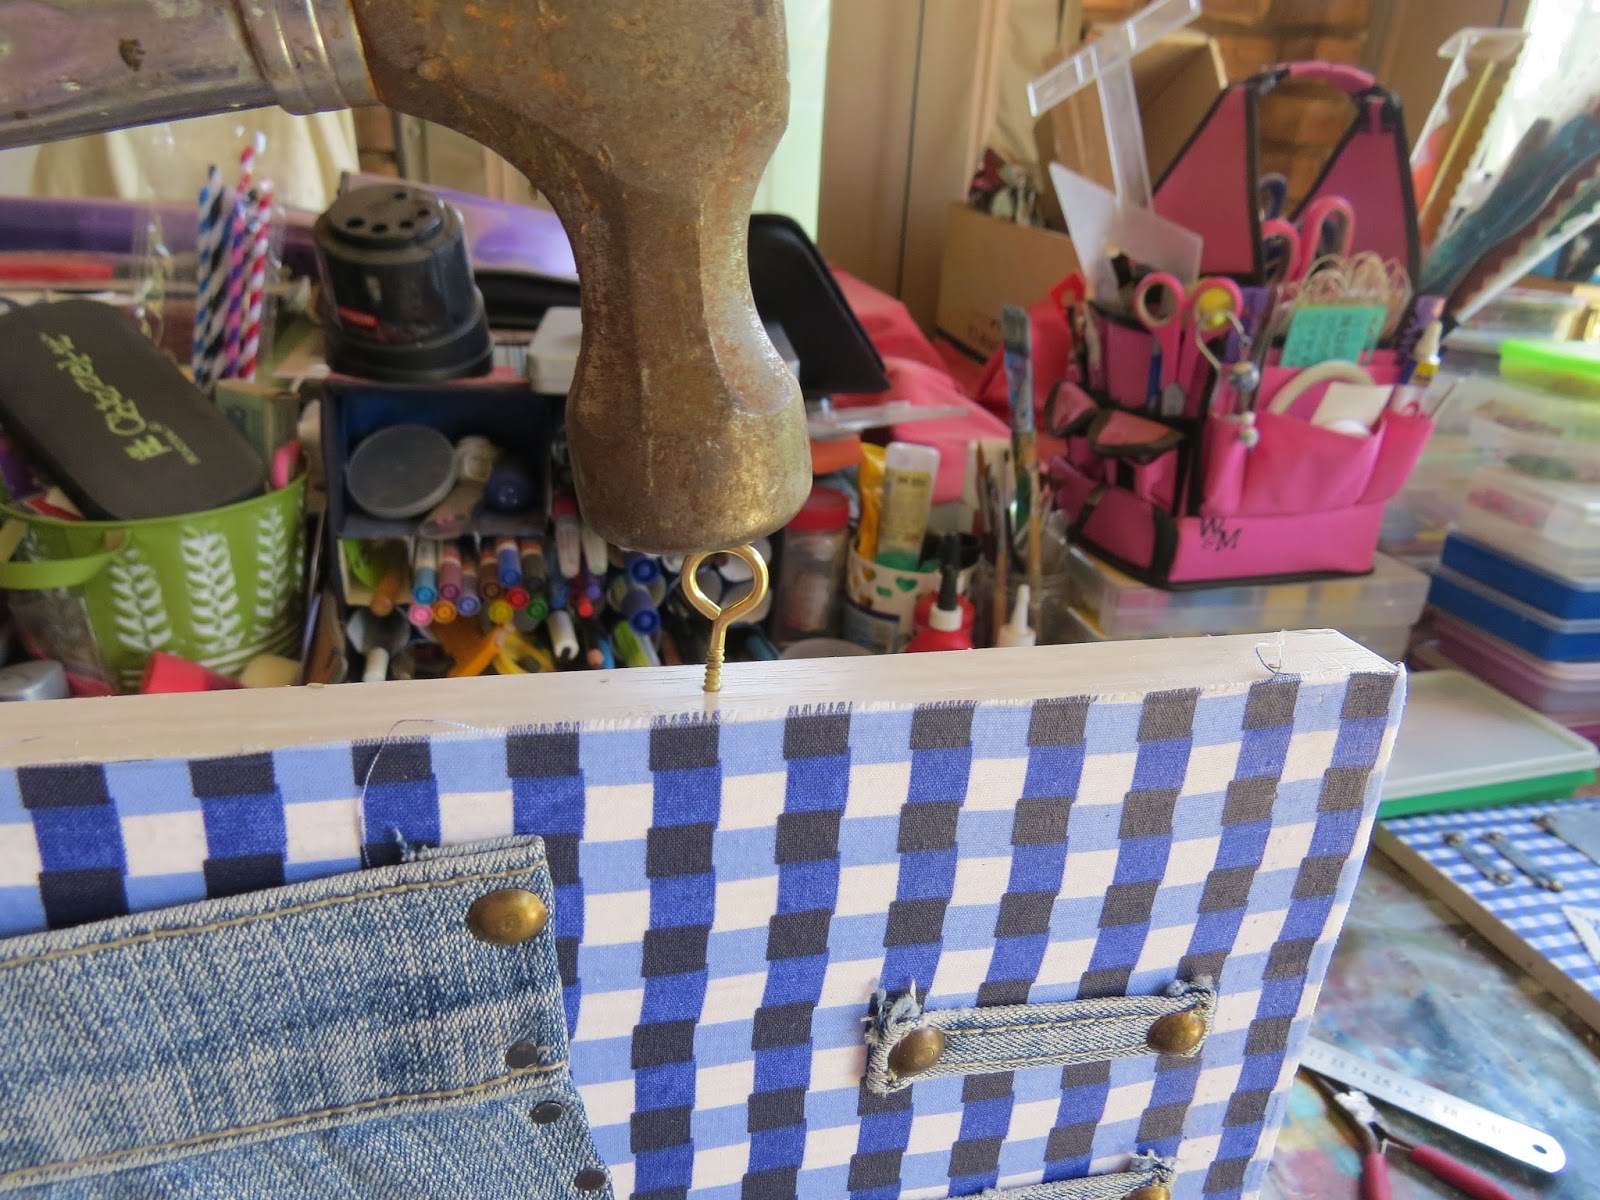
The hooks are then screwed into the wood by hand. You can also use pliers. You will need two hooks on the top edge of the bottom board. You will need two hooks each on both the top and bottom edges of the top board.

Measure 10 cm on your chain and cut two pieces of 10 cm. Cut another piece of 50 cm.

Use pliers to bend the loops on the hooks open. Slip the chain in and close the loop with your pliers. At this stage a very interested little boy appeared and immediately volunteered to assist.

It requires less effort than this little face lets on.

With all of the chains in place, you can hang the boards on a wall. I hung it on the easel behind me, which was standing by.

This is what the finished product looks like with all of the background distractions removed.

My assistant and I then had loads of fun stuffing things into the pockets so I could take this shot to demonstrate the use and versatility of the storage boards.

Marietjie Uys (Miekie) is a published author. You can buy the books here:
You can purchase Designs By Miekie 1 here.
Jy kan Kom Ons Teken en Verf Tuinstories hier koop.You can purchase Designs By Miekie 1 here.
Jy kan Kom Ons Kleur Tuinstories In hier koop.
Jy kan Tuinstories hier koop.
For more crafty ideas and great products, visit A Pretty Talent on Facebook.
Remember to keep nurturing your TALENT for making PRETTY things.
You can subscribe to this blog and receive regular updates by email by simply registering your email address at the top of the current blog.
No comments:
Post a Comment