When I left off at the previous blog, we had a lovely coloured picture that would probably end up in a cupboard somewhere if we did not find a use for it.
As my picture is A4 in size, I needed to make a card that was double that. A3 is double A4, and therefore perfect for the job. I opted to use a green that echoed the center of the butterfly.
As I stated in the previous blog already, I did not wish to retain the white areas of the coloured page, I would therefore need a different background. I searched among my 12" x 12" craft paper and found one that I liked. It underscored the idea of a flower garden.
Fold the A3 cardboard in half to create the card.
Crop the craft paper to be slightly smaller than A4 so as to fit on the card, leaving a little edge on all 4 sides.
Ink the edges of the card.
Ink the edges of the matting.
Use double-sided tape to attach the matting to the card.
Carfully cut the flowers and the butterfly out. I switch to a craft knife for the delicate areas.
Cut a little ways into the petals of the flowers to separate them slightly. Cut about halfway into the petals, along the petal lines.
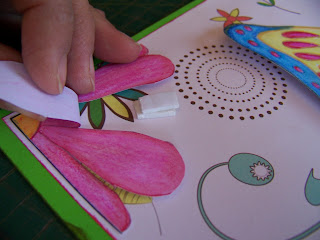
Use double-sided tape on the center of the flower, as well as the two outer petals. Use 3-D double-sided tape on the 2nd and 4th petals and use 2 layers of 3-D double-sided tape on the petal in the middle.
Here you can see the double layer of double-sided tape for the center petal.
You have just created a gradual incline and decline for your petals, making the card ever so much more interesting than it would be otherwise.
Repeat these steps for the other flower as well.
Cut apart the wings on the butterfly in the same way that you cut the petals on the flower.
Use double-sided tape on the body of the butterfly. Use 3-D double-sided tape on the back wings and use two layers of 3-D double-sided tape on the front wings..
I use the fine point on my Tombow glue dispenser for the areas that were too small to be attached with double-sided tape.
When you stick your butterfly in place, you will have created something that simulates flight by creating different depth perspectives.
Note how the butterfly seems to be pulling up and away from the page.
As a last surprise element, I add a few scattered rhinestones to the flowers in the background. I keep these to a minimum so as not the detract from the focal point, which is the butterfly.
Adding a tiny bit of bling to the background, pulls it into the picture, ensuring that it is not viewed as an accidental background.
Not taking the time required to colour the picture into account, this card can be made in about half an hour or so. Well worth the trouble, wouldn't you agree? Imagine how happy you can make a teacher's heart if you present her with such a happy card to thank her for the hard work and effort she put into your child. Or who do you have in mind for your card?
Marietjie Uys (Miekie) is a published author. You can buy the books here:
You can purchase Designs By Miekie 1 here.
Jy kan Kom Ons Teken en Verf Tuinstories hier koop.You can purchase Designs By Miekie 1 here.
Jy kan Kom Ons Kleur Tuinstories In hier koop.
Jy kan Tuinstories hier koop.
For more crafty ideas and great products, visit A Pretty Talent on Facebook.
Remember to keep nurturing your TALENT for making PRETTY things.
You can subscribe to this blog and receive regular updates by email by simply registering your email address at the top of the current blog.


No comments:
Post a Comment