I start by cutting a 12" x 12" silver cardboard sheet in half to measure 6" x 12".
I then fold the cardboard in half to form the card.
I cut a piece of plain white printer paper to measure 5,5" x 5,5".
I cut a piece of vellum to measure 5" x 5".
Raw handmade paper is cut to measure 4,5" x 4,5".
I then mimic these same sizes on another piece of white paper to ensure my drawing fits properly on the card.
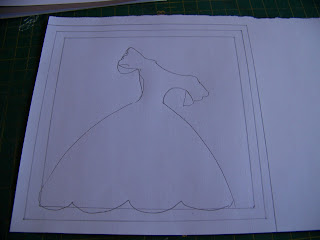
I draw the dress to fit inside the smallest of the squares.
I then carefully cut the drawing out with a craft knife.
I double-check to make sure it fits on the red background.
I draw the hems of the skirt and the sleeves smaller.
I crop the hems to the shortened length.
I then trace the sleeves and the skirt on the vellum.
I cut only the skirt and sleeves loose so the dress is still attached to the main piece of vellum.
I once again crop my original design shorter at all the hems.
This time the sleeves and skirt is traced on the white paper.
The traced lines are clearer on the white paper than on the vellum.
I once again cut only these lines open.
Shorten all of the hems once more.
This time the whole dress is traced on the front page of the card. I used a marker as the pencil would not trace on the card.
The traced outline.
I cut this shortest dress loose from the card.
I then add all of the length I've been taking off the different dresses. You don't have to be too accurate, just estimate these measurements. Do not exceed the 4,5" x 4,5" limit of the red paper.
Cut these extra lengths away.
Put glue all around the outline of the dress, on the inside of the card, as well as along the perimeter of the front of the red paper.
Paste this red paper to the card on the inside of the card.
This is what the outside of the card should look like at this stage.
Ink the edges of the white paper, as well as the hems.
A piece of double-sided tape is placed on the bodice of the dress, as well as all around the edges of the white paper, on the wrong side of the paper.
Lay the white paper in place, lining the skirts up.
Use double-sided 3-D squares to lift the sleeves and and the hem of the skirt.
I want a little more of the red to show and very carefully cut away from the hem of the skirt.
That is better.
Glue the vellum sheet as you did the white one.
Cut the skirt and sleeves two lengths shorter.
Line the dresses up at the waist and skirts and stick the vellum in place.
Attach 3-D squares to lift the hem of the skirt.
Glue the silver dress at the bodice and use 3-D squares on the hem of the skirt.
I inked the silver dress as well.
Line the dresses up at the waist and skirts. Stick in place. I used my black marker to tidy up the white frill of the skirt, right on the edge of the bottom white frill.
I use a silver marker to draw very basic body lines for my dancer.
I glue some rhinestone detail to the hem of the top skirt.
I then add an oversized ribbon and rose to the head of the dancer to finish the card.
A close-up of the completed card.
Marietjie Uys (Miekie) is a published author. You can buy the books here:
You can purchase Designs By Miekie 1 here.
Jy kan Kom Ons Teken en Verf Tuinstories hier koop.You can purchase Designs By Miekie 1 here.
Jy kan Kom Ons Kleur Tuinstories In hier koop.
Jy kan Tuinstories hier koop.
For more crafty ideas and great products, visit A Pretty Talent on Facebook.
Remember to keep nurturing your TALENT for making PRETTY things.
You can subscribe to this blog and receive regular updates by email by simply registering your email address at the top of the current blog.


No comments:
Post a Comment