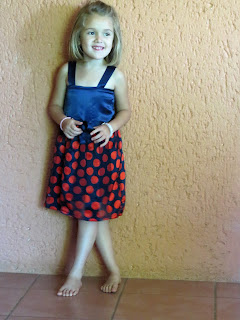
I literally made this dress from scrap pieces of fabric. I had a tiny bit of the dotted fabric left over to fashion into a skirt. A tiny rectangle of navy stretch fabric would have to serve as lining for the skirt. I had a small rectangle to fashion a bodice from and some off-cuts to turn into straps. These pieces were lain on top of an existing dress to determine width, length, etc. for each piece. It would only need to fit roughly at this stage as the actual fitting would be done on the child.
This is the rough idea for the dress, with the lining crumpled up on the side there.
I started by sewing two extra long tubes for the straps.
Turn the straps right side out and iron them flat.
Sew only one side seam for the bodice.
Sew the side seams for the skirt.
Sew the side seams for the lining of the skirt.
Hem the skirt. The lining is cut shorter than the skirt and does not need to be hemmed.
Pin the lining to the skirt at the waist.
Staystitch the lining to the skirt at the waist.
Set your machine to tack.
Tack the combined skirt and lining at the waist.
It is time to fit the bodice to the child. Get the width of the bodice, as well as the length of the straps. Mark the positions of the straps. Shame, that little face tells me how little this girl trusted those pins near her body!
Crop the bodice to the correct size and sew the remaining side seam.
Crop the straps. Fold the top of the bodice over and pin. Pin the straps to the bodice.
Sew the top seam of the bodice, including the securing the straps in place.
Pin the bodice to the skirt at the waist. Tack the skirt to fit the bodice.
Sew the skirt to the bodice. Work slowly to avoid catching the layers of fabric in the seam.
It turned out that I could simply cut one strap in half to create two straps. I was now left with one extra long strap. I folded the ends in and sewed the tube shut at both ends.
I then folded a simple ribbon that I caught with a small hand-sewn stitch in the center.
I then wound the yarn around the center of the bow to crease it in, creating the false impression of a knot.
The bow was then sewn onto the dress by hand.
I added a decorative button to the center of the bow.
I now had a completed dress made from waste fabric. Cute, isn't it?
My niece was so impressed with this dress that she flatly refused to take it off. She could not keep her hands off the bow!
Marietjie Uys (Miekie) is a published author. You can buy the books here:
You can purchase Designs By Miekie 1 here.
Jy kan Kom Ons Teken en Verf Tuinstories hier koop.You can purchase Designs By Miekie 1 here.
Jy kan Kom Ons Kleur Tuinstories In hier koop.
Jy kan Tuinstories hier koop.
You can follow Miekie's daily Bible Study blog, Bybel Legkaart, here in English & Afrikaans.
For more crafty ideas and great products, visit A Pretty Talent on Facebook.
Remember to keep nurturing your TALENT for making PRETTY things.
You can subscribe to this blog and receive regular updates by email by simply registering your email address at the top of the current blog.


No comments:
Post a Comment