Search This Blog

Tuesday, 25 September 2018

How to draw: A Parasaurolophus

I recently went shopping at the famous art shop in Rosebank, Herbert Evans. They were having their annual sale, and a friend and I made an outing of it. When I arrived home with some newly purchased pens, I could hardly wait to put them to the test. My disappointment was great when I discovered that most of the pens I had bought were dry! Today's drawing of a Parasaurolophus was intended to be coloured in a great many shades, but I could simply not get the rest of the pens to work. The restrictions aside, I show you how to go about this simple pen sketch in today's blog.


Start with a sheet of white paper and a pencil.


Draw a large oval for the body. A triangle with an extended side, forms the head.


Draw the tail and mark the tops of the legs with two cicular shapes. Draw the top of the neck.


Draw the legs and the bottom of the neck. Draw the curve in the tail.


Draw the outline of the feet. Draw the detail on the head.


Draw the detail on the feet and the folds in the neck.


Redraw the parasaurolophus in brown ink. Add the folds for the body, for instance at the knees, etc.


Erase the pencil lines.


Use a dark green in the darkest areas of the body.


Use a lighter shade for the highlighted areas of the body.


I barely managed to scrape some colour out of this silver pen, after having discarded four other pens!


I was then forced to use the same green for the foreground and background of the picture.


I was also forced to use the same brown for the shadow areas. Neither of these last two choices were fortunate for the drawing.


The final drawing left me feeling highly dissatisfied!


Marietjie Uys (Miekie) is a published author. You can buy my books here:
You can purchase Designs By Miekie 1 here.
Jy kan Kom Ons Teken en Verf Tuinstories hier koop.
Jy kan Kom Ons Kleur Tuinstories In hier koop.
Jy kan Tuinstories hier koop.
You can follow Miekie's daily Bible Study blog, Bybel Legkaart, here in English & Afrikaans.
You may prefer to follow the traveling blog, A Pretty Tourist.
For more crafty ideas and great product reviews, visit A Pretty Talent on Facebook.
If you are in a literary mood, follow Miekie's musings, stories and poetry on A Pretty Author - Miekie.
Remember to keep nurturing your TALENT for making life PRETTY.
You can subscribe to any of these blogs and receive regular updates by email. Simply register your email address at the top of the applicable blog.

Saturday, 22 September 2018

How to draw: A Spider

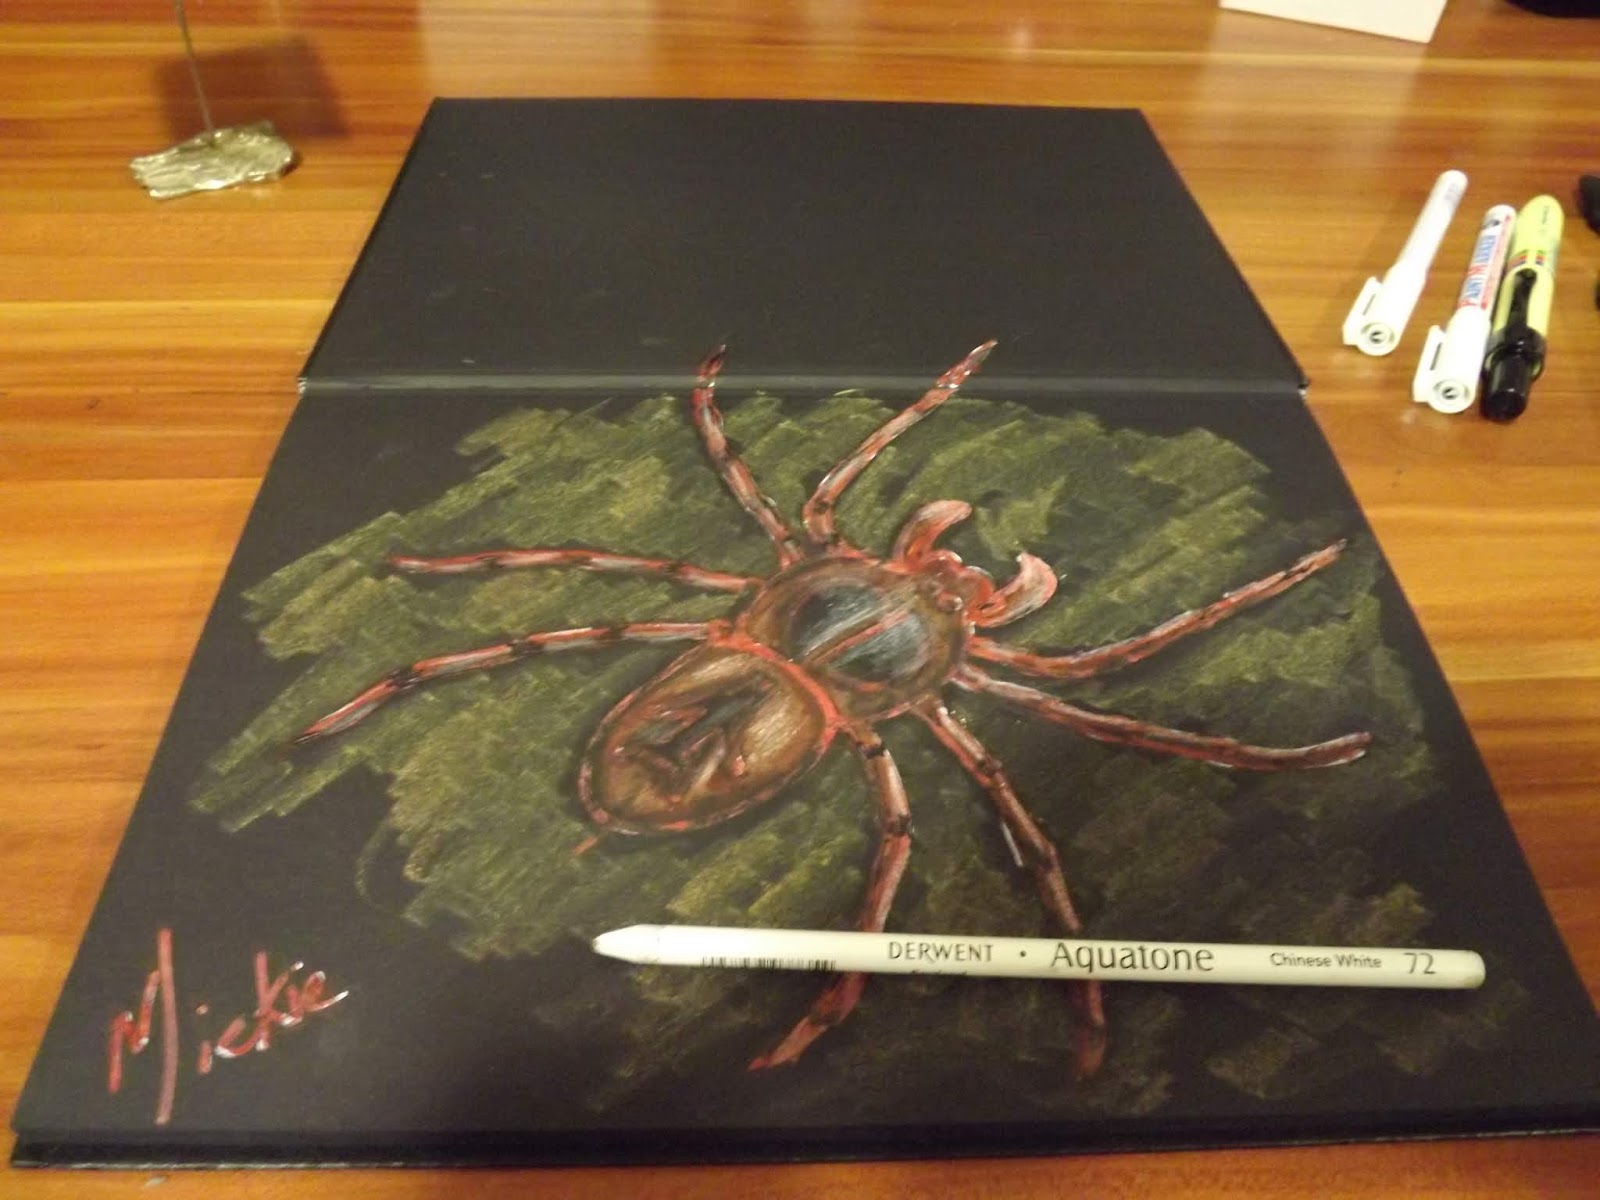
Today's drawing exercise is a little more interesting, as we will be working on black paper, which we have not done in this series, until now. We will be using a chalk pencil to draw with, and white pens to outline our drawing with. We will then cover most of this white when we use the water-soluble Aquatone we used in a previous blog, to colour the spider. However, this time we use the Aquatone dry!


You will need black paper and a white chalk pencil.


Start by drawing an oval with an overlapping circle. Overlap the circle with a semicircle.


Draw eight legs onto the body of the spider. I liked the idea of allowing my drawing to run over onto the next page, but you may prefer to restrict yours to a single page. Shape the jaws and head of the spider.


Complete the legs of the spider and divide it into segments.


Draw the pattern on the back of the spider.


Outline the drawing with a white paint pen.


Erase the white chalk pencil lines with a black eraser.


These are the pencils I will be using to colour the spider with. These colours show off beautifully against the black. These pencils are called Aquatone, by Derwent.


Colour the body of the spider.


'Hide' the stark white pen lines by redrawing them in brown ink.


Colour the background in two tones.


Colour the shape on the back of the spider black. Colour the shaded undercarriage of the spider also black to make its body appear more rounded.


Use a black pen to accentuate certain dark areas where necessary.


Use a white pencil to highlight the areas where the light will reflect off the body of the spider.


Draw in the shadows under the spider's raised legs, using a black pencil.


Add lively dark nuances to the background and shadows with a dark purple pencil.


The completed drawing of the spider.


Marietjie Uys (Miekie) is a published author. You can buy my books here:
You can purchase Designs By Miekie 1 here.
Jy kan Kom Ons Teken en Verf Tuinstories hier koop.
Jy kan Kom Ons Kleur Tuinstories In hier koop.
Jy kan Tuinstories hier koop.
You can follow Miekie's daily Bible Study blog, Bybel Legkaart, here in English & Afrikaans.
You may prefer to follow the traveling blog, A Pretty Tourist.
For more crafty ideas and great product reviews, visit A Pretty Talent on Facebook.
If you are in a literary mood, follow Miekie's musings, stories and poetry on A Pretty Author - Miekie.
Remember to keep nurturing your TALENT for making life PRETTY.
You can subscribe to any of these blogs and receive regular updates by email. Simply register your email address at the top of the applicable blog.

Thursday, 20 September 2018

Chocolate Squares

One of the all-time favourite hits in our house, are these delicious chocolate squares. I have to make them every so often. One thing I have found with them, is that they really are best when I use certain brands of ingredients. I will share my favourite ingredients for this recipe with you in today's blog.


Crush a packet of Marie Biscuits to pieces. I prefer Blue Label Marie Biscuits as they seem to retain their crispness better than the others.


Measure 500 g icing sugar and 4 tablespoons (50 ml) cocoa in a large bowl.


Melt 500 ml margarine on the stove. I prefer Stork baking margarine. On this occasion I did not have Stork in the house and my squares came out much more sticky than usual, as a result.


Add the dry ingredients to the melted butter and continue cooking until the ingredients start making a round shape on the bottom of the pot.


Stir all the while that the pot is on the stove.


Break one egg in a bowl.


Add 1 teaspoon (5 ml) vanilla to the pot.


Add the Marie biscuits to the pot and stir well. Then add the raw egg to the pot. Stir quickly before the egg has time to cook in the scalding hot pot.


Spread the mixture over a deep tray or baking dish that has been prepared with non-stick coating.


Allow it to cool down to lukewarm and then cut into squares. Allow to cool further in the fridge before removing from the tray.


Serve with something savoury as these are very sweet.


Marietjie Uys (Miekie) is a published author. You can buy my books here:
You can purchase Designs By Miekie 1 here.
Jy kan Kom Ons Teken en Verf Tuinstories hier koop.
Jy kan Kom Ons Kleur Tuinstories In hier koop.
Jy kan Tuinstories hier koop.
You can follow Miekie's daily Bible Study blog, Bybel Legkaart, here in English & Afrikaans.
You may prefer to follow the traveling blog, A Pretty Tourist.
For more crafty ideas and great product reviews, visit A Pretty Talent on Facebook.
If you are in a literary mood, follow Miekie's musings, stories and poetry on A Pretty Author - Miekie.
Remember to keep nurturing your TALENT for making life PRETTY.
You can subscribe to any of these blogs and receive regular updates by email. Simply register your email address at the top of the applicable blog.

Tuesday, 18 September 2018

Bacon & Corn Muffins

It was time for a tea party to celebrate the fact that I had moved into a new place. Who better to invite than the friends who have been a part of my life since varsity? We got together one Saturday morning, and I quickly rummaged through the house to find something to bake. My thoughts settled on Bacon and Corn Muffins. These turned out very deliciously. Fortunately, I had taken photos of the steps and am therefore able to share this recipe with you.


Fry 250 g bacon bits in oil.


Brown two large chopped up onions in oil.


Measure 2 cups (500 ml) cake flour, 4 teaspoons (20 ml) baking powder, 1/2 teaspoon (2,5 ml) salt and 2 tablespoons (25 ml) sugar in a bowl.


Boil 1 cup (250 ml) corn in water, or drain a tin of corn.


Add the cooked corn, fried bacon and browned onions together in a bowl.


Add a cup (250 ml) of grated cheddar cheese to the dry ingredients and mix well.


Add a cup (250 ml) of milk, 1 egg and 4 tablespoons (50 ml) butter/margarine to the fried ingredients.


Add 2 teaspoons (10 ml) crushed garlic to the wet ingredients. Add 1 teaspoon (5 ml) each of oregano, parsley and sweet basil to the dry ingredients.


Mix the wet ingredients well.


Add the dry ingredients to the wet ones.


Mix well.


Scoop into muffin pans, or small bread pans.


Bake for 30 minutes in a preheated oven at 180°C.


Allow to cool slightly in the pan.


Remove from the pan and allow to continue cooling on a wire rack.


These muffins have enough 'wet' ingredients to as to not need butter.


Marietjie Uys (Miekie) is a published author. You can buy my books here:
You can purchase Designs By Miekie 1 here.
Jy kan Kom Ons Teken en Verf Tuinstories hier koop.
Jy kan Kom Ons Kleur Tuinstories In hier koop.
Jy kan Tuinstories hier koop.
You can follow Miekie's daily Bible Study blog, Bybel Legkaart, here in English & Afrikaans.
You may prefer to follow the traveling blog, A Pretty Tourist.
For more crafty ideas and great product reviews, visit A Pretty Talent on Facebook.
If you are in a literary mood, follow Miekie's musings, stories and poetry on A Pretty Author - Miekie.
Remember to keep nurturing your TALENT for making life PRETTY.
You can subscribe to any of these blogs and receive regular updates by email. Simply register your email address at the top of the applicable blog.