Search This Blog

Tuesday, 20 December 2016

Turning Leftovers Into Rice Salad

It is the time of year where we entertain and invite friends over for meals and snacks. If your house is anything like ours, you will also be sitting with small containers of little bits of leftovers. I show you how to turn those leftovers into a wholesome rice salad in today's blog.


Start with your leftover rice. I had some brown rice left over.


I had sliced gherkins left over, although not very much. The pickling spices will go well with rice salad as well and I retain these. It is added to the rice.


This tiny piece of feta cheese was left over. I will add this lastly. If I add it too quickly, it will crumble into fine crumbs and completely disappear into the salad.


Instead of finely chopping a whole onion, I add leftover cocktail onions.


I only have four pitted olives left over. I cut them into quarters and add them to the salad.


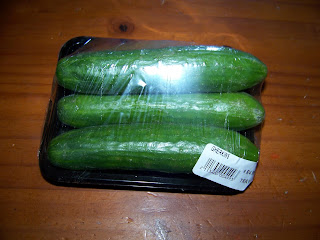
I need to add a bit more crunch. These lovely fresh gherkins are ideal. I slice one and add it to the salad.


Peaches are in season and this tree is bearing well. The cling peaches would be better, but they are not fully ripe yet. I add what I have. Peel the peaches and slice them into the salad.


We have been subjected to very rich food lately and I wish to make a lighter salad dressing. I therefore use equal measures mayonnaise and plain yoghurt.


I add my home-made mustard and some seasoning of my choice to the salad dressing. You can read all about making your own mustard in this blog:

Mixing Mustard a la Mama


Mix everything, except the feta cheese, well.


I decided that the brown rice basis I used, begged for a little more flavour and added a tiny bit of crushed garlic and chilies.


Mix well, transfer to a serving dish and crumble the feta on top. Serve cold.


Marietjie Uys (Miekie) is a published author. You can buy the books here:
You can purchase Designs By Miekie 1 here.
Jy kan Kom Ons Teken en Verf Tuinstories hier koop.
Jy kan Kom Ons Kleur Tuinstories In hier koop.
Jy kan Tuinstories hier koop.
For more crafty ideas and great products, visit A Pretty Talent on Facebook.
Remember to keep nurturing your TALENT for making PRETTY things.
You can subscribe to this blog and receive regular updates by email by simply registering your email address at the top of the current blog.

Monday, 19 December 2016

Baking Quick Pizza Using A Sourdough Starter

I love pizza, but I seldom order mine from the shops. Sometimes, though, I simply do not have the time to wait for dough to rise. That is when today's recipe is absolutely wonderful. I show you how to mix your own pizza base in no time at all and then give you some ideas for toppings, although I hate being pedantic about this, as everyone has their own likes and dislikes. With not needing any time to rise, this pizza base is sure to be a favorite with the whole family.


To a large mixing bowl, add 3 cups (750 ml) cake flour, 1 1/2 teaspoon (7,5 ml) salt and 1 tablespoon (12,5 ml) sugar. Mix the dry ingredients well
Option 1: If you are not using a sourdough starter, you can add a packet of Instant Dry Yeast to the dry ingredients.


Add 1 egg, 200 ml lukewarm water, 1 cup (250 ml) sourdough starter, and 75 ml olive oil to the dry ingredients.
Option 2: If not using the sourdough starter, add a packet of Active Dry Yeast to the tepid water and sugar and allow 10 minutes to froth up.


Bring the dough together.


Knead for roughly 10 minutes into a pliable ball.


Divide in two.


Roll one of the dough balls out. You may prefer the traditional round pizza. I seldom make these and prefer to roll rectangles that fit on my baking trays. This is a matter of personal choice and will not affect the taste in any way.


Transfer the dough to a baking tray that has been prepared with non-stick spray and coated with flour. Prick the dough with a fork to prevent air bubbles from forming.


Pre-bake the dough in a preheated oven at 200 °C for about 10 minutes. Do not leave the dough to rise, unless you prefer a thick base. Not giving the dough time to rise, results in a very thin crust pizza that has all the flavour of the thick base pizza.


Coat the pre-baked pizza base with tomato paste.


I then add a thin layer of garlic.


This is followed by finely chopped onions.


Fresh tomato slices and gherkins follow next.


I add a bit of tang with Jalapenos.


I then add a mixture of fresh herbs from the garden, including spinach. All of this finely chopped up. If you don't have fresh herbs, you should add the traditional Italian herbs, namely parsley, oregano and sweet basil.


I then added some chicken mayo I had left over from a making sandwiches the day before. The second pizza received roast beef slices that had been chopped up, as I was catering for someone who did not eat chicken. This was the only ingredient difference in my two pizzas, although you may have to make greater variations to accommodate everyone's likes and dislikes.


I did not have any mozzarella in the house and simply covered the pizza in grated Cheddar cheese.


I then crumbled some feta cheese over the pizza.


The pizza went back in the oven at 200 °C for another 15-20 minutes.


The beef pizza when it was ready.


The chicken mayo pizza when it was baked.


I also want to share this idea with you from another time that I made pizza for the family. I make a wood fire in the kettle braai. I then place an oven dish on the grill and the baking tray with the pizza goes onto the oven dish. This creates a slight barrier between the fire and the pizza so that the heat is not as direct. The result is a slightly smoked flavour in a pizza that tastes as if it had been prepared in a traditional woodfire pizza oven, or as close as you could possibly come to the real thing without actually using a traditional pizza oven. Try it, you won't regret it. You are still looking at a cooking time of 10-15 minutes, unless your braai is very hot. This particular one baked roughly 10 minutes at 240 °C.


Marietjie Uys (Miekie) is a published author. You can buy the books here:
You can purchase Designs By Miekie 1 here.
Jy kan Kom Ons Teken en Verf Tuinstories hier koop.
Jy kan Kom Ons Kleur Tuinstories In hier koop.
Jy kan Tuinstories hier koop.
For more crafty ideas and great products, visit A Pretty Talent on Facebook.
Remember to keep nurturing your TALENT for making PRETTY things.
You can subscribe to this blog and receive regular updates by email by simply registering your email address at the top of the current blog.

Sunday, 18 December 2016

Baking Fruit Roll-Up's Using A Sourdough Starter

Having made the date balls in the previous blog, I was inspired to make a few more things with dates in them. I love both Chelsea Buns as well as Cinnamon Rolls and these two traditional recipes inspired me to come up with my own version of a semi-sweet delight that reminds one of these delectable treats. I call these rolls my Fruit Roll-Up's and use my sourdough starter as raising agent. You will love these! I baked them with teatime in mind, and ended up having them for breakfast the next morning. They are that good.


 In a large pot, measure 2 cups (500 ml) pitted and diced dates, 1 cup (250 ml) raisins, and 1 tablespoon (12,5 ml) lemon peel. You may opt to add fresh lemon peel.


Add 100 g (100 ml) margarine/butter.


Add 1/2 cup (125 ml) brown sugar.


Add the juice of 1 lemon (50-100 ml).


Melt the butter and sugar.


Allow the mixture to cool down. I placed the whole pot in cold water to speed this process up.


Now we will mix the dough. Add 4 cups (4 x 250 ml) cake flour to a large mixing bowl. Add 1/2 cup (125 ml) white sugar and 1 1/2 teaspoon (7,5 ml) salt.


Now add your sweet spices; 2 teaspoons (10 ml) fine cinnamon, 1 teaspoon (5 ml) nutmeg and 1/2 teaspoon (2,5 ml) fine cloves.
Option 1: If you wish to speed up the raising process, you can add a packet of Instant Dry Yeast to the dry ingredients.


Mix the dry ingredients well.


Add 1 cup (250 ml) sourdough starter, 1 cup (250 ml) lukewarm milk, 4 tablespoons (50 ml) oil, and 1 egg.
Option 2: If using Active Dry Yeast, add it to the lukewarm milk and sugar and allow 10 minutes to froth up.


Bring the dough together.


Knead the dough into an elastic dough ball.


Flatten the dough with your fingers to an almost rectangular shape.


Roll it out to about 1 cm thick.


Divide in quarters with a knife.


Divide each quarter in 4 so that you have 16 pieces altogether.


Roll each piece out to about 1/2 cm (5 mm) thick.


Ideally, they should all be the same size, although I deliberately did not shape them that way as I was baking for the family. There is always someone who wants a small piece! This time I am one step ahead of them. It won't be pretty, but it is accommodating ;-)


Coat each piece of dough with the cooled filling.


Roll the pieces up.


Stand them straight up in a rectangular (or round) cake tin. Prepare the tin with non-stick spray and coat with flour.


They can be slightly more firmly packed than mine turned out, but this will do.


Cover with plastic and allow to rise in a warm dry place until doubled in size.


Once risen, melt 100 ml (100 g) unsalted butter (or margarine, but be careful of it being too salty) and pour it over the rolls.


Bake in a preheated oven for 35-40 minutes at 200 °C.


Turn out on a wire rack to cool.


Prepare 1/2 cup of icing sugar, 2 teaspoons of lemon juice and old water to mix a thick icing sugar paste. Add the water a teaspoonful at a time as this mixture will easily become too runny.


Wait for the rolls to cool down before covering with icing, or the icing will melt and 'disappear' into the rolls.


Drip the icing onto the rolls with a spoon or knife.


Break the rolls apart at the 'seams'.


Each roll's fruit will be neatly tucked inside itself.


When you unroll the rolls, you discover this deliciousness inside. Some people prefer butter with their rolls, others enjoyed it without. Again, it is a personal choice.


Marietjie Uys (Miekie) is a published author. You can buy the books here:
You can purchase Designs By Miekie 1 here.
Jy kan Kom Ons Teken en Verf Tuinstories hier koop.
Jy kan Kom Ons Kleur Tuinstories In hier koop.
Jy kan Tuinstories hier koop.
For more crafty ideas and great products, visit A Pretty Talent on Facebook.
Remember to keep nurturing your TALENT for making PRETTY things.
You can subscribe to this blog and receive regular updates by email by simply registering your email address at the top of the current blog.