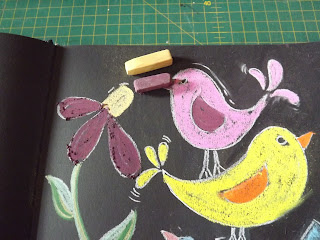
The picture I drew is by no means original. I have encountered different versions of it all over the internet and do not know who to credit with the original idea. It is a picture that has spoken to me, though, and I finally decided to draw it myself. I decided to use a black paper background and drew on this with a white chalk pencil. Instead of printing the picture, I sat down at my computer and drew the picture directly from the screen.
I started with the flower.
I then added the first of the four little birds.
The second bird followed. It had a rather awkwardly shaped body and tail.
The third bird faced the opposite direction.
The last bird had to end eye level with the top of the flower.
I then sat down at my art station to complete the picture in soft pastels. The first bird was done in shades of pink, although the choices of colour are certainly up to you.
Then followed a bird in shades of blue.
The third bird was done in vibrant yellow and orange.
The last bird repeated different shades of pink.
I then coloured the green bits in three different shades of green. I opted to switch to my pastel pencils at this stage for more accurate work.
I then coloured the flower in yellow and mauve.
I coloured the eyes blue, added black charcoal pupils, and then added white light reflections with my chalk pencil. I then used the charcoal pencil and the chalk pencil to add the accent lines all over the drawing. Pay special attention to the dots on the second bird's back.
Any smudges can easily be erased with a black eraser.
I then fixed the chalk, charcoal and pastels to the page by spraying the page with a fixative. Do not fret if your picture seems to disappear when you spray the fixative on it. It will reappear as the fixative dries.
The final picture.
This was the point where I decided to put my reaction to this picture in words. I journalled theses words on the opposite page, using a white Posca marker. The words read as follows: "Sometimes, you've got to give someone a leg up, so they can smell the roses too. - Miekie."
My completed journal page.
Here is the promised video that has me so excited. Here is the link, if you would like to share the video: https://youtu.be/R9aq2JpyVdk
Marietjie Uys (Miekie) is a published author. You can buy my books here:
You can purchase Designs By Miekie 1 here.
Jy kan Kom Ons Teken en Verf Tuinstories hier koop.
Jy kan Kom Ons Kleur Tuinstories In hier koop.
Jy kan Tuinstories hier koop.
You can follow Miekie's daily Bible Study blog, Bybel Legkaart, here in English & Afrikaans.
You may prefer to follow the traveling blog, A Pretty Tourist.
For more crafty ideas and great product reviews, visit A Pretty Talent on Facebook.
If you are in a literary mood, follow Miekie's musings, stories and poetry on A Pretty Author - Miekie.
Remember to keep nurturing your TALENT for making life PRETTY.
You can subscribe to any of these blogs and receive regular updates by email. Simply register your email address at the top of the applicable blog.


No comments:
Post a Comment