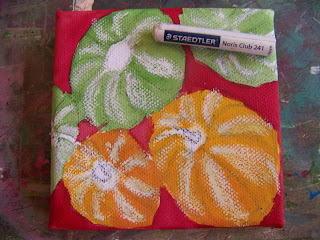
In today's blog we will be making a set of two small watercolor paintings. I will show you how to use wax resist to help you to retain white and color layers in the painting. The paintings are available from the Gallery in APrettyTalent.com from Miekie.
I use two small square canvasses of about 10 cm x 10 cm each.
I use watercolors and gouache from a tube.
I draw the picture on the canvas with a 2B pencil.
I use a white oil pastel to draw lines and dots on the squash. The watercolors will not stick to the wax, leaving those areas white. You can also use wax crayons or a white candle for this purpose.
I add a dollop of Crimson Red Lake to a well on my palette.
I find that my paint has become a little drier than I like and add a few drops of clean water to get the consistency right again. Most watercolors can be recovered by adding water, making it a wonderful product that will last for years.
I use a medium angle brush to paint the larger areas in the painting with.
I paint the background in this bright red. Red is the complimentary color of green and the paintings will be dominated by greens. This background will therefore serve to offset the focal areas beautifully.
I add some Lemon Yellow to a palette well.
The whole squash is painted yellow.
The flowers are painted the same yellow color.
I now add Gamboge Hue to a well on the palette.
I add detail to the flowers in this warmer yellow.
It is time to add the greens. I add Sap Green to one well.
Another well receives Viridian.
The leaves are painted in the Viridian.
I use the white oil pastel again to draw even more lines and dots on the squash.
This time I paint the squash Sap Green. You can clearly see how the wax resists the paint.
I sit back and realize that I will need to add detail to the flowers and leaves.
I use a no 2 round to add the detail to the leaves and flowers, using the colors already in my palette.
I squeeze some Black Gouache into a well. I will use a fine Rigger/Liner Brush to sign my name with.
The first painting in the set of two is finished and I put it aside to dry.
I once again draw the picture on the canvas with a 2B pencil.
Once more the white oil pastel is used to draw lines on the squashes.
Three of the squashes are painted Sap Green.
Two of the squashes are painted Gamboge Hue.
The background is once again painted Crimson Red Lake.
I again draw some white lines on all of the squashes.
The top three squashes are painted Viridian Green this time.
The bottom two squashes are painted Lemon Yellow.
In the following steps I work on the detail for the stems and centers of the squashes, using the colors already available on the palette.
I once more sign my name in Black using a Rigger.
Laying the two paintings side by side, I decide that the first needs to be painted with the brighter Viridian to match the second.
I painted it over with the Viridian and added some more detail to the leaves and flowers. Finally I was satisfied with the results and left it at that. These paintings are available from the Gallery in APrettyTalent.com from Miekie.
These paintings are available from the Gallery in APrettyTalent.com from Miekie.
For more crafty ideas and great products, visit APrettyTalent.com.
Remember to keep nurturing your TALENT for making PRETTY things.
You can subscribe to this blog and receive regular updates by email by simply registering your email address at the top of the current blog.


No comments:
Post a Comment