This is the set of water mixable oil colours I had bought for myself. I opted for an entry level quality set.

I squeezed a little dollop of each colour onto a discardable palette to see what the colours looked like.

I also wanted to see what it would look like when spread thinly on paper, in an undiluted state.

I found it fascinating that I could clean my brush in clean water, even though this was oil paint I was working with.

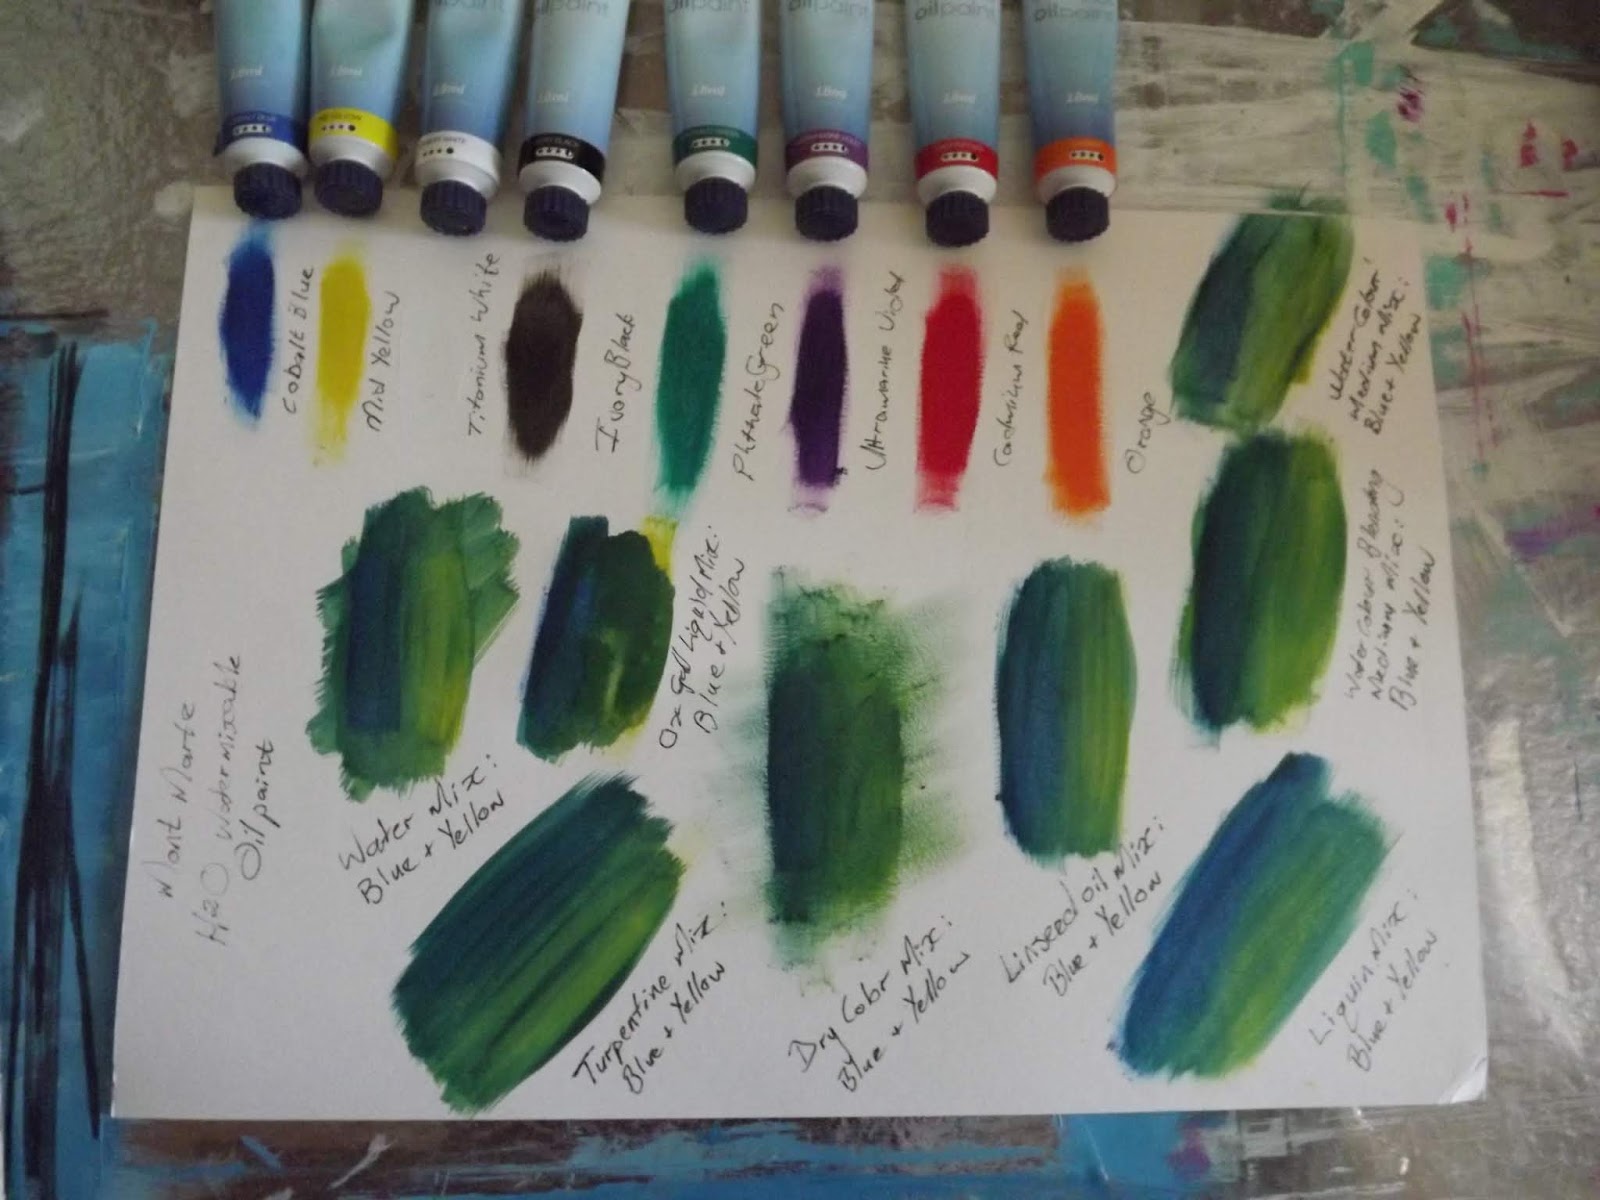
This is what the colours looked like on the paper.

I then decided to start mixing the colours. I decided to mix green, using blue and yellow to do so.

In my first mix, I did not make use of any solvents, but simply mixed the two colours together on the paper. I found that the paint was a little on the 'dry' side, as if it needed a solvent to spread and mix better. This may not be the case with a more expensive brand of paint. It would be interesting to find out if my suspicions about this is true.

I started again with blue and yellow next to each other. I would do this for all of the remaining mixing tests I did with the various solvents.

This time I used water to mix the two colours. It was better than the dry mixing, but I was still not entirely happy with the result. There are dedicated solvents available on the market for this medium, but I wanted to find out if it was really necessary to splash out on even more solvents and mediums, or if my existing collection would not do the trick.

I then blended the colours with turpentine. I liked this better than the water.

I then tested Linseed Oil as a solvent. This was more or less on par with the turpentine.

Then I used Liquin to mix the two colours. Of all of the solvents I used, this would be my favourite, not unlike when I paint with normal oil colours.

I then decided to be slightly rediculous and went in search of my water colour mediums. First, I tried a long drying medium as solvent. It worked perfectly fine!

I tried yet another water colour medium and again I was entirely satisfied with the results.

I then pushed on and tested mixing the paint with Ox Gall liquid. Again, I was satisfied.

I had now found out what I wanted to know about solvents. I will leave this page to dry for six months. If any of the paint samples show signs of cracking, I will update this blog and report back accordingly.

I have still only been rinsing my brush in water, wiping it on a cloth when it came out of the water.

I then remembered that I had not tested any acrylic mediums yet and promptly did so. I was very impressed with these results.

So, this then is the final summary of the tests done up to this point.

Up to this point, I have done all of my mixes directly on the paper. What if I mixed the colours on the palette? I did so, using Liquin as my solvent. This gave me a perfectly mixed colour.

What about consistency, you may ask? I made a couple of brush strokes on the palette to show you how beautifully the paint maintains the strokes of the brush, making it a true oil paint, by nature.

Now I wanted to mix the paint with acrylics, as I have read that this could be done with success.

I found a clean sheet of paper and laid down two lines of paint, one in acrylic and the other in the water mixable oil colours.

I mixed the two, using Liquin and got a beautiful blend in return, although the acrylic dried much faster and was already half-way set on the page.

I then mixed the same paints on the palette, using a palette knife.

I painted the mixed colour on the paper, with both a palette knife, as well as a brush.

I wondered how the two types of paint would work, painted over each other. I started with acrylic at the bottom, giving it some time to dry slightly. I then painted over it with white H2O oils. It worked fine, as normal oils would also do.

I then reversed the process. This time I put the H2O oils at the bottom and the acrylic white on top. As the oils need more time to dry, I ended up with a slight mix. It worked fine, but I do have to wonder if this won't show cracks in time, as it is in complete defiance over lean principle. This principle holds that top layers should have more oil than bottom layers, or the top layers will dry before the bottom colours do. Then, when the bottom layers dry, they will cause the top layers to crack. I fully expect that this may happen in time, unless the mix was sufficient to prevent this from happening. Painting with acrylics over oils, is not something you can do with normal oil colours, as the oil based paint will not allow the water based paint to stick to it. The water mixable oils no longer resists water, and therefore it is now possible for me to paint acrylics over oils.

I then mixed the two paints used directly above deliberately, using acrylic painting medium as a solvent.

This was not at all bad, but I am not sure I would like to pursue this too far, as I am still weary of cracks appearing later on.

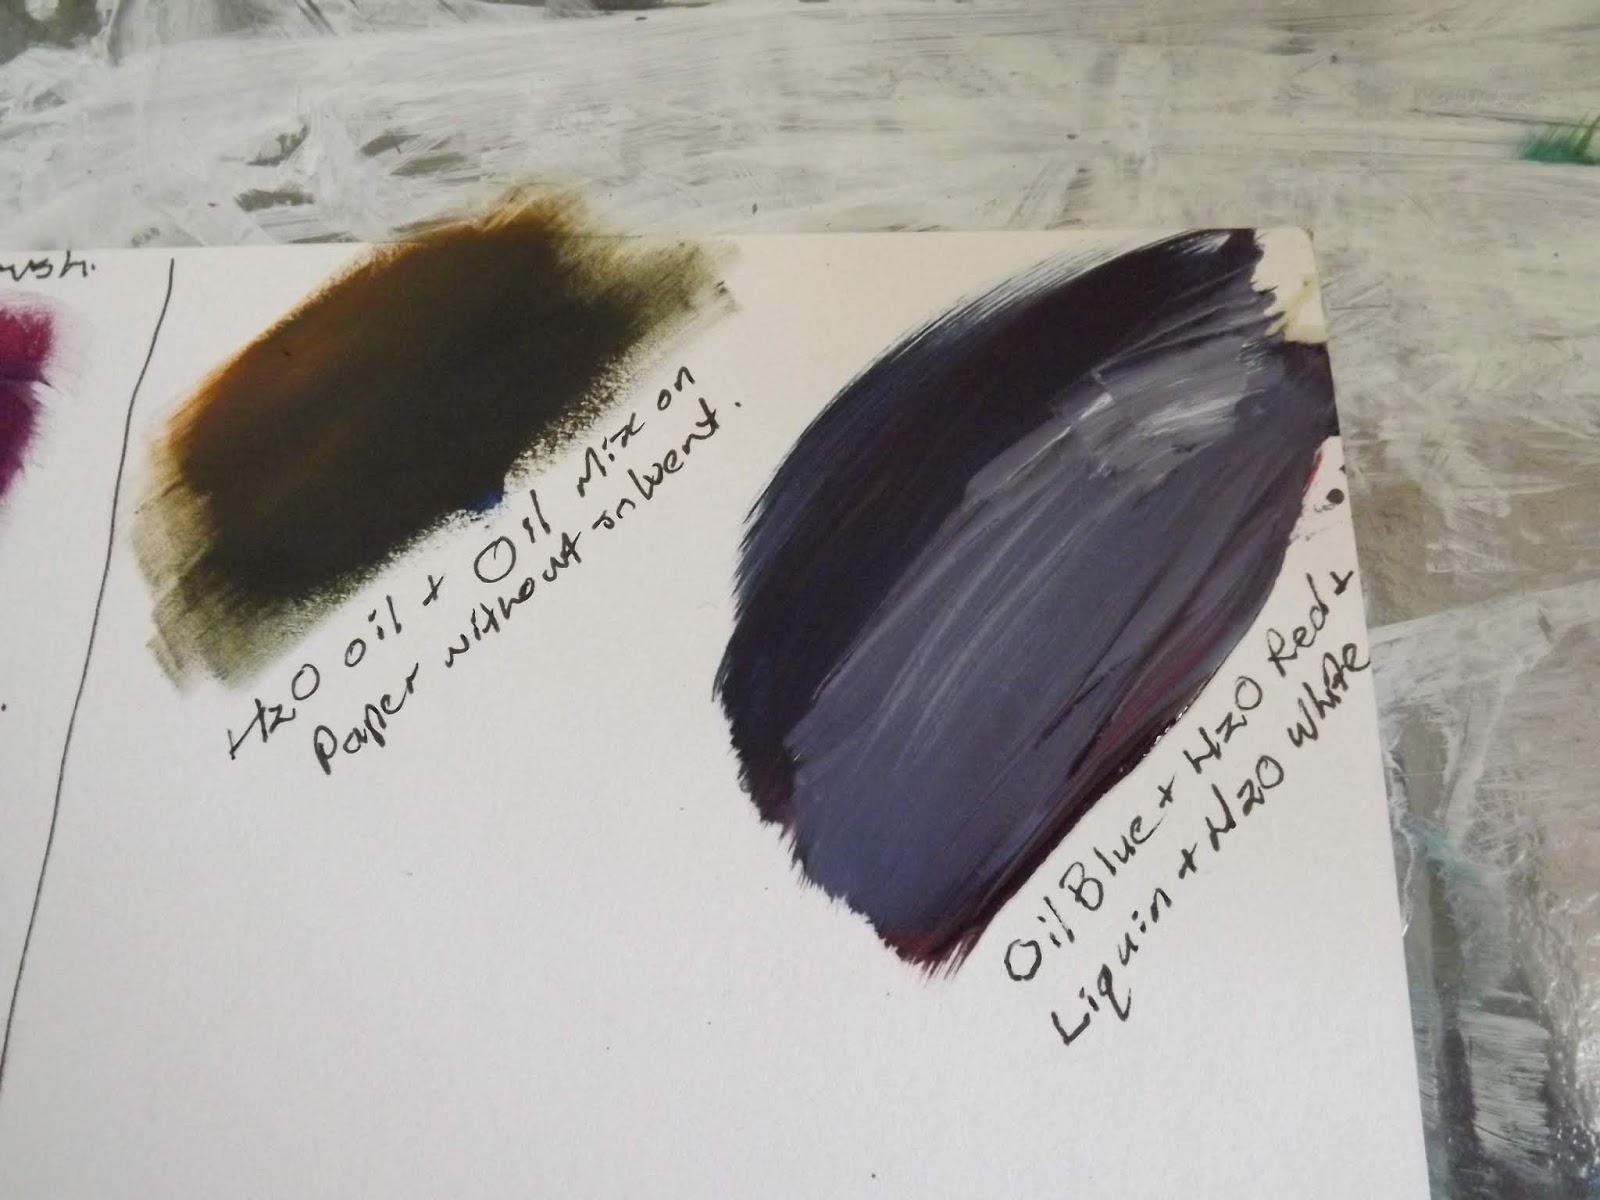
It now came time to test how well the water mixable oils would work with traditional oils.

I dabbed some orange H2O oils onto the paper and dabbed some blue traditional oils next to it.

I mixed the two, without using a solvent. It blended beautifully.

I wanted to try the experiment again, but this time I would use a solvent. I swapped the orange for red.

I mixed the two paints with Liquin. It came out very dark, as both colours were very intense.

I then added white H2O paint to make it easier to see the mixed colour.

This is very successful, but it has not yet stood the test of time. It would be interesting to see what happens to this sample, in due time. Will it crack, or not?
There was still one more colour test I wanted to do with the paint. I wanted to create swabs of tones, tints and shades. I started by blobbing samples of the hues on the paper.

I then blobbed white and black next to these to create tints and shades.
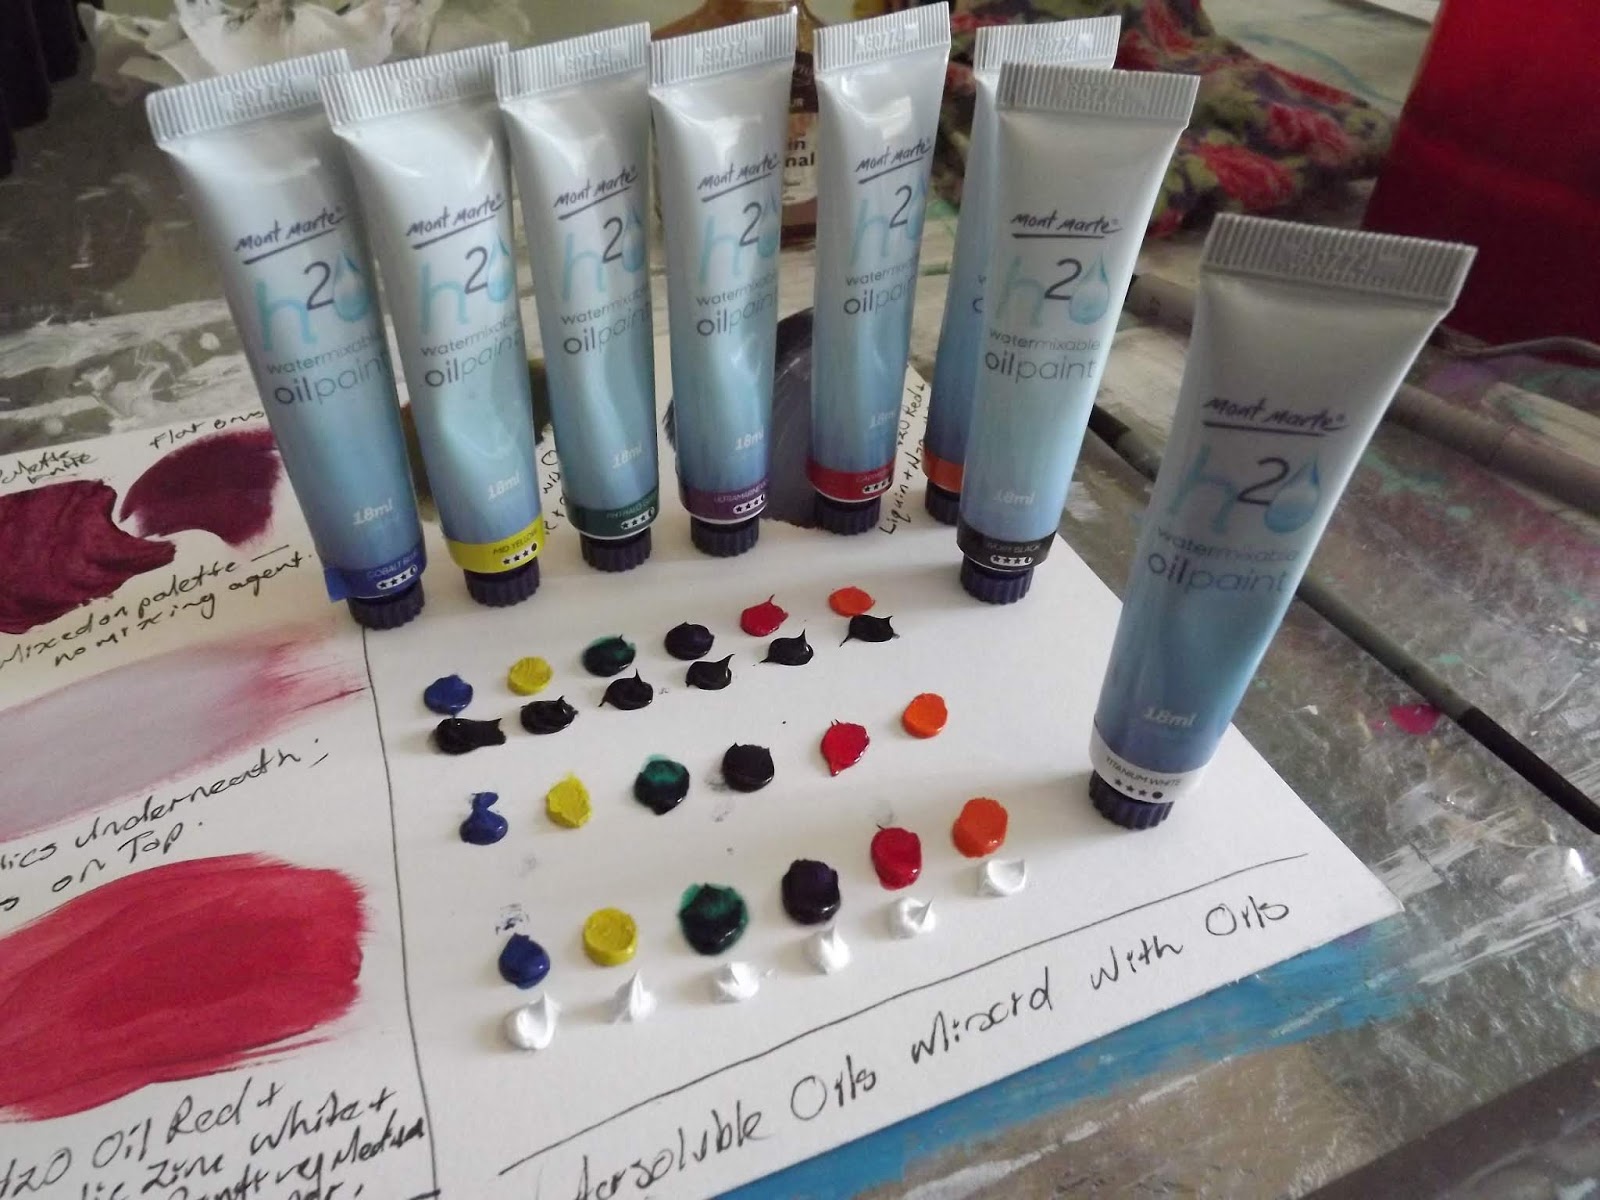
The tints came out lovely, but the shades were very dark.

I then blobbed white next to the shades to create tones.

An overview of the colour test.

Here is a summary of the second round of tests.

And here is the summary of the first round of tests again, so that it is conveniently close to the results of the second round of tests.

You can watch a short compilation video of the tests shared above, on YouTube:
Marietjie Uys (Miekie) is a published author. You can buy my books here:
You can purchase Designs By Miekie 1 here.
Jy kan Kom Ons Teken en Verf Tuinstories hier koop.
Jy kan Kom Ons Kleur Tuinstories In hier koop.
Jy kan Tuinstories hier koop.
You can follow Miekie's daily Bible Study blog, Bybel Legkaart, here in English & Afrikaans.
You may prefer to follow the traveling blog, A Pretty Tourist.
For more crafty ideas and great product reviews, visit A Pretty Talent on Facebook.
If you are in a literary mood, follow Miekie's musings, stories and poetry on A Pretty Author - Miekie.
Remember to keep nurturing your TALENT for making life PRETTY.
You can subscribe to any of these blogs and receive regular updates by email. Simply register your email address at the top of the applicable blog.
No comments:
Post a Comment