With only two days to Christmas and it was getting high time to put up the Christmas decorations. We left it late on purpose this year as most of it is edible! This year we are going for a no-hassle Christmas tree. I should explain, we do something different every year. We had a tree die in the front garden and this was brought down. We use a branch from this tree as a Christmas tree and decorate it with ... Wait, I am getting ahead of myself. Let me show you how to decorate Christmas with things that do not need taking down and putting away.
The two teenage cousins were very happy to get themselves high up into the dead tree and to bring it down, with grandad keeping a watchful eye from the ground.
The youngest boy in the family was not at all happy about not being allowed to help, so I gave him a saw and some pointers and allowed him to select and saw off the branch we would be using as a Christmas tree. One happy chappie guaranteed!
We then trimmed the bottom sticks from the branch so we could 'plant' it in a container.
We used an old bucket and the sawed off limber from the tree to prop the branch up.
Unpacking the sweets that would be used as decorations was met with squeals of delight.
Myself and the 9 year old niece pierced holes in the packaging of the sweets with an awl.
We then strung colorful string through the holes and tied it together with slip knots.
The younger ones soon realised that this was more trouble than what they wanted to do, but gave it a go anyway. They opted to rather hang the 'decorations' on the tree.
This little lady surprised me with her nimble little fingers and between the two of us we soon had the decorations ready for hanging.
This will by no means be the prettiest tree you'll see this year, but the kids took great delight in knowing it was all their own work ... and that they would be allowed to help 'undo' the work again!
My three helpers feeling very proud of themselves. The best thing about this tree is that the family will assist in consuming the decorations between now and New Year's eve. Then we will add the tree and the wood used to prop it up to the wood on the bonfire and all will be burned up. Only the bucket will need to be put away at the end of the day!
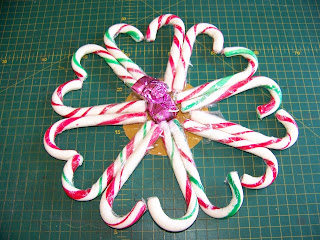
We had a couple more ideas to try out for decorations. This one I saw on the internet. You may have come across it yourself. I cut a smallish circle, about radius 5 cm, from cardboard.
I then tied little Christmas canes back to back with sellotape.
I painted the cardboard circle Raw Sienna, which is very neutral with a hint of gold.
Once the paint had dried, I applied glue lavishly to the cardboard.
The canes were now laid down side by side in a circle on top of the glue with a chocolate in the center. It was still drying when I wrote the blog, but this would be hung on the front door and taken down and distributed to the family on Christmas day.
I have shared my recipe for Brazilian Nut Shortbread Cookies in a previous blog. I pack these in cellophane bags and seal the bags.
The cookies are then slipped into the gift boxes I have been making during the run-up to Christmas, and that I have shared with you in previous blogs. These boxes go around the Christmas tree on Christmas morning, with a name card for each of the guests as a thank you gift from the hostess, which they take home with them. Merry Christmas!
For more crafty ideas and great products, visit APrettyTalent.com.
Remember to keep nurturing your TALENT for making PRETTY things.
You can subscribe to this blog and receive regular updates by email by simply registering your email address at the top of the current blog.


No comments:
Post a Comment