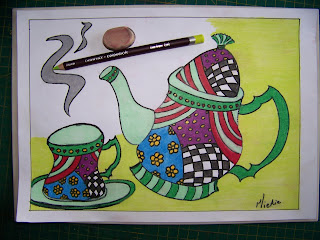
There are so many adults who have rediscovered the joy and therapeutic value of coloring that it has become a booming business! I am no exception to this rule. Only thing is that I like to turn my colored pages into crafts when I am done with them. Today I use one of the designs that are available for download in the store, APrettyTalent.com, for my project. You can head to Digital Downloads to see what is available or click here if you like the Tea Set. I designed this drawing when I wondered what a tea set would look like when invited to the Mad Hatter's tea party. I set out a Royal Dalton tea set and drew my inspiration from there. You would not believe it, would you?! Let me show you how I colored this design before I turn it into a very practical place mat.
I used Derwent Coloursoft pencils to color the design. I followed the steps you would have to take when I downloaded it from the store and printed it on normal printing paper.
I started off by coloring the blocked pattern Black and leaving every second block white. This set the right dramatic tone I was hoping for.
I now turned to the striped areas and colored every second one Deep Red.
The background of the dotted areas was colored Purple.
Finding the yellows not quite bright enough for what I had in mind, I opted to use Pale Orange instead. This was used on the flowers.
The background for the flowers were colored Electric Blue.
The dots and hearts are colored alternating Pale Orange and Deep Red.
I use Green on the edges.
The rest of the white areas (aside from the white squares) are all colored Pale Mint. The dots in the Purple Background are colored Pale Orange.
The steam is turned Dove Grey.
Finally the background is colored Lime Green.
The coloring is done, but still prone to smudging.
I spray the paper with two layers of fix it to prevent smudging. You can also use hair spray for this purpose.
Leave the paper to dry completely after spraying the Fix-It.
I want the place mat to have a small border. The picture inside the frame measures 19 cm x 27 cm. I therefore measure the masonite to measure 21 cm x 29 cm.
A saw gets me the desired size in no time. Yeah right!
I use a file to tidy the edges.
Using a pair of scissors, I cut just outside of the black border when cutting out the picture.
A treatement of gesso primer will make the surface more receptive to paint as well as to provide a white background that will allow the color I choose to display brighter than when painted directly on the wood.
Both the front and back of the board gets a treatments of gesso. Allow the gesso to dry before you continue.
I use Cadmium Yellow Acrylic paint to cover both the front and back of the board. Once acrylic has dried it forms a kind of plastic coating which is excellent for something that is intended to be used in the kitchen.
I make sure to paint the edges in the same yellow. Allow the paint to dry before you continue.
I use Acrylic Gel Medium to decoupage the design onto the masonite backing.
Coat the whole front with the Acrylic Gel Medium.
Lay the picture on top of the wet Acrylic Gel Medium and work out any bubbles. A sponge roller will assist in achieving this.
Treat with two or more coats of Acrylic Gel Medium. This will make the place mat waterproof and protect it against wear and tear.
Allow to dry thoroughly before using the place mat.
As an afterthought, this is what my toddler niece and nephew did with the same picture. Hers was printed and his was traced by hand.
For more crafty ideas and great products, visit APrettyTalent.com.
Remember to keep nurturing your TALENT for making PRETTY things.
You can subscribe to this blog and receive regular updates by email by simply registering your email address at the top of the current blog.


No comments:
Post a Comment