I had a large bowl of freshly prepared pumpkin to work with, but you can just as easily work with leftovers. Just about any pumpkin will do fine. I worked with a Crown Prince that was peeled, pitted and then boiled with sugar and cinnamon. You will need approximately a cup (250 ml) of pumpkin, or 250 g. Keep this aside and allow it to cool down, if necessary.
In a large mixing bowl, mix together 2 1/2 cups (625 ml) White Bread Flour and 2 cups (500 ml) Brown Bread flour.
Add 2 teaspoons (10 ml) salt and 2 tablespoons (25 ml) sugar. Mix the dry ingredients together.
Option 1: You may wish to speed things up by adding a packet of Instant Dry Yeast to your dry ingredients, instead of (or accompanying) the sourdough starter.
Add a cup (250 ml) lukewarm water and a cup (250 ml) sourdough starter together.
Option 2: If you opt to use active dry yeast, you can add a packet to the water and wait 10 minutes for it to froth up.
Add the pumpkin, the water and the sourdough starter to the dry ingredients.
Add 60 ml cooking oil to the mixing bowl as well.
Bring the dough together.
This is a slightly sticky dough, but it still needs to be kneaded for 5-10 minutes.
Put the dough in a medium sized bread pan that has been prepared with non-stick spray. Press it into the corners.
Cover with plastic and allow to rise to double in size in a warm dry place.
As I mentioned before, I will be baking my bread over the coals, but if you opt for the oven you can preheat it to 200 °C. In the meantime, I have lit the briquettes.
It is best not to bake the bread over direct heat. That is why I put the dividers into the kettle braai.
When the briquettes are ready, I decant the chimney to spill the coals on the side of the braai.
As I am working in a traditional bread pan and not a cast iron one, I put my bread pan inside an oven pan to provide a thicker base between the dough and the fire.
The pan is put inside the kettle braai. If you are familiar with kettle braais, you will know that it is important to have everything lined up with the front handle of the braai for circulation purposes.
Close the lid and check your thermometer. Mine stayed at 150 °C for about 5 minutes before finally climbing to around 200 °C. Do NOT open the lid to check on the progress as this will cause the temperature to drop and may result in the bread falling flat. Regardless of whether you are using a conventional oven or a kettle braai, the bread will bake for approximately 40-45 minutes. Check after 40 minutes.
Remove the bread from the heat when you hear a hollow sound when you tap on it.
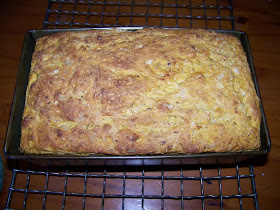
Turn the bread out on a wire rack to cool down. Tap the bottom to make sure that the hollow sound can be heard on that side as well. That means it is baked through.
Serve hot. Unless you were working with very sweet pumpkin, the bread will not be overly sweet, but rather more savoury. It will have a hint of pumpkin in the taste, but most people will probably not be able to place what the taste reminds them of as it is very subtle. The bread is sure to have a bright orange-yellow appearance which is very attractive and appetizing.
Marietjie Uys (Miekie) is a published author. You can buy the books here:
You can purchase Designs By Miekie 1 here.
Jy kan Kom Ons Teken en Verf Tuinstories hier koop.You can purchase Designs By Miekie 1 here.
Jy kan Kom Ons Kleur Tuinstories In hier koop.
Jy kan Tuinstories hier koop.
For more crafty ideas and great products, visit A Pretty Talent on Facebook.
Remember to keep nurturing your TALENT for making PRETTY things.
You can subscribe to this blog and receive regular updates by email by simply registering your email address at the top of the current blog.


No comments:
Post a Comment