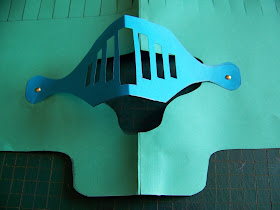
This mask would have to fit right around the head and that is why I start by gluing two A4 papers together to make a very long page.
I then measure 5 cm in from the center.
I fold the paper in half, deciding it would be much easier to create the mask on the fold. This way I would be able to get both sides similar without any hassles.
I shape the 'chin' on the 5 cm mark.
I then shape the bottom of the mask all the way to the end of the page.
I measure the length of his face, from chin to eyes and find it to be 10 cm. I add an extra cm and make a mark at the 11 cm mark on the fold.
I measure 5 cm in at the 11 cm mark.
I cut the opening for the eyes and nose at this mark.
Then I measure 4 cm from the top and draw a line across the length of the paper.
I trim the sides to fit his head, after measuring the papers around his head.
I draw the feathered top with lines 1,5 cm apart.
He then helps me to cut the mask out.
He also helped in cutting the 'feathers' loose.
I find a coordinating A4 page and measure 6 cm on the width of the paper.
I draw a line and cut the 6 cm strip apart.
I fold the strip of paper in half and draw the mouth guard.
I also draw the slits for the eyes to see through.
He helps me to cut the shape with scissors, but I cut the slits out with a craft knife.
We fit the guard onto the mask, making sure it would stand away from the rest of the mark, that is, that it will not lie flat on the mask.
I use an awl to make hole through the guard and mask.
The guard is attached to the mask with split pins, giving it slight movement up and down.
I cut two strips of 2 cm wide each from the remaining coordinating paper.
These are attached to the mask with glue.
A thin line of glue is put on the back of the mask.
The two sides of the mask is then glued down on each other.
Time for our knight to go slay some dragons!
Marietjie Uys (Miekie) is a published author. You can buy her books here:You can purchase Designs By Miekie 1 here.
Jy kan Kom Ons Teken en Verf Tuinstories hier koop.Jy kan Kom Ons Kleur Tuinstories In hier koop.
Jy kan Tuinstories hier koop.
For more crafty ideas and great products, visit A Pretty Talent on Facebook.
Remember to keep nurturing your TALENT for making PRETTY things.
You can subscribe to this blog and receive regular updates by email by simply registering your email address at the top of the current blog.


No comments:
Post a Comment