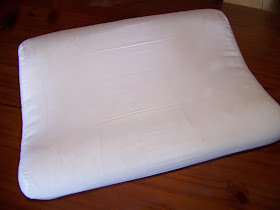
I have this oddly shaped pillow that I love to sleep on. The problem is that the pillowcase is so unsightly that I don't want to leave it on my bed. It is also not possible to buy pillowcases for these pillows. What is a girl to do?! Well, I simply had to make my own. In today's blog I show you how to take measurements and draw a 'pattern' for an oddly shaped pillowcase. I also show you step by step how to sew it yourself.
This is the pillow that is badly in need of a pretty pillowcase. I know there are a lot of these on the market for snoring. I have never had any complains about this particular problem. Probably because I sleep alone. However, they are also brilliant for backaches as they keep the spine straight and keep their shape well.
I decided to cover the pillow in this 100% cotton fabric as it matches my bedclothes beautifully, I already have it in stock, and cotton breathes well.
Put your tape measure at one end of the pillowcase.
Wrap the tape all the way around the pillow and take the measurement at the other end. I got 94 cm.
Now add 6 cm for rolled hems. This brings the measurement to an even 100 cm (or 1 m).
Measure the width of the pillowcase. I got 47 cm. Add 1,5 cm seam allowance for each side. It brings the total to another beautifully rounded 50 cm.
Cut a stretch of cloth measuring 100 cm x 50 cm. Wrap this around your pillow to make sure your measurements were correct and that it will fit.
Now stand the pillow up on the fabric so the oddly shaped side rests on the fabric.
Use dressmaker's chalk to draw a line all the way around the pillow.
When you are done you should have an outline resembling the shape of the pillow.
Add 1,5 cm seam allowance all around this shape.
Fold the fabric over so you can cut two of these shapes for the two ends of the pillowcase.
Cut along the line for the seam allowance.
Take the long strip of fabric and fold the short ends over 1 cm.
Fold it over again to create a rolled hem. Pin in place. Do this on both ends of the fabric.
Sew the hem.
Fold the fabric over and line up the ends. Find the center points on both sides of the fabric. Mark the centres with pins.
Fold the end pieces over as well and find the center points.
Laying the pieces with right sides facing, line the centres up and pin.
You should line up the center of the side that curves inward, with the wrap-around piece. The outward curve should be where the two ends meet.
Pin all the way around and overlap the rolled hem ends.
Here is a close-up of the ends.
You will now need to sew very carefully all the way around the pinned sides.
When you are done, set your machine to overlocking, or zigzag and finish the seam so it won't fray.
Do the same on the other side of the pillowcase.
Turn the pillowcase right side out.
Cover your pillow and you are done! Finally my pillow matches my bedroom!
Marietjie Uys (Miekie) is a published author. You can buy my books here:
You can purchase Designs By Miekie 1 here.
Jy kan Kom Ons Teken en Verf Tuinstories hier koop.
Jy kan Kom Ons Kleur Tuinstories In hier koop.
Jy kan Tuinstories hier koop.
You can follow Miekie's daily Bible Study blog, Bybel Legkaart, here in English & Afrikaans.
You may prefer to follow the traveling blog, A Pretty Tourist.
For more crafty ideas and great product reviews, visit A Pretty Talent on Facebook.
If you are in a literary mood, follow Miekie's musings, stories and poetry on A Pretty Author - Miekie.
Remember to keep nurturing your TALENT for making life PRETTY.
You can subscribe to any of these blogs and receive regular updates by email. Simply register your email address at the top of the applicable blog.


No comments:
Post a Comment