Are you familiar with the art of paper piecing? It is where a design is cut up into different pieces and the individual pieces are then cut from various paper designs. The pieces are then reconstructed into the original design to make a colourful and visually fun picture to look at. I show you how to transform a normal design into a paper piecing design in today's blog. before showing you how to reconstruct the design again. The design is taken from my book Designs By Miekie 1.
This is the design we will be working with. It is printed on A4 paper.
I will trace it by hand onto a white sheet of paper, as well as onto a yellowish paper sheet.
I trace the design in pencil onto the yellow paper.
I do the same with the white paper.
Now I make sure to label each segment in a manner that makes sense to me. I label both copies of the butterfly.
Here is a close-up view of my labelling. L is for Left and R is for Right, with C for Center.
I cut out the white design.
I then carefully cut all the segments apart, laying them in place on the yellow butterfly to make sure they don't get jumbled up.
I find a piece of printed vellum paper to cut a large part of the wings from.
I trace around each segment as I work with it.
It is then carefully cut out.
I then lay it in its proper place to make sure the order does not get jumbled up.
I do this with all of the segments that I wish to cut from the vellum.
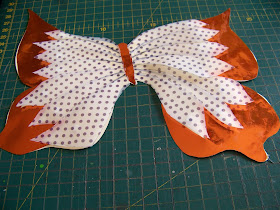
I find a piece of old gold foil paper to cut the outer edges of my wings from. Again, I trace around the edges before carefully cutting the segments out.
Again, each segment is carefully laid in place on the original butterfly.
The top layer of my butterfly is now cut out and ready.
I carefully and piece by piece transfer the pieces off my yellow paper.
Now I carefully cut out the butterfly on the yellow paper, making sure to cut the wings apart.
The foil cut-outs are glued onto the wings as well as the body of the butterfly.
I then make sure to erase all of the labeling as this will show through the transparent vellum.
I accentuate the lines that matter with a black Sharpie marker.
I lay down a line of glue right next to the body of the butterfly.
I glue the inner parts of the wings down at the body only. The outer edges are still flapping loose.
I do this with all four wings.
With all of the loose parts now fixed to the butterfly, I gather my original design and transfer it to a zip lock bag which I keep in a file. I may want to use these again!
Each segment of the wings are now 'glued' down with 3D double-sided squares, which adds a bit of dimension to the wings.
I tried to take this photo at an angle that would show you the lift in the wings.
I use double-sided tape to fix my butterfly to a card and draw the antennae by hand using the black Sharpie marker. I will tell you more about finishing this card in the next blog.
Marietjie Uys (Miekie) is a published author. You can buy my books here:
You can purchase Designs By Miekie 1 here.
Jy kan Kom Ons Teken en Verf Tuinstories hier koop.
Jy kan Kom Ons Kleur Tuinstories In hier koop.
Jy kan Tuinstories hier koop.
You can follow Miekie's daily Bible Study blog, Bybel Legkaart, here in English & Afrikaans.
You may prefer to follow the traveling blog, A Pretty Tourist.
For more crafty ideas and great product reviews, visit A Pretty Talent on Facebook.
If you are in a literary mood, follow Miekie's musings, stories and poetry on A Pretty Author - Miekie.
Remember to keep nurturing your TALENT for making life PRETTY.
You can subscribe to any of these blogs and receive regular updates by email. Simply register your email address at the top of the applicable blog.


No comments:
Post a Comment