I needed three lemons for the ginger beer, but had only these sad looking ones available. They may not look great, but at least the juice inside is still fabulous. I would need the grated peel of the lemons as well, but these were no good for that purpose any longer. That is why I simply opted to use candied peel instead. If you are working with fresh lemons, I suggest you add the zest, rather than settling for second best, the way I was forced to.
Squeeze the juice, the flesh and the pips into a bowl. The ginger beer will be strained before serving, so it doesn't matter if all these particles are added.
You probably grated the skin before squeezing the juice out. Now add the zest to the juice. Set this aside.
If you have fresh ginger, you can peel it and put it through a chopper. Otherwise you can add crushed ginger. Measure 1/2 cup (125 ml) crushed ginger and keep it ready to be added a little later.
Boil 2 litres water. Pour the boiled water into a very large mixing bowl. Add 4 litres cold water as well.
Now add 700 g white sugar to the lukewarm water.
Stir to dissolve the sugar.
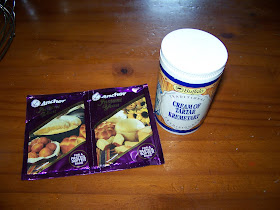
Add two packets of Instant Dry Yeast and 2 tablespoons (25 ml) cream of tartar to the mixing bowl. Add the ginger as well.
Stir well to dissolve the ingredients and to mix everything together.
Add a small handful of raisins/sultanas.
Set your lemon juice mixture aside. This will only be added in a few hours time.
Cover the mixing bowl with a net to keep unwanted visitors of the non-human kind out and leave at room temperature to ferment for 2-3 hours.
Once the fermentation process is well on its way, the ginger beer will begin to look like this.
You can now add your lemon mix to the mixing bowl. Stir well.
Cover again and leave at room temperature to ferment overnight.
This is what my ginger beer looked like the next morning.
Stir it through.
We now need to strain the ginger beer. I find it simplest to line a large bowl with fine netting.
Pour the ginger beer into the lined bowl.
If you do not have a large enough container, you can work with a smaller one and do it a little at a time, rather than all at once.
Gather the netting together and lift the strained bits out.
Pour the ginger beer into bottles.
Leave enough space at the top for the fermenting beer to expand. I add roughly 5 fresh raisins to each bottle to ensure further fermenting.
Screw the bottle tops on lightly. Do NOT tighten. Fermenting gas need to be able to escape, or the bottles will explode.
By the end of the day, my raisins had swollen slightly and was starting to move up and down the bottles. I put the bottles in the fridge just before turning in for the night. We would have ice cold ginger beer the following day!
The next day I served ice cold ginger beer to the family and it was welcome relieve to the scorching heat. This recipe is not as sweet as the other two recipes I've shared, but it is absolutely delicious.
If you would like to try out the previous recipes I shared for making ginger beer, you will find them here:
Brew some Home-made Ginger Beer
Or try this recipe:
Making Ouma Marietjie's Ginger Beer
Marietjie Uys (Miekie) is a published author. You can buy the books here:
You can purchase Designs By Miekie 1 here.
Jy kan Kom Ons Teken en Verf Tuinstories hier koop.You can purchase Designs By Miekie 1 here.
Jy kan Kom Ons Kleur Tuinstories In hier koop.
Jy kan Tuinstories hier koop.
For more crafty ideas and great products, visit A Pretty Talent on Facebook.
Remember to keep nurturing your TALENT for making PRETTY things.
You can subscribe to this blog and receive regular updates by email by simply registering your email address at the top of the current blog.


No comments:
Post a Comment