I am continuing on a surface prepared for a previous demonstration. In the previous blog, I used Dala Gesso to paint a masonite board.
I then painted a single coat of each of the seven colours that Dala Blackboard Paint is available in to show the brilliance of the colours. This is the board that I use to do today's blog on.
I cover the previous paint layers with a single coat of Dala Gesso. This does not completely hide the what lies beneath, but it will be completely covered by subsequent layers of paint and I don't bother trying to cover it up with any more Gesso layers.
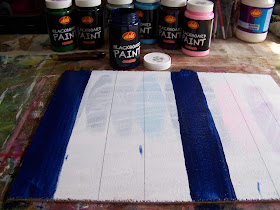
Once the Gesso is dry, I rule lines 5 cm apart along the width of the board, using a pencil and ruler.
I then paint the first layer of navy blue Blackboard Paint in the appropriate spaces. I will be alternating four different colours of Dala Blackboard Paint and therefore I leave three empty spaces between the navy bands. Note that I am not bothering with straightening the edges at this stage. I try to stay inside the lines as far as possible, but where I venture over, I am not too bothered. I do take not of the fact that the paint is very runny and has dripped on the other bands. I should be careful of not overloading the brush and getting drops on the painted bands!
I then paint the Light Blue Bands.
This is followed by the Light Grey bands.
I use Maroon to fill up the remaining spaces. I then walk away to have a cup of coffee while I wait for the paint to dry sufficiently for me to carry on with a second coat.
My second coat will also be the last coat. Therefore I need to make sure that I have clean, crisp and sharp edges connecting the bands. I use a metal ruler which I position right in the dividing line. I press the ruler down firmly and paint the navy blue band.
I take great care to wipe the ruler clean before lining it up to paint the second navy band. Paint tends to seep in under the ruler and not wiping it could result in ugly blotches.
I do the same thing painting the second coat for the Light Blue.
This is followed by the Light Grey.
Maroon follows last.
I once again need to leave the board to dry before I can continue.
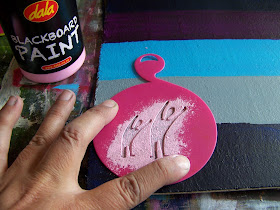
I use a stencil brush to pick up only a little bit of Pink Blackboard Paint from the lid of the bottle.
I dab very gently at the stencil. The drier your brush when doing stenciling, the better your results. You will see the difference when you compare my too wet brush for this stencil work ...
... with the perfectly loaded dry brush used for this stencil work.
Notice how the wetter brush caused smudges under the stencil? The dry brush that the sun was stenciled with gave perfect results.
Once the paint is completely dry, I put the board to the test. The great thing about using Dala Blackboard Paint to paint the whole board with, including the stenciled designs, is that you can now write over the designs with a chalk stick, making the whole surface useful. I often see people using Acrylic Paint for the decorative features on blackboards. The result is that the chalk will not stick to the plastic-like surface, Here, we have avoided that problem.
The board is now ready for my beginner-writer to practice his writing on.
The easy clean-up is what makes this medium a wonderful one to use. Simply wipe the chalk away with a soft cloth and the surface is ready for a second round!
Marietjie Uys (Miekie) is a published author. You can buy her books here:
You can purchase Designs By Miekie 1 here.
Jy kan Kom Ons Teken en Verf Tuinstories hier koop.Jy kan Kom Ons Kleur Tuinstories In hier koop.
Jy kan Tuinstories hier koop.
For more crafty ideas and great products, visit A Pretty Talent on Facebook.
Remember to keep nurturing your TALENT for making PRETTY things.
You can subscribe to this blog and receive regular updates by email by simply registering your email address at the top of the current blog.


No comments:
Post a Comment