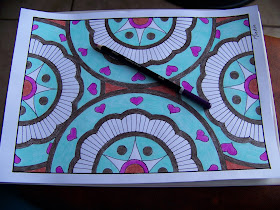
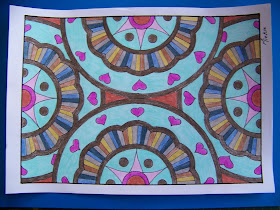
In the movie You've Got Mail, Tom Hanks' character sends an email to the character played by Meg Ryan in which he expresses the wish to send her a 'bouquet of freshly sharpened pencils'. This line has stuck with me since the first time I saw the movie all those years ago. Today I will show you how to turn your adult coloring page into a 'pencil pot' to make present just such a fabulous bouquet of freshly sharpened pencils to someone as passionate about coloring as yourself. I use one of the patterns from the Geometric Foursome collection to fold this box. The design is available from APrettyTalent.com as a Digital Download. I show you how to color the design, but you can skip over this part and do your own thing. Once the design is colored, we'll fold the container.
Coloring the Design
I use Derwent's student range coloring pencils for these designs, simply to save my more expensive artist quality pencils a bit. The Academy range of products are still very good and you will certainly not be disappointed by it, but it is not quite on par with sets such as Coloursoft or Studio as it requires more effort to get a rich color on the page.
Throughout the coloring process I am going to be making use of the principle of repetition. This means that I will use the same color in more than one part of the design. Here I have started with Terracotta in the small semi-circles. I repeated the same color in the background.
I moved on to Burnt Umber and used it in four different areas of the design.
I then added Sea Green to two more areas of the design.
My surprise color was Violet, which was used in two areas of the design.
Bright pink was used only in the s'star' shapes of the design.
When coloring the spokes, I used six different colors and alternated their positions on the wheels. I started with Blue Grey. There are five empty spaces between each occurrence of the color.
The second color used was Grey.
The third color I opted for was Dark Blue.
I then added a warm French Grey.
This was followed by another warm color when I added Brown.
The last warm color to be added was Yellow Ochre.
Google put together this cute animation of the coloring process. Simply click on the highlighted words to view it.
Folding the Page into a Pot
The page is now fully colored and it is time to work on folding the lampshade.
I start by cropping the white borders.
I then set my compass to the width of the page and draw an arch from side to side.
I position the compass outside the page and, with the same radius, I construct a second arch as high up on the page as possible.
I then cut out the shape formed by the arches.
I measure 5 cm in from both sides and construct diagonal lines to these points from the top arches.
I stick a line of double-sided tape to one end of the paper.
The paper is now rolled into the size you want. Overlap as much as you like. The shape will be slightly taller on one end.
Cut small incisions into the narrower end of the cup.
Fold these ends in. Measure the diameter of the bottom of the cup.
Set your compass to the radius of the cup's bottom (half the diameter).
Cut a coordinating piece of cardboard using the compass to construct the circle. Glue the bottom and secure it onto the folded ends of the cup.
You now have a quirky little cup that is slightly off-center.
Fill the cup with an assortment of pencils and hand to the artist in your life as the perfect gift.
The designs used in this project are available from APrettyTalent.com. Go to Digital Downloads and select Geometric Foursome. Add it your cart and proceed to checkout. The link to your downloads will appear in your inbox as soon as the transaction has cleared.
For more crafty ideas and great products, visit APrettyTalent.com.
Remember to keep nurturing your TALENT for making PRETTY things.
You can subscribe to this blog and receive regular updates by email by simply registering your email address at the top of the current blog.


No comments:
Post a Comment