I use the pattern for the full flair skirt and lay it out on the fold. I want the skirt to be a little shorter than the pattern's version and fold the pattern back at the hemline. Best is to measure from the waist tot the hem and draw a semicircle on the fabric with dressmakers chalk. Cut on the chalk line.
Cut a second skirt on the fold. This time you can use the first skirt as a pattern to guide the sewing.
Cut a waistband. Measure the waist with two fingers inside the measuring tape. Add 3 cm for seam allowance and 2 cm for a button flap. Cut the waistband 10 cm wide.
Cut the organza skirt using the fabric pattern. I Again shortened the hemline as I want the organza skirt to be shorter than the fabric skirt.
This layout gives a rough idea of what we will be creating.
Cut stiffening for the waistband and iron it on.
Fold the waistband in half and sew one end closed at seam allowance 1,5 cm.
Sew the 2 cm button flap at the other end.
Cut the seam open up to the stitch line of the button flap.
The two ends of your waistband should now look like this.
Iron the waistband flat.
Mark the space for the buttonhole with dressmakers chalk.
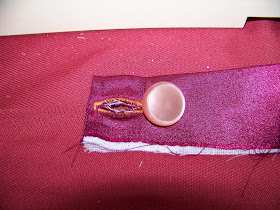
Sew the buttonhole and make sure the buttin slides in and out without getting stuck.
You can sew the button on at the end if you prefer. I opted to do so now.
Lay the organza skirts on top of each other with right sides facing. Sew ONE of the side seams.
Lay the fabric skirts on top of each other. Sew ONE of the side seams.
Lay the other sides seams of the skirt on top of each other, with the organza skirt sandwiched between them. Line them all up and pin in place. Measure the length of the zipper. You will only sew this length closed on the side seam.
Hem the organza skirt before you continue.
Starting at the bottom of the skirt, sew only the fabric skirt closed at the remaining part of the side seam that is still unsewn. Do NOT catch the organza skirt in this seam.
Fold the fabric skirt away and now sew only the organza skirt closed in the remaining open side seam.
Iron the side seam open. Pin and sew the zipper onto the sewn side seam.
Unpick the length of the zipper to open the sides seam here.
Hem the fabric skirt.
Find the quarter marks on the waistband as well as the waist of the skirt.
Line the skirt and waistband up at the quarter marks. Pin the two together. You can tack the skirt to make it fit in the waistband, or you can fold small pleats. This is personal choice. Make sure that your button opening lines up with the zipper.
Sew the outer side of the waistband onto the skirt.
Fold the inner side of the waistband in at the seam and pin in place.
Finish the waistband by hand.
You now have a pretty little skirt to delight a little girl with. Warning: she will not want to stop twirling!
For more crafty ideas and great products, visit APrettyTalent.com.
Remember to keep nurturing your TALENT for making PRETTY things.
You can subscribe to this blog and receive regular updates by email by simply registering your email address at the top of the current blog.


No comments:
Post a Comment