Easily navigate between the three parts of this blog series by clicking on the links provided:
Part 1
Part 2
Part 3
I started by creating a large enough work space for myself. This I achieved by gluing 3 A4 paper sheets together.
The basic size of the cushion would be 30 cm in diameter. I therefore set the compass to 15 cm radius.
Describe the circle on the paper.
I then moved onto the ears. These would be fairly prominent. I set the compass to radius 5 cm.
I described two circles since I wanted to lay out the whole face before moving on to the fabric. I would only need one to use as a pattern, though. I followed this rule throughout the designing process.
I then ruled a line of 10 cm.
I wanted to construct a perpendicular line to this line and set my compass to radius larger than 5 cm.
Centering my compass on one end of the line I constructed two arches either side of the line.
I then centered my compass on the other end of the line and repeated the steps.
Joining the centers of the two arches will give me a perpendicular line that crosses the original line in the middle at right angles.
I now marked off 3 cm on either sides of the newly constructed line.
I then constructed an ellipse on the set out markings. This would be the white of Minnie's eye.
I cut this eye out and traced it to cut a second eye as well.
At this stage it dawned on me that I did not cut the chin extension on the face. I glued a piece of paper to the already cut out face.
I then drew a chin extension by hand.
Folding the face in half, I cut the chin extension on the fold to make sure that both sides are equal.
Progress photo.
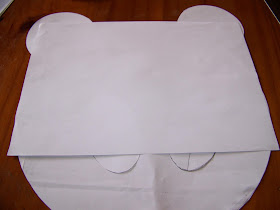
Minnie Mouse has a very distinctive hairline and it was time to cut this. I laid an A4 sheet over the face and found that it should give me enough space to design the hairline.
I fold the A4 sheet in half. I will design only half of the hairline and cut the two sides on the fold.
I start by getting the bottom arch in place.
I then devote my attention to the heart-shaped top of the hairline.
I am not sure that the shape is right but will cut it out to test it.
Immediately upon lying the eyes in place I can see that I have not left enough space open.
I draw a widened line that will accommodate the eyes.
I use the original fold line to cut the adjusted line.
This is better, but I think the hairline should come down lower. Before I can be sure, I need to shape the head properly.
I turn the head upside down and trace the outline on the back of the hairline. I then cut away the extra paper.
Looking at the hairline now it is obvious that it has to extend downwards.
I glue on extensions and shape them accordingly.
I now draw Minnie's mouth freehand. I then fold it in half.
The mouth is cut on the fold to keep the two sides even.
Progress photo.
Minnie's tongue should fit perfectly in her mouth. For this reason I trace the mouth on the fold.
The tongue is drawn and cut on the fold withing the confines of the traced mouth.
Progress photo.
The pupils should likewise fit perfectly in the eyes. For this reason I trace the eyes.
I fit the pupils in the eyes.
Progress photo next to the source that I am working from.
It is important to mark the different pattern pieces or I will be very confused about which goes where later on.
The arms will be formed from a whole A4 sheet of paper. No need to do any cutting there. I only need to design the circles for the 'hands'. Set the compass to radius 4 cm.
Construct the circle for the hands.
The pattern pieces for the arms and hands.
We still need to design the pattern pieces for the ribbon on Minnie's head. I use an A4 sheet of paper for the actual ribbon. This will be cut on the fold.
The center piece for the ribbon is a length of paper 8 cm wide and 21 cm long.
For more crafty ideas and great products, visit APrettyTalent.com.
Remember to keep nurturing your TALENT for making PRETTY things.
You can subscribe to this blog and receive regular updates by email by simply registering your email address at the top of the current blog.


No comments:
Post a Comment