I recently had a client who asked me to find her some specific molds. I became increasingly frustrated when nobody seemed to stock what I was looking for. I had to reply in the negative to the client, but remained dissatisfied with the result. I decided to search for ways to make my own molds. The results were encouraging. Then I started looking for the products used in the articles. I could not find a single one of them in South Africa. I could import, but by this time I was growing increasingly irritated with not being able to achieve success. I then decided to experiment with making my own silicone molds from widely available materials. Explore and experiment with me. Please feel free to give me advice and assistance at the end as I had no idea what I was doing here and went at it blindly.
I bought a tube of normal household silicone after checking the label and making sure that it could withstand extreme temperatures, as all silicone naturally should be able to do. I decided to 'line' my containers and shapes with talcum powder in an attempt to keep the silicone from sticking to them. I have no idea if this will work at this stage, but I am willing to give it a try. I also grabbed some containers from the kitchen to squeeze the silicone into.
I next went in search of shapes that I could use in the molds. I decided to concentrate mainly on wooden shapes, but added some foam rubber shapes and a felt flower as well.
I liberally sprinkled talcum powder into the containers and over the shapes.
After making sure that everything was covered in a fine layer of talcum powder, I shook out the excess onto a lid.
I used a craft knife to cut the seal off the silicone container.
I then inserted the silicone into a silicone gun I found in the garage.
I started squeezing the silicone into the containers.
When the container was full enough I laid the silicone gun aside.
I folded a piece of cardboard to use as scraper to flatten the silicone. I should have dusted this with the talcum powder as well in hindsight.
I had to work the silicone over a couple of times to get it this flat. A little arduous!
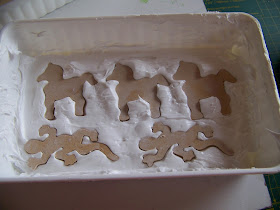
I then inserted my talcum dusted shapes into the silicone.
I dusted my fingers.
I used my finger to flatten the silicone where the shapes pushed it up. Not very successfully done!
When I had all the shapes inserted in the silicone, I laid it aside to set overnight. I had other projects to work on and could afford to wait. 24 hours the silicone seemed dry on top. Closer inspection proved that it was a long way from set at the bottom and I left it to dry further.
After 48 hours I was done waiting and decided to lift the silicone out. This was a tremendously difficult task and convinced me that I never wanted to repeat this exercise again.
I finally managed to get the molds out, but it left me with some arduous cleaning to do to recover the containers I had used.
I found that the silicone was still wet at the bottom when turned over. I left it and when I came back about an hour later it had dried completely. Interesting. I did not expect that to happen.
The wooden shapes came out without a problem, but I could not release the felt flower from the mold and eventually had to discard it. The foam rubber shapes also came out without any trouble, although The broke in pieces and I had to throw them away. No big deal, but worth taking note of.
The top two molds seemed to have worked fine.
At the bottom I had a problem. I obviously did not use enough silicone here.
I trimmed the edges of the molds and cut away the bottom molds that had failed.
This left me with two very untidy but workable molds. I shall have to test these to see if they are at all useful.
I struggled to release the shapes from the silicone and especially the longer and thinner shapes gave me problems. A number of the shapes did not come out whole.
I had a fairly usable mold here. This one too will have to put to the test.
In the meantime applying a little bit of wood glue would be enable me to salvage some of those wooden shapes.
I had very little confidence in the molds I had made, but I still wanted to put them to the test. I therefore mixed Plaster of Paris with water and poured it into the molds. In retrospect I should have been more careful, but I was convinced it would not work and became very sloppy as a result.
I put the molds aside while the Plaster of Paris dried.
Having become impatient with the molds, I removed the Plaster of Paris casts when they were touch dry instead of waiting for them to harden thoroughly. They slipped out very smoothly.
Any breakage in the casts was to blame on my impatience and not on the effectiveness of the molds. I regretted my sloppiness when I saw how beautifully the casts actually worked!
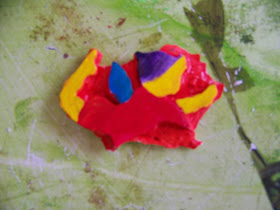
I grabbed a brush and some acrylic paint and quickly painted this fairy. I could also chisel the sloppy background away if I worked very carefully, but next time I will take more care with the casts. Silicone can withstand extreme temperatures of cold and heat and is non-toxic. This means I should be able to use the molds in the oven, the freezer and with food items.
For more crafty ideas and great products, visit APrettyTalent.com.
Remember to keep nurturing your TALENT for making PRETTY things.
You can subscribe to this blog and receive regular updates by email by simply registering your email address at the top of the current blog.


No comments:
Post a Comment