I start the drawing with a water-soluble graphite pencil on Fabriano Elle Erre 220 gsm pastel paper in Sky Blue. The paper is able to withstand water washes without buckling and the pencil will dissolve along with my wax bars when I paint the owl during the final steps. I like the Sky Blue backing since my owl is going to be dominantly blue.
I start by drawing the main body of the owl, which is nothing but a huge circle.
Two big circles on top of the body forms the base for the eyes and head. Keep going round and round until you achieve the outlines you are looking for.
Erase the lines you will not be using with a putty eraser or soft eraser. Brush the residue of the eraser away with a mop brush.
Draw the beak between the eyes. This is an upside down triangle. Once you have drawn the triangle, simply bend the top line outwards and the bottom lines inward. Erase the excess lines.
Draw the lines for the eyebrows of the owl. (I lowered these in a later step when I realized they would end up too high). Add two holes on the beak for the nose.
Complete the brows with the top line.
Draw two smaller circles in each of the eyes for the detail of the eyes.
Draw two sickle moons on the sides of the owl for the wings.
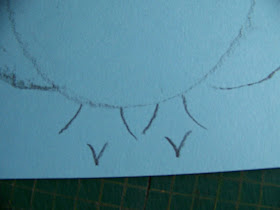
Draw the legs of the owl at the bottom of the body as shown. Keep the lines short.
Add the middle toes of the owl. Do not connect the lines.
Connect the lines to form two more toes on each foot.
Add a branch for the owl to sit on. That is not a tail I added to the owl! When I add color it will correct itself.
I have a tray in which my water-soluble wax bars are all arranged together. I will be using Derwent's Artbar as well as Reeves' wax pastels. When I am done coloring, I will paint the picture with water using the Pentel Aquash Brush.
I color the eyebrows and wings with Artbar Primary Blue.
The outer circles of the face is done in Reeves Raw Sienna.
Where the wings meet the body there will be a very dark shadow and I add a dark line with Artbar Burnt Umber.
The body of the owl is done with Reeves Sky Blue.
The outer circles of the eyes, as well as the shiny spot in the pupils are added in Reeves White.
The pupils of the eyes are colored with Artbar Black.
The beak and feet are done in Artbar Tertiary Orange.
The branch is colored with Artbar Cocoa.
The leaf is done in Artbar Kiwi.
It is time to start painting the owl. I start with the lightest color; white.
I then paint the black with water. Neither Reeves', nor Derwent's wax bars are set when dry (unlike Derwent's Inktense). I have to work very carefully to avoid mixing the adjacent colors into the one I am painting.
I paint the head of the owl.
Next up are the brows and wings.
Time to paint the Sky Blue body of the owl.
I now paint the shadows between the body and the wings.
The beak and feet are next in line.
I now move down to the branch and twigs.
The leaf is all that remains for now, but we are not quite finished yet.
I draw the nostrils with Derwent Black before painting it with water.
I draw tiny hearts on the owl's body in Reeves Raw Sienna. The feathers on an owl are neatly arranged in lines and I keep my hearts equally neatly arranged. I then paint the hearts with water as well.
Despite my background already being blue, I decide I want to alter the intensity of the blue and very lightly stroke Artbar Turquoise over the background. To do this, I break a small piece off my bar, lay it on its side and simply sweep it over the page in wide strokes.
Paint the background with water.
In next to no time you are done!
For more crafty ideas and great products, visit APrettyTalent.com.
Remember to keep nurturing your TALENT for making PRETTY things.
You can subscribe to this blog and receive regular updates by email by simply registering your email address at the top of the current blog.


No comments:
Post a Comment