Attaching the Cap to the Head Band
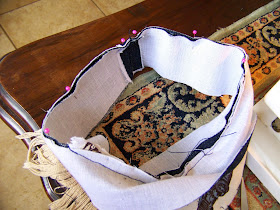
Having constructed the cap in the previous blog, the logical next step is to attach the head band to the cap. Start by finding the centre of the cap. Now find the centre on both of the two head bands. Line the centre of the cap up with only one of the two headbands. Pin the cap to the head band as illustrated.
Pin the centre of the second head band to the cap as illustrated and continue to pin this head band in place as well. This is a bit tricky, so be patient. Don't pin the rest of the head band yet, only pin as far as the cap stretches.
It is time to sew the cap to the band. There is a 1,5 cm seam allowance worked into the pattern. It is tough sewing, but try to stay as close as possible to the 1,5 cm seam allowance. Sew only the pinned section of the head band.
We now need to close the head band. Pin as illustrated, so that the two head bands form two circles, and stitch, allowing a 1,5 cm seam allowance.
Iron the seams open before you continue, or the hat will not look neat when finished.
Pin the head bands together as illustrated. We will start sewing where we ended on the cap and end where the cap starts again. Make sure you start exactly on the stitch line and end exactly on the stitch line.
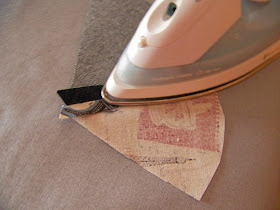
Iron the stitch line flat. It will be difficult to get in here again if you don't iron this now.
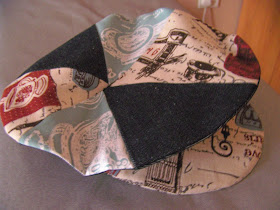
It is already starting to take shape, isn't it?
Construct the Lid of the Beret
We are going to put the band and cap aside for the moment to concentrate on the beret. Place sections 1 and 2 of the beret lid side by side.
Now lay them face to face (right side to right side) on top of each other. and pin the connecting sides only.
Sew the pinned side.
I know it is tedious to jump up and iron first, but it really does result in the best quality work. That said, I strongly recommend you iron each small seam open before moving on to the next.
Repeat the same steps with section 3, attaching it to the first two sections.
You have now constructed half of the beret lid. Lay this half aside and sew the leftover three sections together in the same fashion. In the end you must have two halves as illustrated.
For some inexplicable reason I did not take a picture of the next step, but let me explain. Pin the two halves right side to right side and sew one straight seam down the centre. When you open it up the beret lid is finished.
Attach the Beret Lid to the Beret Ring
I started on the lining. Lie the beret lid and the beret ring right side to right side on top of each other as illustrated. Pin it in place. Use enough pins, since fabric cut on the bias will move quite a bit. Since the beret is circular there will be large sections that are cut on the bias.
Repeat the same steps with the fabric lid and ring.
Allowing yourself a 1,5 cm seam allowance, sew right around the outer edges of both the fabric and lining berets.
The lining is not going to be turned inside out, but the fabric will. We need to get rid of the excess fabric. Cut small triangles in the seam line on the outer edge of the beret.
Trim the seam to about half of the 1,5 cm allowance.
Turn the beret right side out and finger iron the edge to smooth it out.
Now iron it flat. It will not be easy to iron this seam again and this is the best time for it.
We now need to insert the lining inside the beret. Trim the seam of the lining to about half the seam allowance so it will fit better.
Insert the lining wrong side to wrong side in the beret. Turn the lining until the short side of the lining lines up with the short side of the fabric and the long side with the longs side. Pin it in place.
Attaching the Head Band to the Beret
You will remember that when we drew up the pattern for the beret, we added 1,5 cm seam allowance to the inside hole of the ring, effectively reducing the space where the head fits into. At the time I told you that I would show you a trick to recover that lost space. This is it. Cut approximately 1 cm into the beret at regular intervals. These small cuts will open up just enough to be able to fit the head band to the beret and your head in the hole. Do not cut so deep that the cuts run into your seam line (the seam allowance is 1,5 cm).
Attach the head band to the beret. Pin only one layer of the double, open head band to the beret as illustrated. In other words, pin one layer of head band to both the beret and the lining.
Fold the head band open and sew all along the pinned edge. Take care not to catch anything else in the stitching.
We now need to fold the open side of the head band in and pin it in place. Turn the beret inside out for easier access.
Hand stitch this seam with small neat stitches. You can also stitch this with the machine, using a top stitch, but it seldom has neat results and I strongly recommend doing this by hand.
When you are done, the finished product is so neatly finished off that you might as well wear it inside out, as well as right side out.
Thank you for following with me. Please leave photos of your own berets in the comments. I'd love to revel with you in your success.
For more crafty ideas and great products, visit APrettyTalent.com.
Remember to keep nurturing your TALENT for making PRETTY things.
You can subscribe to this blog and receive regular updates by email by simply registering your email address at the top of the current blog.


